Life has changed there is no doubt and we wanted to reach out to see how you are doing.
As we go through this interesting time, we are trying to look at this as an opportunity to focus on our family and on friends like you. Let us use this extra time to catch up and talk more. Let us cook food that is not fast, but interesting and satisfying. Let us learn to enjoy a time to try new things. Let us find ways to enjoy time at home!
Computer Security
If my client base is any experience, anyone can be a victim of a Ransomware, Malware or Virus attack.
What can you do about it?
I conduct audits of your entire computer infrastructure and apply best practice solutions to plug the security holes on your computers, Smartphones and networks.
Now offering consultations to give you the best protection possible:
1:06 PMHigh Tech House Calls, Expert Computer Consulting
Some of my tactics might work for you, others might not be
your style. The trick to managing the balancing act of a small business
is to throw yourself behind any time-saving tricks that fit the bill.
1. Take notes (by any means necessary!)
How many stray thoughts run through your mind every day? How many of them do you wish you'd held on to?
Be they business ideas or the dreaded
"I-should-call-him-backs," these thoughts are important. That's why I
always keep my information safely stored on one of my gadgets. While
most people will tell you to keep a notebook handy, I wouldn't be
America's digital goddess if I didn't have some note-taking apps to
present to you.
The best way to keep websites, images and other cool stuff that you find on the Web is Evernote. The app helps you to easily save a cool website to all of your gadgets. Perfect for my daily Happening Now posts.
Post-it notes, as many small business owners will attest,
are a real lifesaver. That's why my other note-taking suggestion helps
you take your post-it notes digital.
Post-it Plus
lets you take pictures of any Post-it note and instantly digitize it.
That way, you'll be able to carry all of the reminders and ideas that
you've jotted down on a Post-it note with you on the go. But it doesn't
just save individual Post-it notes; you can also arrange them in
infinite combinations to help organize your thoughts.
2. Rethink your priorities
Now, taking notes is just one piece of my time-management
puzzle. There are only so many hours in a day, and figuring out where to
spend them is where things really get tough. Whenever you get an email,
what's your first reaction? Do you open it up and respond to it
immediately?
Are there certain email messages that you put off for
later? Priorities start with figuring out which tasks that you have to
handle now and which ones can safely be put off until your critical
priorities are solved. While many email providers offer features that
let you tag certain email addresses and subject lines as "priority,"
it's a little tougher in practice.
That's why small business owners everywhere are excited
for Google's Mailbox app. It works seamlessly with your Gmail account
and automatically tags certain emails conversations based on how fast
you usually react to them.
Now, I'm using Email as my jumping-off point. But
obviously ranking priorities extends far beyond whether or not you wait
to open up Aunt Gertie's new dog pictures until now or later.
While everyone's priorities differ, I have an easy way to help you visualize how you organize them.
3. Graph out your 'urgents' and your 'importants'
A priority matrix is a decision-making tool for
prioritizing your day. You can organize your matrix however you want,
but mine is based around four categories: Important, not important,
urgent and not urgent.
Here's an example of how a priority matrix might look. Keep in mind
that normally, you'd be filling out this matrix with your current
priorities.
Organizing your business and personal
priorities around this four-square matrix does something very important.
It helps you to decide whether or not to panic.
Listing all of your priorities on a chart like this gives
you a visual depiction of how busy you should be. It also makes that
aforementioned business balancing act just a little easier to juggle.
A fun way to build a list like this would be to create a Prezi. It's a cool presentation tool with slick animations that everyone in the tech world's going wild for.
4. Solve your urgents, delegate your importants
Remember when I said that the most valuable part of the
presentation matrix was its ability to teach you when to panic? Well,
it's also the most important tool for finding the right moment to
delegate. Here's an example: You realize that you have an important
meeting today, but you have to finish up a presentation for another
client. If you've created a priority matrix and kept it up to date, then
you'll know exactly how important both issues are.
If you realize that both events classify as both urgent
and important, then it's time to delegate some of the work somewhere
else. Reputation is everything in business. Knowing your obligations and
organizing them appropriately can be a powerful tool in protecting your
biz's rep.
5. Reflect and review
For a small business owner, the weekend is the only chance
to really be "off the clock." Assuming, of course, that you're not
working through it.
Don't worry, I'm not going to tell you that everyone needs
to work through the weekend to stay productive. I have one important
caveat for how to organize your weekend.
Whenever you've got an hour to spare, it's important to
take a look back at all of the notes and events of your week. The real
secret to making your notes and priority matrices valuable is to take a
moment to reflect on how your week went.
The best way to manage your future priorities and
obligations more effectively is to understand what went right and wrong
during the past week. All of the suggestions that I've made in this tip
have had one very important feature: They stick around.
Putting some time aside to remember all of the ups and
downs that you've forgotten over the past week can help you save time in
the future.
Protect it all
There's one major hit to your productivity that's easy to predict,
but almost no one does it. It's the hard drive in your computer. It
doesn't matter how organized you are, a dead hard drive brings any
chances of getting something done to a screeching halt.
For the ones who do think ahead and back up their gadgets — I salute
you. But if you're trying to back up your gadgets yourself without my
sponsor Carbonite's automated drive backup, then you're wasting precious
time that could be better spent.
Backing up your computers with Carbonite is a one-step, turnkey
solution that protects you and your business from losing everything when
you need it most. Plus, besides saving so much time day in and day out
automatically backing up all your gear, if the worst does happen getting
back up to speed is a snap.
I know some folks who think they are perfectly protected doing their
own backups. But backing up to external hard drives leaves your business
wide open to burglary, fire or flood. What good is your backup if it's
gone or destroyed?
I've used Carbonite to protect my valuable information and I
personally recommend it to family and friends. Now Carbonite is helping
me to protect your business, too. My listeners get an exclusive free two
months added to any paid order. Click here to find out the best way to protect your business.
12:01 PMHigh Tech House Calls, Expert Computer Consulting
OK, please let me see a show of hands, how many of you have ever
emailed a file - like a photo or a document - to your Mac from your
iPhone or iPad, even as you sit right in front of your Mac? Yes, I've
done it too, just like nearly every other Apple user on the planet.
That's probably because using email to move files around works pretty
well as long as your file is small enough to be attached to an email.
But now there's a better way to move files among your gadgets or even
among your friends.
Though file moving is a feature that goes back to iOS 7, previous
versions did not include your desktop Mac computers. Seems many users
simply used third-party apps like DropBox
to move files back and forth between gadgets. That's all changed now.
When Apple released iOS 8 along with the newest desktop OSX, Yosemite, it also dramatically improved - and simplified - the ability to easily move files around.
Here's the really cool part of this new function: Your various Apple
gadgets don't even have to be on the same network or signed into the
same iCloud account
to move files back and forth. That means you can also move files to a
friend or co-worker. However, there is one small caveat to this file
moving system: It is designed to work between users who are near each
other. Apple says gadgets should be within about 30 feet of each other.
So this works well in coffee shops, conference tables, between cubicles
or across the den.
Apple AirDrop
Apple AirDrop lets you seamlessly move files back and forth between
nearby desktop Macs and iOS gadgets like iPad, iPhone or iTouch. To use
AirDrop from a Mac, it is available from the Finder, the Share menu, and
in Open and Save windows. When you choose AirDrop in Yosemite, your Mac
looks for nearby devices that can also use AirDrop. This includes Mac
computers with OS X Lion or later installed, and iPhone, iPad, and iPod
touch devices with iOS 7 or later.
To see if your Mac works with AirDrop, make sure you’re in the Finder
by clicking the desktop (the background area of your screen), or by
clicking the Finder icon in the Dock.
Then, check to see if AirDrop is listed as an option in the Go menu.
If you don't see AirDrop listed, your Mac doesn't support this feature.
In order to transfer files between a Mac and an iPhone, iPad or iPod touch
Your iOS gadget needs to include a Lightning connector with iOS 7 or later installed
Your Mac needs to be a 2012 or later model with OS X Yosemite installed
Your Mac and iOS device both need Bluetooth and Wi-Fi turned on. You do not have to be connected to a specific Wi-Fi network.
To transfer files between two Mac computers, you need the Mac models
listed below with Wi-Fi turned on and OS X Lion or later installed.
MacBook Pro (Late 2008 or newer)*
MacBook Air (Late 2010 or newer)
MacBook (Late 2008 or newer)*
iMac (Early 2009 or newer)
Mac Mini (Mid 2010 or newer)
Mac Pro (Early 2009 with AirPort Extreme card, or Mid 2010)
*The MacBook Pro (17-Inch Late 2008) and the white MacBook (Late 2008) do not support AirDrop.
Steps to use AirDrop between a Mac and a mobile
1. Wi-Fi must be turned enabled on your gear. For
iOS: Settings -> Wi-Fi; and Mac: Menu Bar -> Wi-Fi -> Turn
Wi-Fi On. The gadgets using AirDrop do not have to be on the same Wi-Fi
network.
2. Turn on Bluetooth on your mobile (Settings ->
Bluetooth) and Mac (Menu Bar -> Apple -> System Preferences ->
Bluetooth -> Turn Bluetooth On).
3. Turn on AirDrop on your phone, tablet or touch
iPod (Slide up to access Control Center -> AirDrop -> Choose
"Contacts Only" or "Everyone") and Mac (Finder -> Menu Bar -> Go
-> AirDrop -> Click "Allow me to be discovered by:" -> Choose
"Contacts Only" or "Everyone").
4. You may now begin using AirDrop to transfer files
between a Mac and an iOS gadget. To test it out, go to the AirDrop menu
in the Mac Finder and notice that your iOS device is represented by
circle. Drag and drop a file onto the circle, and your iOS device will
prompt you to accept the file. If you don't see the receiving device in
the AirDrop window, make sure the recipient is set up to get files over
AirDrop. If you don't see the receiving device in the AirDrop window,
make sure the recipient is set up to get files over AirDrop.
You can also transfer files from the Mac to an iOS device using apps
that have Share feature built-in. The Share menu can be accessed in the
upper right corner of an app and is represented by a square with an
upward facing arrow.
5. Transferring a file from an iOS device to a Mac
can be done in any app that supports the Share functionality. Like on
the Mac, the Share button brings up a list of options for transfers
including AirDrop. For example, sending an image to the Mac from the
Photos app can be done by tapping the Share button, tapping AirDrop, and
selecting the desired Mac. A prompt to accept the file should then
appear on the Mac.
Steps to use AirDrop between mobile gadgets
Sending files from your iPad or iPhone is the similar as shown on the previous page.
You’ll need both gadgets no more than 30 feet apart, with Wi-Fi and
Bluetooth turned on. On the iPhone that you want to send from, find a
file such as a photo and press the share button.
Again, you'll see sharing options including Message and Mail plus any
nearby users who have AirDrop enabled, such as user "Richard" shown on
the screen shot below. If you see only the AirDrop icon with no users,
ask your receiver to enable Wi-Fi and Bluetooth. Tap the AirDrop icon
until the receiver's name and is displayed below their circle photo or
icon.
When you see the contact picture and name of the device you want to
send to, tap on the circle. This will start the transfer. If you are
sending to yourself on another gadget, it will auto download on that
gadget and will display the file. If you are sending to someone else,
they need to accept the file. The receiver's mobile screen will display
an "accept" as shown below.
AirDrop has been an Apple feature since iOS 7. But with the updated
version in iOS 8 coupled with Mac's desktop OSX Yosemite, Apple seems to
have smooth out earlier bugs making AirDrop a smooth, seamless was to
move files between gadgets.
11:48 AMHigh Tech House Calls, Expert Computer Consulting
It's no secret that Facebook is using your information to build its
huge financial empire. Partly it does this by sharing your information
with other companies - and getting their info on you in return - to
serve you targeted ads and other services.
This network of ad-serving companies builds a detailed profile of
your likes and dislikes based on how you spend your online time and the
sites you visit. So, when you visit a new site and see ads for online
shops and products you've looked at recently, that's why. Creepy, right?
Still, there's a reason companies do it. In 2013 this practice helped
Internet advertisers rake in a staggering $42.8 billion, and the
2014 numbers will probably approach or pass $50 billion. You're not
seeing a penny of it, though, so I bet you're more concerned with how to
stop it and keep your privacy.
But how can you stop a network of major companies from sharing your
information? Do you have to complain to each and every one? Fortunately,
no; there's an easier solution.
Facebook and 176 other major companies are part of the Digital
Advertising Alliance. That means they all play by the same rules when it
comes to respecting consumer choice.
You can use a tool on the DAA's website to opt out of "online
behavioral advertising." It will scan your computer to see what
companies are already customizing ads to target you and if you've opted
out of any in the past.
It's simple to choose a few companies and sites, like Facebook, where
you don't want to see targeted ads. Or you can click the "Choose all
companies" button at the bottom to just opt out of targeted ads for
every participating member.
Simple! Of course, there are some caveats you need to know first.
Opting out also doesn't mean these sites won't still collect some
information about you, but at least they won't share it with other
companies. That limits what any one company potentially knows about you.
Advertiser tracking is largely based on cookies - small bits of code
that sites store in your browser - which means the opt-out is
browser-based. Companies might still be tracking your other browsers, so
you'll need to visit this site in every browser that you use - desktop
and mobile - and run it.
Facebook is one exception. If you opt out in one browser, it will
honor your opt-out whenever you log into Facebook, no matter the
browser.
11:45 AMHigh Tech House Calls, Expert Computer Consulting
Reader Michael Downend is having difficulty ridding his Mac of a utility he no longer desires. He writes:
How do I get rid of MacKeeper?
I won’t go into why you’d want to. Some people have found MacKeeper
useful, others not. But many people I’ve encountered are confused about
how to delete it.
Versions of MacKeeper made in the last couple of years are actually
pretty easy to uninstall, but the process isn’t entirely
straightforward. If you click on the MacKeeper menu in the Mac’s menu
bar you won’t find a Quit command, which might lead you to believe that
it can’t be quit. Force quitting doesn’t seem to work either.
What you have to do is launch the MacKeeper app in the Applications
folder and then quit it. (If this is your first time running it, no, you
don’t have to activate MacKeeper or sign on for any of its services.
Just choose Quit from the MacKeeper application menu.)
When you’ve done that, drag the MacKeeper app to the trash. You’ll be
prompted for your administrator’s password. Enter it and the MacKeeper
app will move to the trash and a window will pop up and offer to
uninstall the rest of its components. Click the Uninstall MacKeeper
button (don’t bother selecting an option about why you’re doing so if
you don’t care to). This should remove most of the files MacKeeper
placed on your hard drive.
Once you've tossed the MacKeeper app you should be offered the chance to remove its other elements.
But not all of them. Although the window tells you that all MacKeeper-related processes will be deleted, one crumb remains.
A MacKeeper Helper folder isn’t removed. You can find it by visiting this location: youruserfolder/Library/Application Support. (To access this Library folder hold down the Option key and, in the Finder, choose Go > Library.)
Inside this folder is a NoticeEngine.plugin file. Go ahead and toss the
MacKeeper Helper folder and this file will disappear right along with
it. Empty the trash, restart your Mac, and MacKeeper will be gone.
11:42 AMHigh Tech House Calls, Expert Computer Consulting
To start out your new year I thought I'd remind you of (or, possible
reveal, if this is new to you) a handful of menu bar tricks that you'll
find helpful. Let’s start with rearranging icons.
If you don’t care for the way icons are arranged in the menu bar—you
want the clock to appear all the way to the left, for example—just hold
down the Command key and drag the item in question to a new position. Be
careful to not drag it outside the menu bar, however, as doing so can
cause it to evaporate. This trick doesn’t work with the Spotlight or
Notification menus.
Speaking of the Notification menu, when you hold down the Option key and
click on the menu, you immediately switch on the Do Not Disturb
feature. You can toggle it off again by holding down the Option key and
clicking on the menu.
The Option key is also helpful when using the Sound menu. When you click
on this menu without holding down Option, you find a volume control.
But hold down Option and all your audio input and output devices appear.
I use this all the time when I want to quickly switch from my desktop
speakers—attached, in this case, to an AudioQuest DragonFly USB audio
interface—to the headphones jacked into my Focusrite Scarlett audio
interface.
You’ll also find the Option key useful with the Wi-Fi menu. Without
Option held down you see something like this—a list of local Wi-Fi
networks. But if you hold down the Option key and click the menu you
learn some important things about your network (some of which I’ve
obscured for my protection). You also have easier access to the Wireless
Diagnostic app, where you can gather information about how your Wi-Fi
network is behaving. The resulting information is dense, but if you’re
of a geekish bent you may find it helpful.
And finally, a trick nearly everyone needs to know. To access the hidden
Library folder within your user folder, click on the Finder’s Go menu,
press the Option key, and select Library. Most people don’t need to mess
around in this folder, which is why Apple hid it, but when you need
to—to deal with a corrupt preference file, for example—this is a handy
tip to know.
11:01 AMHigh Tech House Calls, Expert Computer Consulting
Wish it were a little easier to type in ALL CAPS on your iPhone, or ever get stumped while looking for the em dash?
What about typing letters with accent marks, or dealing with cumbersome
URLs? Or maybe you’re just hankering for an alternative to tapping on a
slippery glass screen.
These 9 tips can make typing on your iPhone or iPad a little easier.
Even if you've been tap-tap-tapping away on the iOS keyboard for years,
it's possible you missed one of these time-saving shortcuts. Or just
point your new-to-iOS friends here if they ever complain that the
iPhone's keyboard isn't as good as Android's. (As if.)
The .com shortcut
Want to type a URL directly into the address bar in Mobile Safari? Don’t bother with laboriously tapping in “.com” or “.net”.
Never type out dot-com or dot-org or dot-whatever ever again.
Instead, just tap and hold the “.” key; when you do, a pop-up balloon will reveal a series of shortcuts, from .com to .us.
Nice accent
Don’t get caught skipping the accent grave in “voilà” while typing that email on your iPhone or iPad.
Impress your international friends with your canny use of accents and other marks.
You can access a generous portion of accent marks—acute, grave,
circumflex, and otherwise—by tapping and holding a letter key (like
“a”).
Swipe to type
Swype iOS 8 finally allows third-party keyboards, like the excellent Swype.
Sick to death of painstakingly tapping out messages on your device’s touchscreen? Try swiping instead of typing.
The concept is simple: Rather than tapping each individual key when
typing a word, swipe-to-type keyboards let you slide your fingertip from
one key to the next.
As your finger loops around the keys, your phone predicts the work you’re trying to type—er, swipe.
Sound weird? Indeed, swiping to type does take some getting used to, but it’ll become second nature with practice.
See the Shift key? Just double-tap it. When you do, a little horizontal
line will appear near the bottom of the Shift key, indicating that
you’re in ALL CAPS mode. Starting with iOS 7, Apple made the Shift key's
different looks (for lower-case, upper-case, and all-caps) much more
subtle, so much so that an entire year later in iOS 8, I still get it
wrong sometimes.
If you have QuickType turned on in iOS 8 (Settings >
General > Keyboard > Predictive), it's easier to notice when the
Shift key is in Caps Lock mode.
If you double-tap your Shift key and nothing happens, head to Settings
> General > Keyboard, and make sure "Enable Caps Lock" is
switched on.
You're so money
Want to type the currency symbols for the yen (¥), the euro (€), or the pound (£)? Simple.
Just tap and hold the key for the dollar sign. When you do, a pop-up
bubble will display a series of additional money-minded options.
Shortcuts for symbols
I’ve rarely met an em dash I haven’t liked—and come to think of it, I’m
also a sucker for bulleted lists. How does someone like me survive
typing on an iPhone? Easy.
Tapping and holding symbol keys will yield buried typing treasure.
Tap and hold the dash key to reveal even more dashing buttons,
including the em dash, a bullet key, and the indispensable underscore.
(To, uh, underscore how convenient this is: If you don't use this
shortcut, the underscore is three more taps away. First tap the number
key, and then the symbols key, then you can tap the underscore.)
Bonus tip: Try tapping and holding other symbol keys. For example,
you’ll find “curly” quotes by tapping and holding the quote key.
Embrace the emoji
What’s a text message without a smiley? Good question. Luckily, the iOS keyboards come with more emoji than you can shake a stick at.
The world is not running out of emoji anytime soon.
First you’ll need to enable the emoji keyboard: In Settings >
General > Keyboard, tap Keyboard again, then check to see if “Emoji”
is in the list of installed keyboards. If it's not, tap “Add New
Keyboard” and find Emoji in the list. Now whenever you're using the
keyboard, you can tap the key with the globe icon, and feast your eyes
on all the gorgeous emoji ready to unleash. Unfortunately, you can't
reorder them, but the first tab keeps your most recently used emoji at
your fingertips.
Talk instead of type
It’s easy to forget that both your iPhone and iPad will take dictation
whenever you’re not in the mood to type. Just tap the little microphone
icon on the keyboard, to the left of the space bar.
Press and hold the gray microphone button to the right
of the message box to record an audio message. The white microphone next
to the space bar lets you dictate a message that will be translated to
text.
As a bonus, the iOS 8 Messages app has two microphone buttons.
The rectangular white microphone button to the left of the space bar
takes dictation as usual, translating your words into text. But if
you're communicating with another iMessages user, you can tap and hold
the gray cicular microphone button to the right to the iMessage text box
to record a voice message that's sent as audio. You'll save typing time
and your messaging buddy get to hear the joy, sadness, or utter
ambivalence in your voice. It's fun.
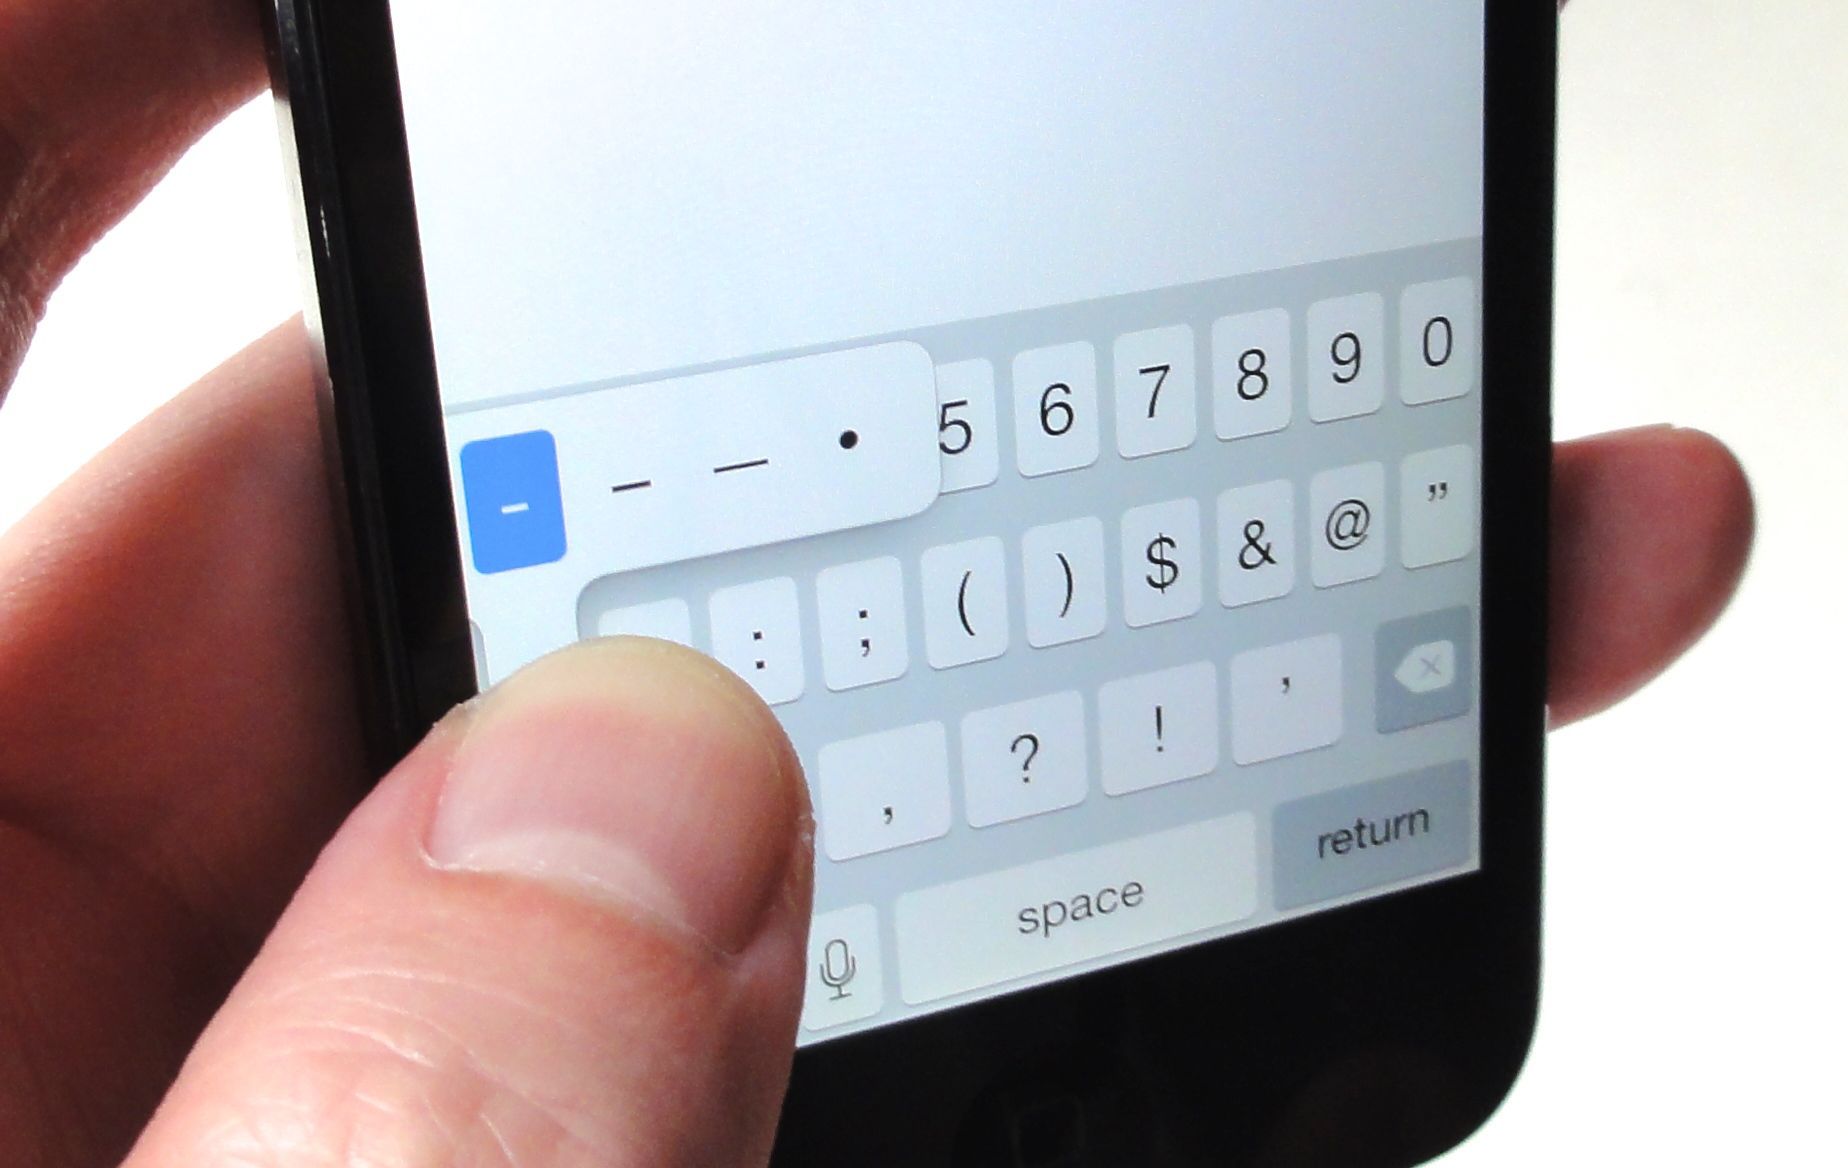
The number slide
There's really no reason to switch from the keyboard's letters layout
to its numbers layout if you only need to type one measly numeral or bit
of punctuation. Instead, press the button with the numbers on it, but
don't pick your finger up off the screen. Instead, slide it to the key
you want to type, and then lift your finger off the screen. The
number/punctuation will be typed and the screen will snap right back to
the letters view.
Of course, to type a simple period at the end of your sentences, you
don't even need that slide trick. In Settings -> General ->
Keyboard, there's a switch to enable ". Shortcut." That's the period
shortcut—once it's enabled, you can just type two spaces at the end of a
sentence to automatically make a period.
Providing many of the features found in its mobile sibling, the
Yosemite-only Photos for OS X offers an interface less cluttered than
iPhoto, improved navigation, simpler yet more powerful editing tools,
the ability to sync all your images to iCloud (though it doesn’t require
you to), and new options for creating books, cards, slideshows,
calendars, and prints. I’ve had the opportunity to take an early look at
Photos, and this is what I’ve found.
The look
Photos has inherited some design elements from Apple’s latest operating
system as well as from iOS’s Photos app. For example, there’s a measure
of transparency near the top of the window, reflecting the images behind
it rather than the desktop. Toolbar items bear Yosemite’s thinner
design, and, like iTunes 12,
you’ll find buttons that provide you with different avenues for viewing
your content—Photos, Shared, Albums, and Projects. (An Import button
also appears when you’ve connected a compatible camera, mobile device,
or media card.) They shake out this way.
Photos interface follows Yosemite's path of clean, minimal design,
Photos: As with Photos for iOS, you can see your images and
movies organized in Years, Collections, and Moments views. In the
highest level Years view you find very tiny images all created within a
particular year. Click and hold on a thumbnail and you see a larger
thumbnail. Click and drag and you can scrub through these thumbnails to
locate the image you’re after.
Click within one of the years and you’re taken down a layer to
Collections view, which comprises images captured during a particular
time and in a specific place. This is akin to iPhoto’s Events view,
where you might find all the images from your camping trip.
Click again and you’re taken to the Moments view—all the images you
captured during your afternoon atop Half Dome, for instance. If you have
a Mac with a trackpad you can navigate even more easily. To dig down
from Year view, just stretch two fingers on the trackpad. Stretch again
to move to the Moments view. To move back up the hierarchy, pinch.
If you click the place name that appears near the top-left of the window
you’re taken to a map that displays thumbnails along with the number of
images associated with that location—all the images you’ve taken in
Central Park, for example.
Shared: This serves a purpose similar to iPhoto’s Shared entry.
After enabling iCloud Photo Sharing you’ll see the photo streams you’re
sharing as well as any streams others have chosen to share with you.
Unlike with iPhoto’s shared albums, Photos presents shared images in a
much more elegant way—similar to something you might see on a
well-designed photo sharing site.
Albums: As its name implies, click Albums and you find any albums
you’ve created. But there’s more to it than that. Unlike with iPhoto,
Photos offers some preconfigured albums that appear in a row near the
top of the window. These are All Photos, Faces, Last Import, Favorites,
Panoramas, Videos, Slo-mo, Time-lapse, and Bursts—it’s not difficult to
see the strong connection between these libraries and the kind of images
you can capture with your iOS device. Just double-click on an album to
see its contents.
Photos gathers images and movies of particular types at the top of the Albums view.
Projects: Should you have forgotten, projects are what Apple
calls slideshows, books, cards, and calendars. When you create such a
project you’ll find it here. To work on an existing project, just
double-click on it.
Import: Similar to iPhoto, when you connect a camera, iOS device,
or media card/reader an Import button will appear. Click it and you can
choose to import all new items on the connected device/media or just
those images you select. If you have more than one device connected—your
iPhone and an SD card, for example—you pick the source you desire from a
pop-up menu and then import the images and/or compatible movies it
contains.
You can import media from cameras, connected iOS devices, and media just as you did with iPhoto.
If you prefer navigating your media as you did with iPhoto, that option
exists in the form of Photos’ Sidebar (which you invoke by choosing View > Show Sidebar
or by pressing Command-Option-S). Do so and you see headings for
Photos, Import, Albums (which contains the preconfigured albums I
mentioned earlier as well as smart albums), and Projects. The navigation
buttons in the toolbar disappear when you expose the sidebar.
Viewing images
To view a photo at a larger size, just double-click on it. When you do
this you have the opportunity to mark it as a favorite (by clicking a
Favorite button in the toolbar). Photos has dispensed with star ratings,
however. Now you simply choose to mark an image as a favorite or not.
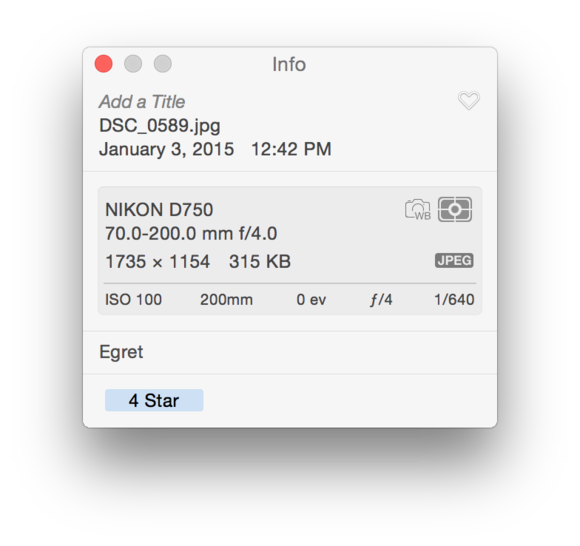
You add keywords and descriptions as well as view EXIF and location data in the Info window.
When viewing a single image you can get and edit information about it.
Just click the Info button and a window appears where you can add a
title, view some EXIF data, see the image’s location if it has been
geotagged, add keywords, and add the identity of faces within the image.
You can select multiple images, press Command-I to produce the Info
window, and add keywords that apply to each selected image.
You can also click a Plus button to add your image to an album, smart
album, or project. And by clicking on the Share menu you can send that
image elsewhere—to iCloud Photo Sharing, Mail, Messages, AirDrop,
Twitter, Facebook, and other services available from within the Share
Menu via Yosemite’s Extensions system preference.
Editing your images
Photos, like the iOS version, presents editing as a collection of tasks.
When you view an image and then click Edit in Photos’ top-right corner
you’re presented with a list of tools—Enhance, Rotate, Crop, Filters,
Adjust, and Retouch. Enhance does what it did before—takes a guess at
what might look good and applies those changes. Rotate does exactly that
in 90-degree increments. Filters offers up eight tasteful filters:
Mono, Tonal, Noir, Fade, Chrome, Process, Transfer, and Instant. And you
use Retouch to remove spots and blemishes (including sensor dust) with a
resizable tool. Crop and, particularly, Adjust need more explanation.
Crop not only lets you cut away unwanted material by dragging corners
and borders, but provides a wheel similar to the one in Photos for iOS
that you use to straighten your image to a grid. Or, if you like, you
can simply click an Auto button and Photos will calculate the horizon
line and straighten and crop the image for you, using the rule-of-thirds
to place the important portions of the image within the frame. Within
the Crop tool you can also choose an aspect ratio for your crop—custom,
16:9, 8:10, 5:7, and so on. Select a ratio and the image will be cropped
accordingly.
The Crop control not only lets you crop your images, but also straighten them.
Making adjustments
Photos’ Adjustments tool is one of its most intriguing features and
provides some insight into how its iOS cousin handles the job. The idea
behind it is that many people don’t want to spend time tweaking their
images. They’d prefer to click Enhance and when presented with the
results—whether great or garish—accept them as all that can be managed.
Intuitive though Exposure, Contrast, Saturation, and Definition sliders
may seem to some of us, they’re confounding to many casual
photographers. Photos’ designers set out to simplify the process while
bringing greater intelligence to the app’s editing tools.
When you click on Adjustments (which Apple terms “Smart Adjustments”)
you see three entries—Light, Color, and Black & White—that are
controlled using “smart sliders.” To make an adjustment in this view,
just click somewhere in the thumbnail image below one of these entries
and drag to the left or right. For example, if your image is too dark,
click in the Light tool area and then drag right or left to brighten or
darken your image.
Photos' Adjustments tools are simple yet powerful.
This addresses your need to make a dark image brighter. But it’s doing
far more than just adjusting the image’s exposure. As you drag to the
right or left, a variety of factors change including exposure,
highlights, shadows, brightness, contrast, and black point (and probably
several other things lurking under the surface). And not always in a
similar direction. Dragging to the right may increase the image’s
exposure but decrease its highlights, for instance. Photos is
calculating the best look for the overall image rather than just dumbly
making it brighter or darker.
You might use these controls this way: A mistake the unwary often make
is shooting a picture of their nearest and dearest against a bright
background—an unclouded mid-day sky is a common problem. Invariably,
Rosco is dark and the background far brighter. If you did nothing but
crank up the exposure you’d better expose your boyfriend, but the
background would also brighten to the point where it entirely overwhelms
the image. But try editing it with the Light control. Drag its smart
slider to the right and Rosco becomes brighter but the background stays
as it is or darkens, thus leaving you with the kind of image you could
share with your mother versus one that shows him in a poor light. You
can do this same kind of thing with the Color and Black & White
controls.
Even finer adjustments can be made via the Add menu.
But this can be just a starting point (or you can ignore it altogether).
Click on the downward pointing triangle next to each control and you’ll
see a series of other controls—the Exposure, Highlights, Shadows,
Brightness, Contrast, and Black Point controls I mentioned earlier. You
can adjust each of these individually using their sliders or by clicking
in the appropriate field and entering numeric values. So, if the global
Light control gets you close, but not quite there, you can dive down a
level and tweak as necessary.
And if that’s not enough control for you, click the Add button in the
edit area and you find such additional options as Histogram, Sharpen,
Definition, Noise Reduction, Vignette, White Balance, and Levels. Adobe
Photoshop (or even Lightroom) it may not be, but if you find iPhoto’s
editing controls a little underwhelming, you should be far happier with
what Photos offers.
About the cloud
When Photos was first announced a number of people fell into a panic.
“Apple can’t force me to keep my images in the cloud!” they cried. And
they’re correct. Apple can’t force you to keep your images in the cloud,
nor will it attempt to. Using iCloud storage is entirely optional. If
you want to only store your images locally and not have them beamed into
the cloud, you can. All you need do is ensure that the iCloud Photo
Library option is unchecked in the iCloud preference within Photos. Or,
if you want your images both in the cloud and on your Mac, enable the
Download Original To This Mac option, also within Photos’ iCloud
preference.
This latter option has advantages. When you edit an image or movie
within Photos for OS X or in the updated version of Photos that will
ship with iOS 8.2, those edits are automatically synced with all your
devices and your iCloud.com account. For instance, if I convert one of
my beach landscape images
to black and white for a more dramatic effect, that version will appear
on all the devices linked with my iCloud Photos Library. (And if I
revert an image, that change will also be populated to my other
devices.)
iCloud storage is not required.
And you don’t lose anything in transit. Images are stored in their
original format and resolution—including raw images. And speaking of raw
images, it’s important to note that if you import a lot of large raw
images and movies into Photos and then choose to store them in the
cloud, you may be looking at purchasing additional iCloud storage. When
you enable the iCloud Photo Library option, Photos will estimate how
much iCloud storage you’ll need to store your current library in the
cloud and provide a way for you to purchase more storage if that library
is larger than your available iCloud storage.
You’re given 5GB of free iCloud storage when you sign up for an account, but if you need more storage you’ll have to pay for it—$0.99
a month for 20GB of total storage, $3.99 a month for 200GB, $9.99 a
month for 500GB, and $19.99 a month for 1TB of storage. Again, iCloud
storage is optional. You can continue to store your images on your Mac
as you always have.
Project enhancements
Photos also spruces up iPhoto and Aperture’s projects. The book creation
tools are now more streamlined—hiding the layout options until you need
them, for example—and adding a new Square book format (20 pages in an 8
x 8 inch format for $24.99 and a 20 page 10 x 10 inch book for $39.99
with additional pages priced at $0.79 and $0.99 respectively). Compared
to iPhoto, Photos in its current incarnation has lost some of the
previous book themes but added a couple of new ones including Bento Box
and Travelogue. Additional themes can be downloaded as they become
available.
Slideshows can now be configured from within a drop-down window rather
than propelling you into a full-screen slideshow window with a small
slideshow window appearing within it. As with books, slideshows within
the beta version have fewer themes with a couple of new additions. As
before, you can export slideshows as movies.
Photos introduces some new slideshow themes.
Photos also offers an option for printing the panorama images you’ve
taken with your iOS device. You can choose prints up to 36-inches wide.
You can also order square prints if you’ve chosen to shoot images that
way on your iPhone.
Moving from iPhoto/Aperture to Photos
When you install Photos you’ll be offered the option to import your
iPhoto library. (If you have more than one iPhoto library, Photos will
ask you to choose one to import.) You can also import an Aperture
library.
Opening one of these libraries in Photos doesn’t duplicate your existing
images. You won’t find one set of images in an iPhoto library and
another in a Photos library. But looking at the Finder, you wouldn’t
think so. Here’s why.
When you launch Photos and it pulls images from your iPhoto library, a
new Photos Library archive appears in the same location as your iPhoto
library. And the Finder tells us that it’s a bit bigger than the iPhoto
library. But the truth is that it’s not really consuming that amount of
space. The Finder simply reflects the size of the library as if it held
all the original files, which it isn’t as it’s referencing the original
images.
Yes, it’s a bit confounding, but you can test it yourself. In Disk
Utility create a disk image with a capacity 25-percent larger than your
iPhoto library. Let’s say that your iPhoto library is 2GB and you create
a 2.5GB image. Copy your iPhoto library to the disk image and then
launch Photos while holding down the Option key. Click Other Library and navigate to the iPhoto library on the disk image. Photos will launch and create a Photos Library archive.
Given that the disk image can hold just 2.5GB of data—4/5ths of which is
already being used by your iPhoto library—you should be told there’s
not enough storage to complete the operation. And yet it works and
there’s the Finder proudly displaying two file sizes that exceed the
capacity of the image. This tells you that the Finder is fibbing in
regard to how much data each library really holds.
Additionally, iPhoto and Aperture don’t become unusable after you’ve
launched Photos. You’ll be asked which app you’d like to use with your
images. You can choose iPhoto, if you like, with the caveat that any
edits you make in a particular app—iPhotos or Photos—will appear only
within the app you used to apply them. So, if you convert an image in
Photos to black and white and then open that same image in iPhoto,
you’ll see the unedited original color version.
iPhoto events and Aperture projects are converted to albums as neither
of these items exist in Photos. Metadata including star ratings, flags,
and color labels will be transformed into keywords and become searchable
in Photos. Other IPTC metadata such as copyright, contact, and content
data is retained as part of the image, but it’s not visible within
Photos. Custom metadata fields aren’t transferred to Photos.
Those with OS X developer accounts will be able to play with Photos
starting today when they download the beta of OS X 10.10.3. The rest of
us will have to wait until the spring when the final (and free) version
of 10.10.3 ships.
When that happens, Aperture and iPhoto will no longer be offered on the
Mac App Store as new-to-you purchases. If you’ve purchased one of them
in the past you’ll be able to download another copy should something
happen to the original—much as you can redownload an older version of
GarageBand that’s no longer being sold at the Store. For this reason, if
you haven’t purchased the latest iPhoto or Aperture and want them, act
before they disappear.
First impressions
I’ve had very little time with Photos but my general impression is that
it hits a sweet spot for the casual-to-enthusiastic iOS and digital
camera shooter. Its navigation is more nimble and, from what I can tell,
its performance is significantly improved over iPhoto’s, which I found
sluggish with large image libraries. And, scaling back to the big
picture, it’s the first of the old iLife apps that shares a common
experience among the Mac, iOS devices, and iCloud. All your photos, your
most recent edits, wherever you are. It’s an app worth looking forward
to.
10:40 AMHigh Tech House Calls, Expert Computer Consulting
Verizon has been the number-one cell service provider for a while
now, but AT&T, Sprint and T-Mobile have cut prices and upgraded
packages recently to try and steal that title. Now, Verizon has
responded by reducing its data charges to attract new customers and stop
current users from switching to its competitors.
The mega cell phone provider is knocking $10 a month off the data
bill for MORE Everything customers that have plans that include 1 GB,
2GB, 3GB or 4 GB of data month. Current Verizon customers can choose to
keep their current data limit and lower their monthly bill or keep the
existing charges and receive an extra gigabyte of data every month.
So someone with a 2GB plan is currently
paying $50/month. If they take the free data option, their data plan
jumps to 3GB for the same price. Or they can elect to stick with the 2GB
and see their data bill drop 20% to $40/month.
Verizon is offering better discounts to Edge customers, too. Users
can now receive a $15 discount every month on plans with 4GB of data or
less. Customers that have plans with 6GB of data or more will receive a
$25 discount every month.
This announcement is welcome news for Verizon customers, but these
savings won't happen automatically for existing customers. If you are a
current Verizon MORE Everything customer, you'll have to do a little leg
work to take advantage of this new deal.
A rep for Verizon confirms to that
current Verizon subscribers will not be automatically opted into either
of these choices and must let the company know — either by calling
customer service or through the Verizon website — when the changes kick
in after Feb. 5.
Making the changes online is your easiest option, so you're not stuck
on hold waiting to speak to a customer service representative. To
change your plan online, just log in to your Verizon Wireless account
and select the "Change Minutes, Text or Data" option underneath the
Manage My Account tab. From there, you can select to keep your current
data allowance for $10 less a month or receive more data for the price
you're paying now.
10:37 AMHigh Tech House Calls, Expert Computer Consulting
Reader Dave Inglis has The Question about the upcoming Photos for OS X app. He writes:
I read your article about Photos for OS X and the app looks great. What can I do with my current iPhoto library to get it ready for the transition to Photos?
The glib answer is “nothing.” When you finally get your hands on Photos
for OS X (which is slated to be released sometime this
northern-hemisphere spring) and launch it, you’ll be asked if you’d like
to import your iPhoto library. (If you have multiple iPhoto libraries,
you can hold down the Option key while launching Photos and then, in the
Choose Library window that appears, select a library to use.) Note that
cloud syncing works only with the default System Photo Library.
As with iPhoto, by holding down the Option key at launch you can choose a library for Photos to open.
As I explained in my first look, this won’t cause Photos to duplicate
your existing images. It will simply work with those images. If you
like, you can still launch iPhoto and work with your images there—with
the understanding that any edits you apply will appear only within the
app you used to apply them.
So much for glib, let’s talk details. First, now is as good a time as
any to start clearing out duplicates in your iPhoto library. I recently
addressed this in How to Cull Your iPhoto Library of Duplicates and Bad Photos.
I’d suggest you read through it and apply the tips I suggest so that
your Photos library isn’t as cluttered with cruft as your iPhoto library
was.
If you intend to store your photos in the cloud via Photos’ iCloud Photo
Library option, you may want to do more than just remove duplicates and
poor images, particularly if you have a very large photo library. Apple
provides you with just 5GB of free storage and the iCloud Photo Library
counts against that storage. (You can always purchase more storage.) To
keep your photo storage under 5GB it may require some serious culling.
Consider archiving your meh images and importing just the best ones.
Star ratings become keywords when you import an iPhoto library into Photos.
You might also rate your images while they’re in iPhoto. Photos lacks
the 0 – 5 Star rating system—it instead allows you to make an image a
favorite. However, it takes the star ratings you’ve applied in iPhoto
and turns them into keywords. So later, if you’d like to find all your
most highly rated images, just enter 5 Star in Photos’
Search field and any images that bear that keyword will appear. And if
you haven’t identified faces within iPhoto, why not do that while you’re
waiting for Photos to arrive? That faces metadata will transfer over
from iPhoto.
In short: Do your housekeeping now so that when Photos finally arrives
your images will be rarin’ to go from the very first launch.
10:34 AMHigh Tech House Calls, Expert Computer Consulting
Whether skiing or going to the beach, place your phone in a sandwich
bag to prevent damage and best of all, you can still use the touch
screen. Need a fast charge? Put the phone in airplane mode to speed up
the process by around 25%. And if you need to pump up the volume in a
flash, set your phone inside a plastic, glass or paper cup, sans liquid
of course.
Today’s gadgets, apps and sites are so powerful and do so many
different things that most of us will use only a fraction of their
built-in features. I put together some of the greatest tricks that you
will use every day or at least on occasion to impress family and
friends.
1. Take a picture with voice
Smartphones and tablets are great for snapping candid pictures.
However, tapping the screen to take a picture, or pressing a hardware
button, can jiggle the gadget, and ruin the shot.
That’s old school now. How about telling your phone to take a picture? In Android, an app like Camera ZOOM FX ($3) has voice-activation. VoiceSnap for iOS ($1) does the same thing for iPhones and iPads. These are also great for taking group pictures from a distance.
There's a lot more to taking a great picture than snapping the
shutter. To increase your digital photo smarts, here are five secrets
for Android and Apple to help you take professional-looking photos.
2. Clean up Facebook News Feed
If you scroll through your Facebook News Feed trying to get past the
ads, game invites, and political rants trying to find actual information
about your friends, this tip is for you.
Click the downward triangle in the upper right corner of any Facebook
post to see a number of options. You can choose to see less from that
friend or unfollow them so you don't see anything. If a friend is fond
of posting stories, videos and pictures from a specific app or site, you
can usually just block that app or site.
For even more News Feed customization options, click the downward
triangle in the upper right corner of your profile and select "News Feed
Preferences." Here you can see and choose what people, pages and groups
you're following and unfollowing.
Finally, add friends to your Close Friends list to see more from them
and add people to Acquaintances list for less. To manage your friend
lists, click the "Friends" heading in the left column next to your News
Feed.
It's safe to say that without Google Search, the Internet as we know it wouldn't exist. But it’s more than looking up websites.
Expecting a package to be delivered? Just enter the tracking number
directly into the search box. Google will pull up quick links that let
you easily track the status of your shipment.
Travelers love this one. Simply type your airline name and flight
number into Google. You'll instantly see the flight's arrival and
departure status, and Google even shows you terminal and gate number
information.
You probably visit a number of websites daily. You might pin a few
and bookmark the rest, but that still means you have to look at
individual sites and scan the page to see what's new.
What if you could get every new post on your favorite sites to appear
in one place? That's what aggregators do. Don't let the fancy name fool
you; they're simple to use and make life a lot easier. Feedly (Free) and Flipboard (Free)
are two popular options. Just add your favorite websites, organize them
however you want and whenever you open Feedly or Flipboard you'll have
plenty of new content to read. Love this one!
5. Remotely control a computer
This isn't a trick you'll use every day, but when you need it you'll
want to have it. Say you're helping a friend or family member with a
computer issue over the phone, and you know you could fix the problem in
30 seconds if you were standing there. Unfortunately, trying to walk
your friend or relative through the fix is going to take an hour.
Instead, log in and take control of their computer with a free remote access program like TeamViewer. It lets you see the other person's screen and control their computer like you're sitting in front of it.
I use programs like this all the time with my friends and relatives.
In fact, when I'm setting up their computer, I usually install a remote
access program so it's ready to go when they need help down the line.
Bonus trick:
Have you ever considered adding a second screen to your computer? If
you haven't, then you probably would after you consider the fact that a
second monitor lets you move videos, music, email, chat and many other
windows without interrupting what you're doing on your main computer
monitor.
Your tablet or smartphone can function as a second monitor to your PC.
First, pick up a stand for your tablet or phone. I sell my recommended model in my store. Then go ahead and download the app iDisplay,
follow the setup instructions and you'll have a more useful computer in
no time. It’s one of these things once you try, you get it.
5:14 PMHigh Tech House Calls, Expert Computer Consulting
Right now, millions of hackers, spammers and scammers are hard at
work. They're after your Social Security number, bank account
information and social media accounts. With any of these, they can steal
your money or trick your friends into giving up theirs.
The scary part is that anyone can be a hacker. For as little as
$3,000, you can buy a complete and fully operational exploit kit. This
kit does most of the illegal work for you automatically. You get to sit
back and rake in the cash, unless you get caught.
Between semi-amateurs with automated systems and serious hackers who
are masters of technology and trickery, how can you possibly hope to
stay safe? The best way is to know how hackers do what they do.
Once you know that, you can counter their malicious acts. Here are
five popular hacker strategies you need to know about and how to counter
them.
1. Phishing scams
Lucky you! A Nigerian prince emailed to say he needs help smuggling a
fortune out of his country. For a little bit of effort, such as making a
few simple wire transfers, you'll get a substantial cut of the loot.
You'll be rich! Of course, if you go along with it, the only money you
end up transferring is your own, and it's impossible to get back. I bet
you're asking yourself, "Who would fall for that?"
Well, tens of thousands of people do every year. That's why Nigerian
scams, or 419 scams, are still very popular. But that's just the classic
version of a phishing scam; there are more variations than you can
count. Other versions might say you won a contest or have a job offer.
Maybe the email says someone wants to meet you, or you can make money
for shipping some goods. It might say there was a problem shipping you
an item, or it pretends to be an important message from a real company
you do business with.
The catch is that you have to respond with personal or banking
information, pay fees upfront or download a file. Of course, your
information and money is going straight to hackers, or the file contains
data-stealing viruses. Use common sense before reacting to any email,
text or social media link online. Scams rely on making you act quickly.
If you think about things long enough, you can usually see through them.
Just remember the old saying, "If it looks too good to be true ..." Click here to see a real phishing email and learn how you can tell it's a fake.
You can also get security software that warns you about potential phishing scams, like my sponsor Webroot. More on that later, including how to save 50% when you buy.
2. Trojan horse
Hackers would love to slip a virus on your computer. Once it's
installed, a virus can steal your information, send out spam email or
attack other computers. The easiest way to get a virus on your computer
is to disguise the virus as something harmless or that you really want.
If you read "The Odyssey" in school, it shouldn't surprise you that this
tactic is nicknamed a Trojan horse, or just Trojan.
One of the most popular ways to deliver a Trojan is a phishing email
scam. For example, the email might say it's from a shipping service,
bank or other reputable company. There's been a problem with a
transaction! To learn more, you have to download and open an email
attachment. The attachment might look like a normal file, but it really
contains a Trojan. Clicking on the file installs it before you can do
anything. Click here to learn one way hackers disguise malicious files as harmless ones.
Similar scams appear on Facebook and Twitter. You think you're going
to watch a funny video your friend posted, but instead you get a message
saying you need to update your video player. If you install the
"update," you're really installing a virus.
The key to defeat this tactic, as with phishing emails, is common
sense and not trusting attachments and files you aren't expecting.
However, security software, like Webroot,
is essential for those times when you click before you think. It can
spot malicious programs and keep them from installing before they do any
damage.
3. Drive-by downloads
Security software is essential, but it isn't always enough.
Out-of-date programs on your computer might have weaknesses hackers can
use to bypass your security software and install viruses without you
needing to do a thing. To make this happen, hackers set up websites that
have malicious code on them. You can end up on these sites by clicking
links in phishing emails, social media or even in a Web search. Hackers can also slip malicious code into ads on legitimate sites you might visit regularly.
Once the code is in your browser, it scans your computer programs for
security holes. If it finds one that's open, it can trigger a virus to
download and install. A security program like Webroot
can warn you when you're about to visit a malicious site, and block
most virus downloads, but that doesn't mean you shouldn't patch up the
security holes on your computer.
To stay safe, you have to keep your programs up to date. Every month,
Microsoft releases updates for Windows and Internet Explorer. These
updates close critical security holes that hackers exploit. Click here to learn how to update Windows.
In Hollywood movies, hackers are masters of guessing passwords. In
the real world, however, very few hackers bother. Instead, they go
around passwords. They might get your password from one of the many data
breaches happening monthly at major companies. Maybe they guess the
basic security question on your account. It could be they slipped a
password-stealing virus onto your system.
You can stop a virus with good security software
and following the directions I gave above. However, it's up to you to
guard against the other dangers. It's important to use a different
password for every account. That way, if hackers get their hands on one,
they won't get access to all of your accounts. Click here for instructions to create strong, memorable passwords.
If you create weak passwords so you can remember them, or reuse
passwords because you have too many accounts, consider getting a
password manager. This will securely store everything for you so you
don't have to give up security for convenience.
For your multiple gadgets, you want a password manager that works everywhere with no hassle. Part of Webroot's
excellent security package is an online password manager that you can
access from any computer or mobile gadget. It's the perfect solution to
the password puzzle.
I'm sure you have a Wi-Fi network at home. Is it encrypted? If you
don't know the answer, then it's probably, "no." That means hackers, and
neighbors, can connect to your network from outside your house. They
can see and record everything you do. Even worse, they can surf to bad
websites and download illegal files on your connection, which means you
might be getting a visit from the police.
You need to take a few minutes right now and secure your network.
Trust me; it's worth it. And if you have secured your Wi-Fi, but you
haven't looked at the settings in a few years, it might time to update
them. You could be using an older encryption like WEP that hackers can
break through in seconds. The instructions for securing your network
will be in your router's manual. Or click here for my step-by-step instructions to secure a Wi-Fi network. You'll be glad you did.
Speaking of things you'll be glad you did, you might have noticed that I'm a big fan of the security company Webroot.
Not only does Webroot provide world-class security for your PC, it can
cover Macs, smartphones and tablets with a single account. No need to
mix and match programs and apps. Webroot uses cloud-based scanning, so
it's blazing fast and won't hog your system space. Plus, it's always up
to date, can spot brand new threats no one knows about yet, and can warn
you about malicious websites and phishing scams.
Webroot
is one of the best services at stopping viruses, but even it might
occasionally miss a tricky one. If that happens, and Webroot can't wipe
out the virus normally, Webroot is able to roll back your computer to a
point just before the virus invaded. It's similar to Windows' System
Restore, but works a lot better.
If you get a really nasty virus that just won't go away, you can
signal for help and Webroot technical support will have a representative
hop on your computer remotely and wipe out the virus manually, free of
charge.
5:03 PMHigh Tech House Calls, Expert Computer Consulting
The Web browser is a funny thing. It's one of the most-used computer
programs, but many people myths and misconceptions. don't really understand it. That's why in the
past I've tackled common browser
Today, I'm helping you get the most out of your browser with a few
simple tricks that you really need to know. Your friends and family
probably want to know these as well, so be sure to click the Share
button.
Choose your home page
What's the first thing you see when your browser starts up? If you're
using Internet Explorer, it's probably MSN's website. Chrome loads up a
modified Google page and Firefox has its own start page.
But if you then type in an address or hit a bookmark button to go to
the same website first thing, then why not have your browser start
there?
In Chrome, click the icon on the right with the
three horizontal bars and choose Settings. On the left column, choose
Settings and then look under On Startup.
Set it to "Open a specific page or set of pages" and then click the
"Set pages" link. Type in one or more Web addresses and click OK. Those
will load up when Chrome starts.
Need a suggestion for a home page? Try the all-new www.komando.com.
It's your one-stop site for the best in tech news, tips, tricks,
reviews, downloads, videos and so much more. And now it's updated all
day long.
In Firefox, click the orange Firefox button and
select Options>>Options. On the General tab, set "When Firefox
starts" to "Show my homepage." Then under that, type in the address you
want for your home page. Then click OK.
If you want to load multiple pages, load them up in tabs and then
click the "Use Current Pages" button. Or you can click "Use Bookmark..."
and select a folder of bookmarks.
In Internet Explorer, click the gear icon on the
right and select Internet Options. Go to the General tab and under "Home
page" enter the Web address or addresses you want to see on startup.
In Safari on Apple, go to Safari>>Preferences. On the General tab, go do to "Homepage" and type in an address.
Pin tabs
This one is for Chrome and Firefox users who have favorite sites they
leave open all day. Load up the site, right-click on the browser tab
and choose "Pin Tab."
Your tab will be moved to a smaller tab on the left side of the tab
bar. That way no matter how many tabs you have open, you always know
where your favorite sites are.
To unpin a tab, just right-click and choose "Unpin Tab."
Middle-click to open tabs
If you're using a mouse that was made after the mid-2000s, then it
probably has a scroll wheel. Did you know that if you press down on the
scroll wheel it acts as a middle mouse button?
OK, you knew that. But did you know that clicking on a link with the
middle mouse button opens that link in a new browser tab? If you didn't,
give it a try. It will change your life - or at least your browsing.
For laptop users, sometimes pressing both trackpad buttons at once
works as a middle click. Or you can left-click a link while holding the
CTRL key.
Zoom text
Have you ever visited a page with text that was too small? If you've
ever leaned in close to a computer monitor to read, you need to know
this.
To zoom text - and images - in any browser, just press CTRL and the
plus key at the same time. Hit it a few time to zoom way in. Too far?
Hit CTRL and the minus key to zoom back out. CTRL and the zero key
resets the zoom.
Or, you can hold down the CTRL key and spin your mouse scroll wheel. That will zoom in and out as well.
Browse privately
Don't want your significant other knowing what his or her birthday
present is? Want to make it hard for snoops to know where you're going
online? Just fire up your browser's privacy mode. Click here for the simple instructions.
See if your browser needs updating
An out-of-date browser is very dangerous. It might have unfixed security flaws that hackers can use to take over your computer.
Or you might just be missing out on some of the latest and greatest
Internet sites that use newer Web standards. Either way, keeping your
browser up to date is essential.
Do you remember every online account you’ve ever made? I know I sure
don’t. If you’re like me, you’ve probably created dozens of accounts
that you only used once.
That’s actually very dangerous. It means your information is floating
around on dozens or hundreds of websites that may or may not be secure.
What's the difference between "http://" and "https://" in your
browser's address bar? If you see the first one while you're on a
sensitive site, you have a problem. That's because it means your
connection isn't encrypted.
Encryption is what keeps your communication safe from hackers. While
any sensitive site supports encryption, some of them don't have it
turned on by default because it slows things down. Well, you can force
it to use encryption anyway so you stay safe.
In Firefox, Chrome, and IE, try CTRL + Tab to move across your tabs
quickly; this is a great tip for power users who have a lot of tabs to
rush through.
On the Mac, Firefox and Chrome let you do the same thing with OPT + CMD + right arrow.
And did you close a tab you didn't mean to? ALT + SHIFT + T will bring it back!
4:26 PMHigh Tech House Calls, Expert Computer Consulting
Of all the different kinds of apps that I regularly use on my iPhone, I
probably spend the least amount of time with weather ones. That’s not to
say I don’t like them, quite the contrary: I’ve downloaded so many of
them over the years, I could probably go a year without needing to open
the same one twice. But no matter which one I’m using, my time with it
is relatively brief—I check the temperature, maybe scan the forecast,
and close.
Therein lies the beauty of a great weather app. Unlike note-takers or
Twitter clients, weather apps aren’t designed to be used for any
substantial length of time. Unless you’re obsessed with all things
meteorological or happen to enjoy poring over a month’s worth of
barometric readings, the data is actually secondary to the experience.
More than any other category in the App Store, there’s quite a bit of
overlap among weather apps, but while they all pretty much do the same
thing, the interfaces and experiences vary widely.
That’s why picking the best one is so difficult. With virtually every
other task I need to do on my iPhone, I have a clear favorite. Tweetbot
for Twitter. Daedalus Touch for writing. Fantastical 2 for day planning.
But weather apps are far more subjective; on my own device I cycle
through a couple dozen apps on a relatively regular basis—and that’s
before I started testing them for this article.
So, to help narrow things down, I set some criteria. First and foremost,
current conditions have to be accessible at a glance. More often than
not I’m popping into a weather app to see what’s going on right now, so I
don’t want to spend any time searching for the pertinent information.
An iPad companion helped but wasn’t necessary, but they did have to
offer a five-day forecast, along with at least some kind of detailed
information, such as radar, precipitation or wind speed. And above all,
they had to be accurate.
Winner: Accuweather Platinum
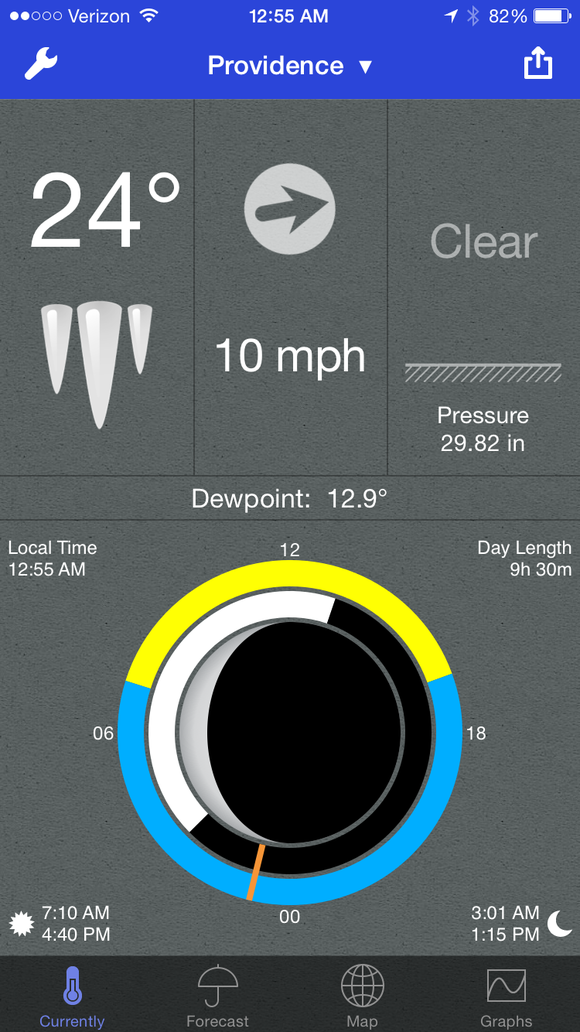
Accuweather’s good looks are nothing compared to its big, beautiful brain.
This wasn’t an easy decision—and some of you will undoubtedly disagree with me. Accuweather Platinum
($4) set off an avalanche of criticism when it got an extreme iOS 7
makeover, but a year later it’s all the better for it. A quick scan of
its reviews will show you that it still has its detractors, but
Accuweather has continuously tweaked and refined its vision to deliver
an app that’s both minimal and meticulous, drawing an utterly exhaustive
picture of the sky above you.
There’s a ton of information crammed into the app’s modular interface,
but none of it gets in the way of the current temperature and
conditions, clearly displayed against an animated representation of
what’s going on outside your window. Any warnings or advisories are
positioned at the top of the screen, but scroll a bit down and you’ll
find a wealth of customizable weather stats, from commonplace figures
for visibility, pressure and dew point to more unique features like
hourly precipitation forecasts to the phase of the moon. Clicking on
most segments expands them to show a greater level of information,
including a very useful plain language description of the forecast.
Accuweather’s array of forecasting tools leave no stone (or cloud) unturned.
But what really sets Accuweather apart is its MinuteCast. Accessible on
the main screen, it offers a forensic look at the next two hours, as it
literally lets you know the exact moment you’ll need an umbrella on your
30-minute walk. Gesture-based and extremely accurate, it blows away any
other app I’ve used for live tracking.
My only real complaint is that it takes a second or two longer to load
than I’d like. We’ve become spoiled with instant-on apps, and
Accuweather takes a moment to refresh its screen each time it’s
launched, occasionally displaying incorrect information while it loads.
And if I really want to quibble, the purple-and-blue color scheme can be
difficult to read in spots. But overall, it’s a fantastic weather app,
and if you’re one of the people who ditched it out of frustration after
its initial re-launch, you’d be well served to give it another shot.
(A quick note: If you’re adverse to spending any money on a weather app
and looking to grab the free version of Accuweather, just be aware that
the inclusion of banner ads upsets the integrity of the interface quite a
bit. Since it’s a scrolling app, they’re not so easy to ignore, but the
rest of the interface is intact, save for ten less forecast days.)
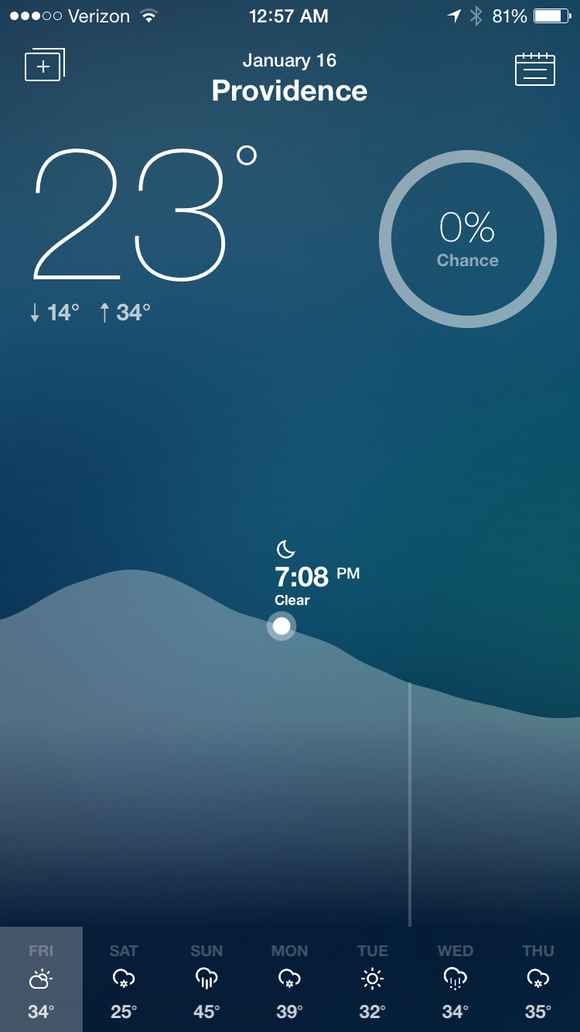
Runner-up: Dark Sky
Dark Sky isn’t nearly as much fun if it’s not raining, but don’t worry, it’ll direct you to someplace where it is.
Most of the time I check a weather app I want to know one thing: When is it going to rain? Dark Sky
($4) is the only app I’ve used that puts all of its efforts
specifically into answering that exact question. It’s so good at what it
does, I rarely need to open it anymore—notifications dutifully keep me
apprised of when the wet stuff is on its way—but when I do, I find
myself using it differently than any other weather app. That is to say, I
spend a considerable amount of time with it, even after it gives me the
information I seek.
Instead of a map, Dark Sky lets you literally scan the globe by swiping
and pinching to find the most intense weather spots. Always visible by
way of a transparent layer just beneath the screen, it puts a whole new
spin on weather apps (literally) by turning the radar into the forecast;
a 12-day span lets you follow storms and watch as they develop and
dissipate, giving a greater understanding to just how hard it is to
predict the weather.
And while most every other weather apps focuses on a few locales of your
choosing, Dark Sky encourages you to explore parts of the world you’ll
probably never visit. If there’s no precipitation near you, the app will
suggest an area where you’re sure to find some, giving you an excuse to
play with its stunning interface. Like a Wikipedia wormhole, once you
start, you won’t want to stop; Dark Sky sports one of the most beautiful
and mesmerizing radars I’ve ever seen on an iOS app (or anywhere else
for that matter), and it’s as much of a joy to use as it is to behold.
Best for budding meteorologists: Seasonality Go
Seasonality has forgotten more about weather than most apps will ever know.
Most of us only check weather apps to see the temperature and
precipitation forecasts, but those who want to go beyond even the
atmospheric readings that Accuweather provides should check out Seasonality Go
($6). Chock full of more charts and data than one could ever possibly
need, the app’s bustling interface can be a bit daunting to casual
weather buffs, but if you take the time to explore it you won’t be
disappointed.
The main screen (which is customizable on the iPad) displays an
excellent cross-section of the current conditions, including air
pressure, dew point, and the coolest astronomical chart I’ve ever seen.
You’ll also find graphs for a wide array of information, including wind
speed, snowfall cloud cover and wave height, as well as a powerful radar
map with live satellite overlays, barometric pressure lines and a
hypnotizing Particle Mode that shows exactly how the wind is blowing.
Gaucho Software has been promoting an upcoming “Pro” version of
Seasonality built specifically for the iPad, but quite frankly, the one
currently available is already more advanced than most every other app I
tested. It won’t fit everyone’s tastes, but those looking for an
in-depth look at the weather on their iOS device should definitely check
it out.
The (other) best for budding meteorologists: Weather Underground
Weather Underground is the next best thing to having a Doppler radar in your backyard.
Let’s just call Seasonality Go and my next choice, Weather Underground
(free; $2/year subscription to remove ads), a tie for all
meteorologists out there. Weather Underground brings the same remarkable
and exhaustive online system of crowd-sourced weather measurements to
its iOS app, and there’s more than enough within its digital walls to
keep the most die-hard of weather junkies extremely happy. There’s so
much information here that some screens can get a little overwhelmed
(the iPad counterpart, WunderStation,
does a much better job with layout), but the customizable interface
does a nice job of keeping things in order without sacrificing any of
its usability.
Drawing live readings from some 40,000 weather stations around the
world, Weather Underground shuns the usual services and radars to
present the most localized and comprehensive forecast around. Fans of
the service will be pleased to know that its interactive WunderMap is on
full display here, with a complete array of buttons to show radar,
temperature, precipitation, fronts, webcams, and anything else you need
to know, including any active fires or brewing hurricanes. While it’s
better for current conditions than forecasting, the sheer breadth of its
weather reporting is simply outstanding, and I defy you to find a
weather app that’s more exhaustive or accurate.
Most unique: Weathertron
It looks like a video game, but Weathertron actually tells you a lot about the atmosphere.
The Weather category of the App Store isn’t without its share of funky
yet functional interfaces, but of all the ones I’ve tried, Weathertron
($2) is the farthest out there. That’s not an insult (and if it was, I
never would have created this category)—Weathertron sets itself apart as
one of the most fascinating apps in the App Store, drawing you in with
its beautiful design and practically challenging you to figure it what
its bars and gradients are trying to telling you.
As much of a live infographic as it is a forecasting app, Weathertron
doesn’t just tell you the conditions—you’ll quickly see the temperature
and a general overview of what’s outside, but it takes a bit of a close
study to understand how to read its hourly breakdown of the day’s cloud
cover and precipitation. Even after you grasp it, however, there’s
nothing casual about Weathertron, and that’s what makes it so great.
Sure, the fluid nature of its UI can get frustrating at times, but
you’re unlikely to find a more stimulating weather app out there.
Best newcomer: Weather Cal
Weather Cal’s slick interface is bolstered by a tight integration with your Calendar appointments.
New and interesting weather apps are constantly popping up, and with
such stiff and varied competition, it can be hard to get noticed. But Weather Cal
($3) is off to a great start—and I felt it deserved some recognition
here. More than just another pretty face, the app is something of a
personal meteorological assistant, incorporating your Calendar events
into its forecast for a complete picture of the week ahead.
Weather Cal’s interface is as thoughtful as its concept, with a muted
background color gradient that changes to reflect the current position
of the sun. Dragging your finger along the curve at the bottom of the
screen gives you a minute-by-minute forecast of the next seven days, and
you’ll get some detailed stats by tapping the precipitation circle at
the top right. The Calendar integration isn’t quite as smooth as it
could be—accessible via a separate screen that doesn’t have the same
polish as the main interface—but it’s an example of the attention to
detail that helps make Weather Cal an especially strong candidate even
in such a crowded field.
Others of note
Solar uses simple colors to tell you how much sun you’ll see today.
Actually, crowded field might be a bit of an understatement. Even if
you’re not interested in any of my selections, you won’t have to look
too long to find a capable and competent weather app that fits your
budget. At the free end of the spectrum, there are numerous ad-supported
apps out there, the most decent of which being The Weather Channel and Yahoo Weather.
Both feature very nice interfaces and detailed stats that tastefully
work ads into their designs without relying on unsightly banners.
Also free (with an annual $3 in-app subscription to remove ads) is the very popular (and very cluttered) WeatherBug, but if you’re looking for something a whole lot more minimal, there’s the exquisite Solar.
You’ll have to forego common data points like humidity, wind speed and
precipitation, but what you get in return is a brilliant impersonation
of the sky above you. As you slide your finger along the screen, the
color gradually changes to reflect the position of the sun, turning your
phone into a brilliant color-scape that’s like looking through at a
living abstract painting.
Make sure the kiddies aren’t around when you use Authentic to check the weather.
Take a few bucks out of your wallet and your options will greatly expand. For minimalists, there’s Shade ($2), which boils the forecast down to a mélange of simple colors and lines in a surprisingly cogent UI.
Another personal favorite is Weather Line
($4), which offers a clean and simple interface that plots temperatures
and precipitation on an interactive graph to illustrate daily, weekly
and monthly trends.
Finally, I would be remiss if I didn’t mention Authentic Weather
($1). Easily the most irreverent weather app on any platform, it
eschews everything about forecasting and plainly tells you what’s going
on outside using, shall we say, rather colorful language. You could
always look out a window to get the same results, but Authentic’s
naughty attitude is way more fun.
For your convenience Venmo and Zelle are also accepted for payment.
Fed up with Windows based computers?
Think an Apple Computer might be what the doctor ordered?
We can help you with that decision for free! Give us a call so we can discuss your computing needs!
Gift Certificates
What will you use your certificate for?
Making the move to an Apple laptop? My business has been running on an Apple laptop for 6 years.
You bought an iPhone. Now what? We have been working on iPhone problems since they came out and we can help.
Summer will be here before you know it. You want to surf on the internet on your wireless network from your pool. We are wireless network experts in both design and deployment.
Or you can use this gift card for any help needed (including training) for the computers in your home or small business.
The perfect present for any occasion:
Available in one hour increments.
No expiration date.
Can be used for service calls or training.
Giving a technology gift that requires setup or training? Why not add a gift certificate?


 Some of my tactics might work for you, others might not be
your style. The trick to managing the balancing act of a small business
is to throw yourself behind any time-saving tricks that fit the bill.
Some of my tactics might work for you, others might not be
your style. The trick to managing the balancing act of a small business
is to throw yourself behind any time-saving tricks that fit the bill.


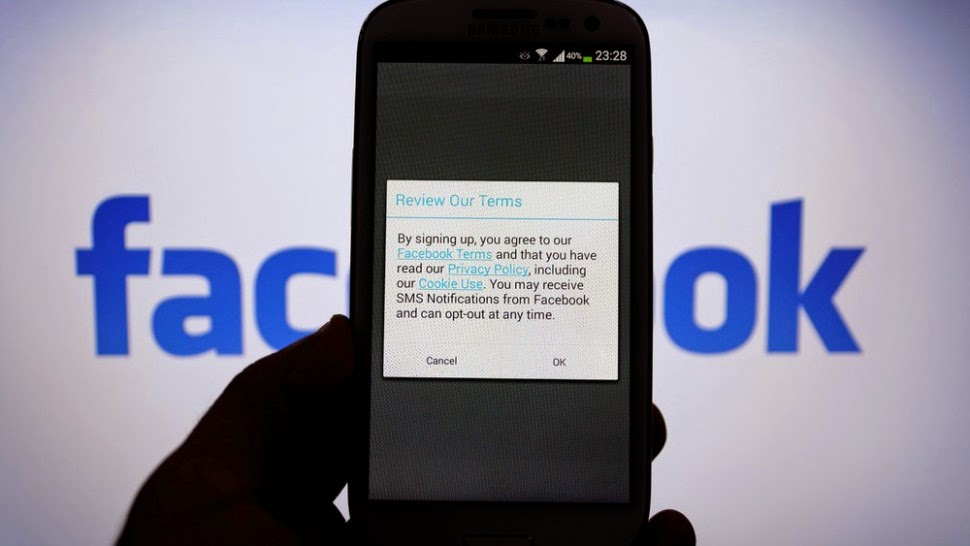

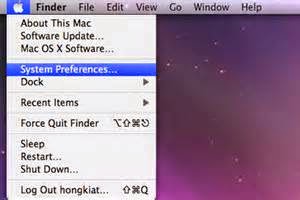
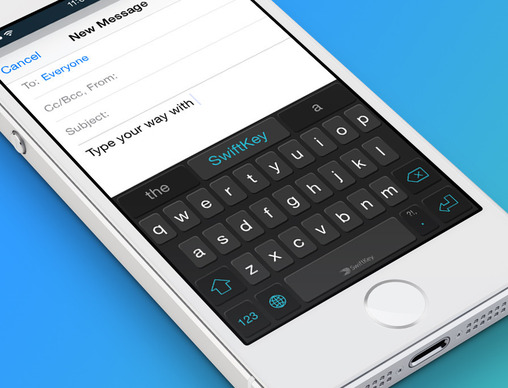
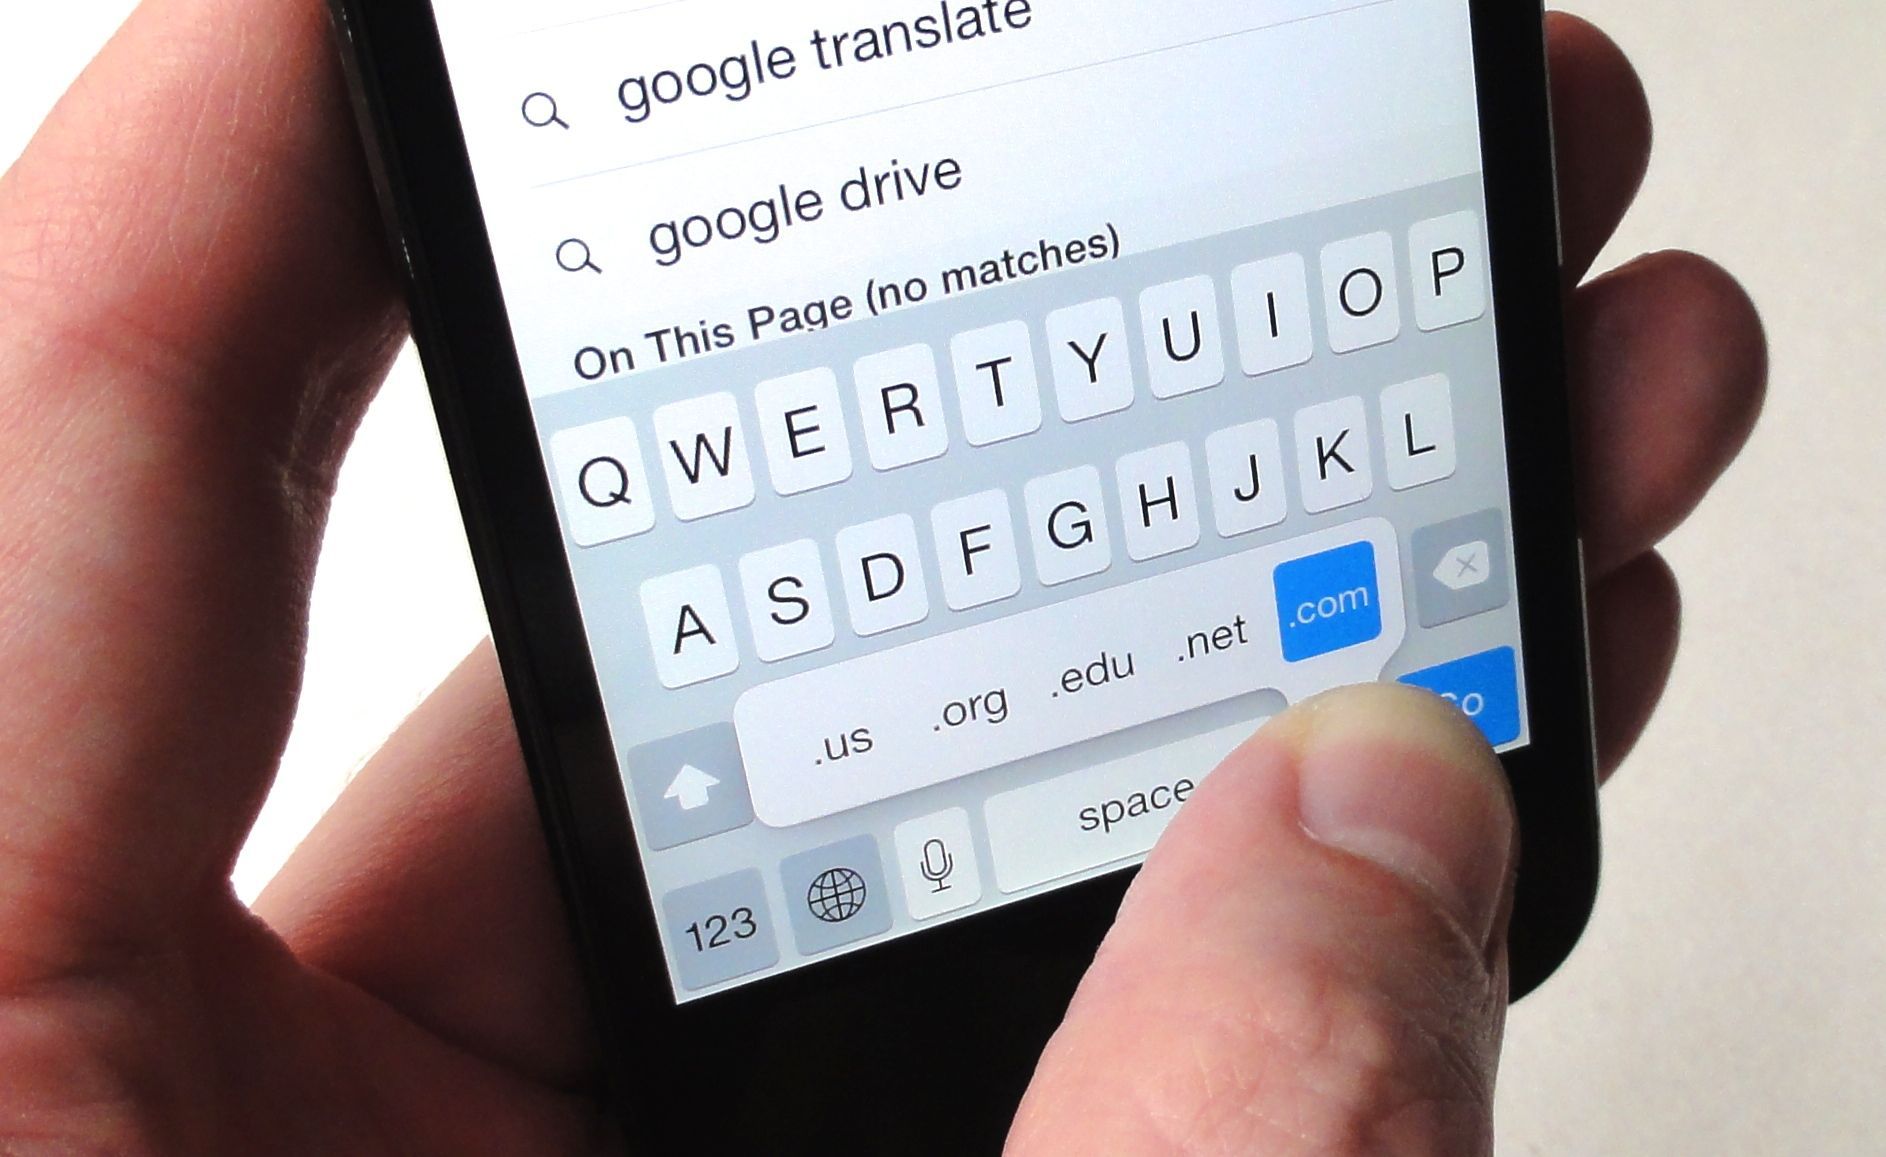
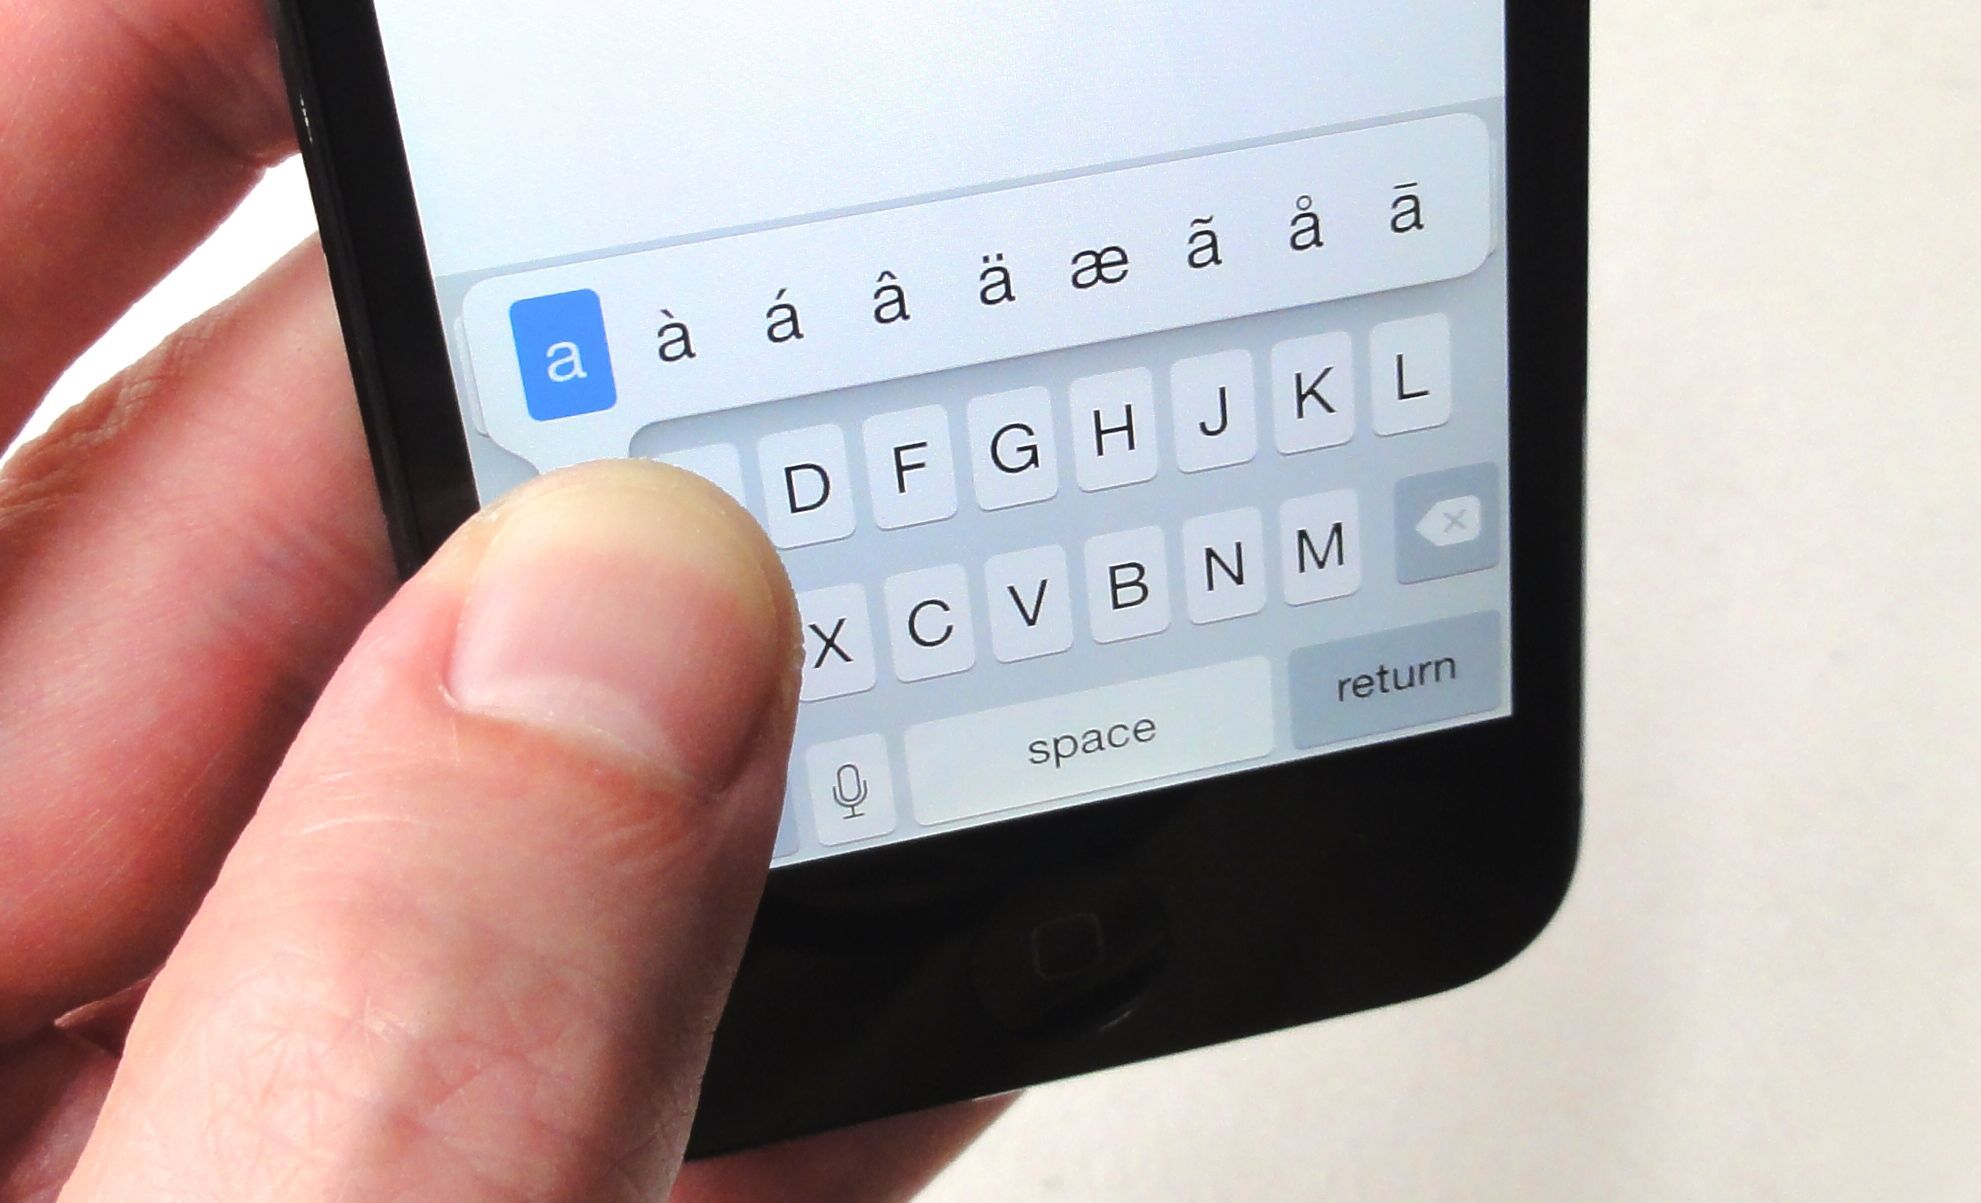
 Swype
Swype