Life has changed there is no doubt and we wanted to reach out to see how you are doing.
As we go through this interesting time, we are trying to look at this as an opportunity to focus on our family and on friends like you. Let us use this extra time to catch up and talk more. Let us cook food that is not fast, but interesting and satisfying. Let us learn to enjoy a time to try new things. Let us find ways to enjoy time at home!
Computer Security
If my client base is any experience, anyone can be a victim of a Ransomware, Malware or Virus attack.
What can you do about it?
I conduct audits of your entire computer infrastructure and apply best practice solutions to plug the security holes on your computers, Smartphones and networks.
Now offering consultations to give you the best protection possible:
8:54 AMHigh Tech House Calls, Expert Computer Consulting
A few months back, VLC Media Player
got Chromecast support and 360-degree video views. It’s just another
tiny notch on the popularity of the open source player which can handle
anything that you throw at it (as long as it’s a media file!).
The
Windows version of the player is closing in on 50 million downloads,
and that’s discounting all the other platforms it can be installed on.
Perhaps the secret to its longevity is the modular design which gives it
a rich set of features. Today, let’s focus on the few “secret” features
under the hood which you can use every day.
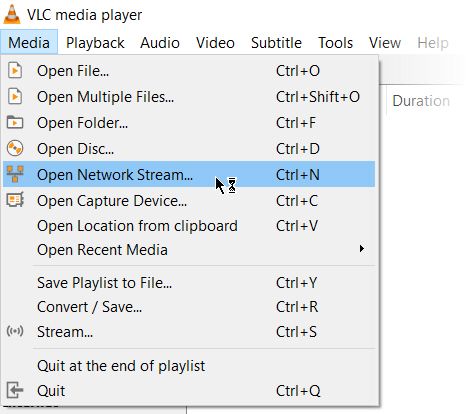
1. Use VLC as a Video Downloader for YouTube
There are several capable free downloaders available for YouTube. But, VLC has this feature built in. Though it’s not a one-click downloader and you will have to take the help of your browser.
Click on Media > Open Network stream.
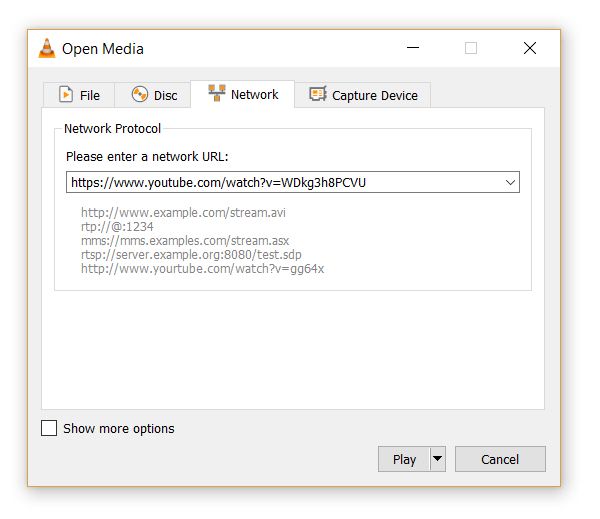
Paste the YouTube URL and click the Play button in the player.
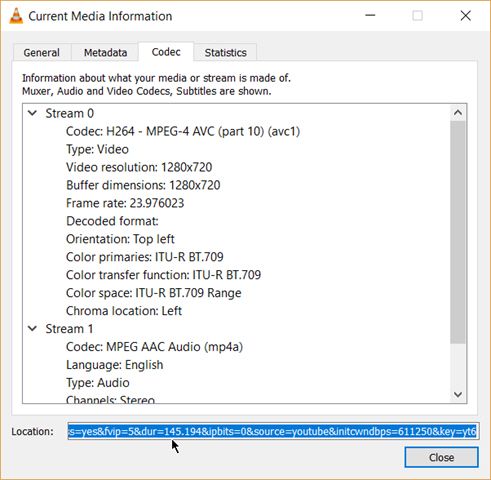
VLC Media Player starts streaming the video. Now, click Tools > Codec Information and at the bottom of the window you will see a Location box.
Copy the long URL in the box and paste this into your browser’s
address bar. The browser will now start playing the video file. You can
download the video file to your desktop by doing a Save video as with a right-click on the video. Or you can choose to record the video.
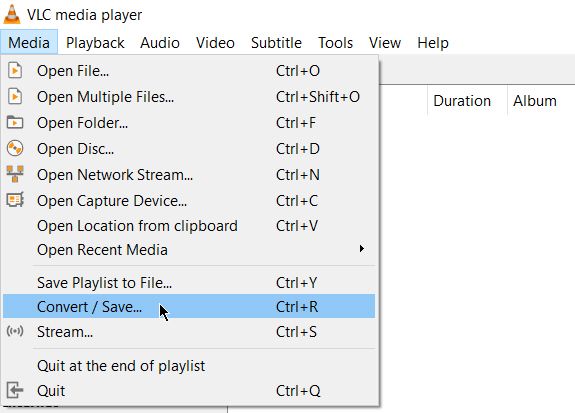
2. Convert Videos to Any Format
Downloading a video is
often the first part. Converting that video so you can play it on a
device of your choice is the second part. The VLC Player can do this
too.
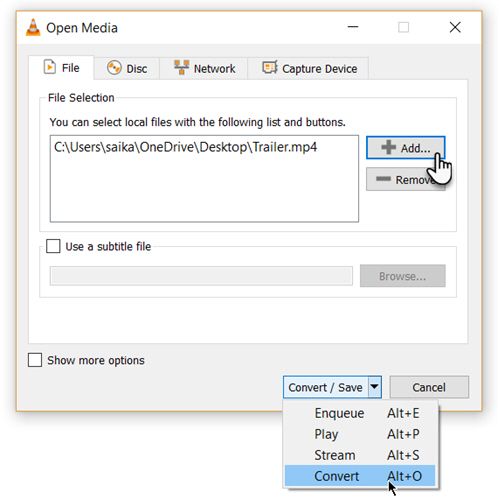
From the toolbar, click on Media > Convert / Save.
In the Open Media dialog box, click on the Add button and choose the media file for conversion. Then, click on the Convert / Save dropdown > Convert.
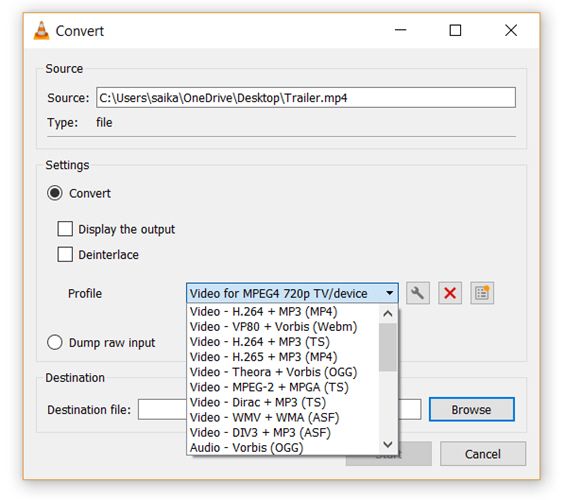
Open the dropdown menu for Profile and select the
file format that you would like to convert your file to. You can also
click on the gear icon next to it and edit the chosen profile.
Click on Browse and select a location to save the converted file. Then, click on Start to begin the conversion and monitor its progress in the bar below.
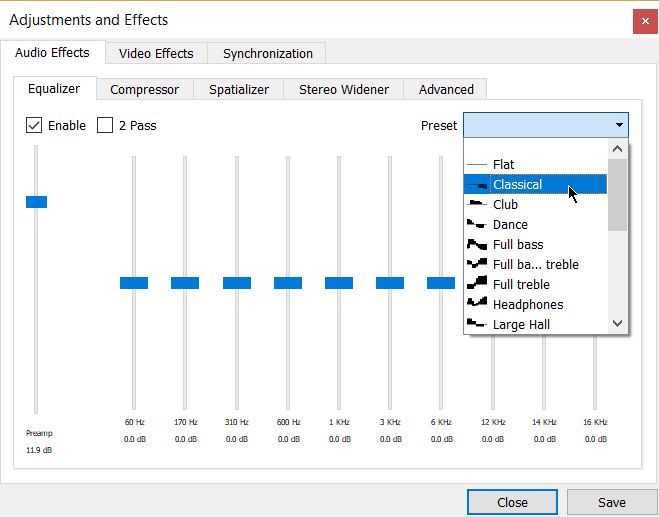
3. VLC as a Graphic Equalizer for Your Music
You
may be using VLC as a video player only, but VLC is a cross-platform
standalone media player too and that brings full audio effects with
playlist support. VLC not only displays cover art but also has a pretty
good graphic equalizer tucked away inside it.
Display it with the shortcut keystrokes Ctrl + E (or go to Tools > Effects and Filters > Audio Effects). Adjust the sound quality with the available presets, or fine-tune it with the Equalizer, Compressor, and Spatializer tabs.
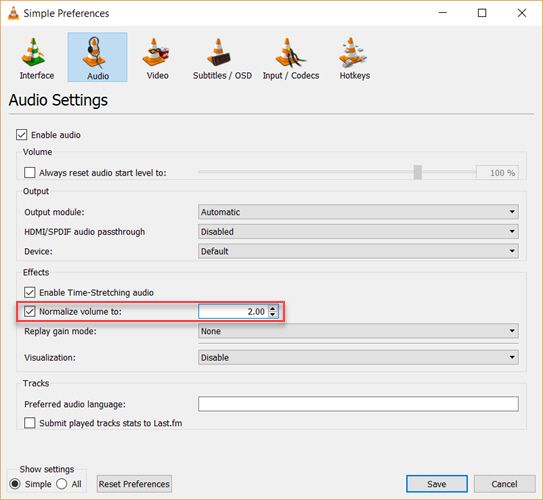
4. Activate Audio Normalization to Protect Your Ears
The
general audio settings for the VideoLan Player are located under
Preferences. One of the key features called Audio Normalization helps to
optimize the volume of any media by a fixed amount and improve the
sound quality.
Go to Tools > Preferences > Audio > Enable Normalize volume to.
The value you set here will help to adjust the decibel levels of
dialog, music, explosions, gunshots etc. in the movies you
watch. Restart VLC after enabling the setting.
In fact, configure this immediately after you download and install the VLC player. It will make your audio sound better.
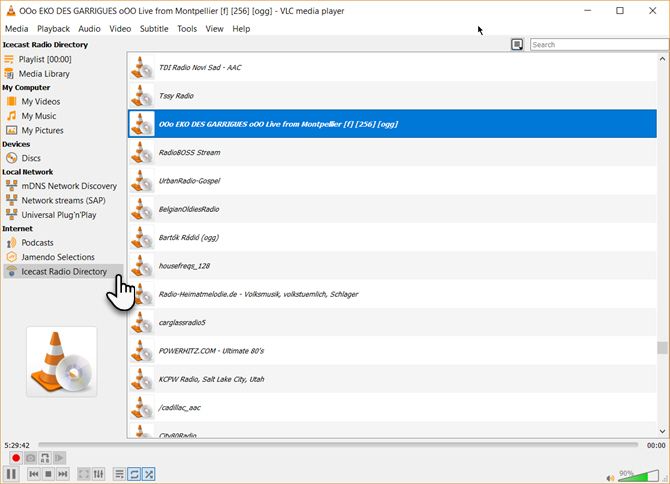
One of VLC’s little used features could definitely be its ability to find and play internet radio. The VLC Player can fill all your audio needs as it can not only stream radio but also play podcasts.
Launch VLC and open the Playlist sidebar.
Under Internet, you can browse through the two radio servers—Jamendo and Icecast—and choose a station of your choice by clicking on it. Also, make sure the Playlist view mode is set to List (Go to View > Playlist View Mode > List).
If your favorite internet radio station is not on the list, use the station’s URL to stream it via VLC. Go to Media > Open Network Stream… Enter the URL and press Play in order to begin listening.
And to play podcasts in VLC:
You can manage your favorite podcasts via the same Playlist interface.
Go to Playlist and under the Internet section, select Podcasts.
As soon your cursor is over the Podcasts section, click the plus sign.
Copy and paste the RSS feed URL of the podcast you wish to listen and click on OK. The podcast will be added to the sidebar and you can pick the episode you want to listen to.
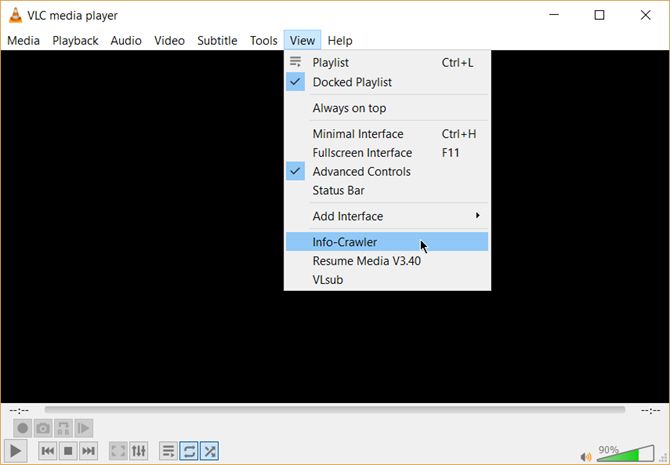
6. Loop a Section of a Video or Audio File
Most media
players can loop an entire video or a soundtrack. With VLC, you have the
added bonus of looping any specific section of a media file.
Open the video or audio file with VLC. Go to View > Advanced Controls.
Now, a few more buttons will be displayed above the normal play and stop controls.
To start the loop from a specific part of the video, move the playhead to the part where you want the loop to start (Point A).
Click the loop button once. The “A” mark on the button will turn
red. To finish the loop, take the video to the endpoint and click on the
same button again. You will see both the A and B points of the button
are red.
Now play the video and the section will loop. Click the loop button once again if you want to switch it off.
This is a handy feature when you want to review a how-to video
or hear an audio file over and over to get it right. I often use this
feature to study Photoshop tutorial videos.
7. Add Features With VLC Add-Ons and Extensions
For everyday use, VLC’s default package of features may be enough. But if you are looking for added functionality then there’s an entire catalog of add-ons
you can install alongside. Remember, VLC has a huge open-source
community behind it and they have helped create extensions, skins,
playlist parsers, and other assorted tools.
These extensions will
help you add more “secret” features to the player like tools which will
help you search for subtitles from the player itself. Extensions may
also work in macOS and Linux, so do doublecheck the instructions on the
add-on’s page.
Visit the VLC add-ons page and browse through the two views—Top or Latest.
Click the Download button on the add-ons page and download the ZIP file. Extract the file. (VLC add-ons have the LUA extension.)
On Windows, place the .lua files in this Windows directory:
8:31 AMHigh Tech House Calls, Expert Computer Consulting
Earbud
makers have been busy doing away with wires—a good thing whether or not
your phone still has a headset jack. You no longer have to deal with
cords if you don't want to. True wireless earbuds connect to one another
and your audio source via Bluetooth.
No wires mean no inline
microphones or controls, but truly wireless earbuds sound just as good
as traditional Bluetooth counterparts (for better or worse). They also
boast all of the features we've come to expect from earbuds designed to
work with your smartphone, tablet, or PC.
Since Apple’s AirPods
became a runaway hit, an endless stream of companies have rolled
out their own true wireless earbuds and earphones. As you might expect,
not all of them are worth your time or money—so we've got your back with
buying suggestions to meet a wide variety of needs.
Latest update (8/23/2018): We've added a review of the Crazybaby Air Nano to our overall list. Check out our full review here.
The $169.99 Jabra Elite 65t are priced close to our former Best True Wireless Earbud pick, the Jaybird Run,
and only cost a few bucks more than a pair of AirPods. With their
customizable sound, comfortable fit, light weight and excellent battery
life, we feel the Elite 65t are better than either of these truly
wireless earbud options, and worthy of top honors. (Read our review here.)
There
are very few downsides to owning the Elite 65t. Sure, they feel a
little cheap to the touch, but their build quality is actually great.
And while their bass response may not please all music lovers (even
after making EQ adjustments via Jabra’s free Sound+ app), they still
sound great. When looking at the 65t as a total package, you’d be
hard-pressed to find a better set of truly wireless earbuds for the
money.
Best low-cost true wireless earbuds
To be honest, this category doesn't really exist. Truly wireless earbuds are a luxury item and their price reflects this.
However, given the current field of true wireless earbuds, Apple AirPods do the best at offering good value for a (relatively) reasonable price. (Read our review here.)
A pair costs $20 less than the Jaybird Run, and if you have ears that
will work with the one-size-fits-all design, they can sound great under
the right circumstance. And for iPhone and iPad users, you can't find an
better set of earbuds for ease of pairing.
You should know,
however, AirPods aren’t as easy to use as other true wireless earbuds
for controlling your music. It also has terrible passive sound
cancelation, so you’ll hear a lot of the world around you when using it.
Best true wireless earbuds for working out
Bose’s $250 SoundSport Free is water- and sweat-resistant, can go five hours between charging, and is insanely comfortable to wear. (Read our review here.)
What’s more, the design of these earbuds' silicon tips makes them
almost impossible to shake out of your head—but you still keep a good
deal of situational awareness, making the SoundSport Free a good choice
for joggers or cyclists.
The only knock against the SoundSport
Free is its size: The earbuds are considerably larger than its
competition, making them a less than fashionable choice for style
conscious individuals.
Best true wireless headphones for audiophiles
B&O’s Beoplay E8 true wireless earbuds cost $300, but if high-fidelity sound quality is important to you, they're worth every penny. (Our review here.)
Though
you can't expect a set of earbuds to match the sound you'd find in a
wired set of cans, the E8s provided the most pleasurable listening
experience out of all the true wireless earbuds we've tested so far. As
icing on the cake, you can further modify your audio experience using
the free Beoplay app.
The Beoplay B8 is incredibly easy to use,
too—touch panels make changing the volume of what you’re listening to or
tinkering with audio tracks no big deal.
What to look for
Sound
Sounding
good is a set of earbuds' raison d’être. When you invest in a new pair
of true wireless earbuds, it’s fair to assume that they should make
everything sound its best.
We start each sound test by listening
to a playlist of five songs that spans different genres and features
strong, layered performances: that we know very very well: Feel Right (Mark Ronson, featuring Mystikal); Up & Rise (Hazmat Modine); Shake Your Hips (The Legendary Shack Shakers); Déjà Loin (Yann Tiersen); and I’m a Little Mixed up (Diana Krall).
We
play this set of songs for an hour, paying attention to low, mid, and
high-frequency performance, and whether they provide a broad, rich
soundstage. We also listen for any sign of distortion at low or high
volumes. Afterward, we use the earbuds in our daily lives for a minimum
of three hours a day over the course of a week, making sure to take in
at least one TV show or movie. (This allows us to verify that the audio
keeps in sync with the video we see.) Finally, we pay attention to
incoming and outgoing call quality, to make sure that you won't get
annoyed during a chat.
Fit
A set of earbuds or earphones
may sound amazing, but no one will know it if they don’t fit well—a good
seal keeps environmental noise out and your audio channeled into your
ears, where it belongs. Because no two pairs of ears are identical, we
note if a set of true wireless earbuds comes with different ear pieces.
We
also pay attention to the tightness of a seal, as a snug fit provides
passive noise cancellation (aka the hush that falls over your life when
you jam a pair of earphones or earplugs into your skull). If you're in a
noisy airport, tuning out your environment is a plus—but it's less than
ideal if you're out running, for safety reasons. We take this into
consideration when evaluating earbuds designed for working out.
Comfort
They
might fit and sound great, but if your new true wireless cans hurt your
ears, you won’t wear them. We wear the earbuds for at least three hours
a day for a week and note if a particular set becomes uncomfortable
after a few hours of use.
Connectivity
True wireless
headphones use Bluetooth to connect to each other and to your audio
device. We pay attention to connectivity issues stemming from signal
interruptions between the earbuds and their audio source, and also note
if audio drops from the left or right side during playback.
Features
At
minimum, a good pair of true wireless earbuds should be able to accept
calls as well as play and pause music. If a pair offers additional
features beyond the basics, those functions should work well and be easy
to use.
Price
It almost goes without saying that if you
pay a premium for earbuds, they should sound spectacular. If a pair of
headphones sound great and don’t cost much? Even better!
All of our true wireless earbud reviews
Click
on the links below to read the full reviews of all the products we
tested. We'll continue to update this article as we put more true
wireless earbuds and earphones through their paces, so keep checking for
our latest opinions.
7:59 AMHigh Tech House Calls, Expert Computer Consulting
You have your laptop open and ready. You need to answer some emails
or complete a work assignment, but there’s no Wi-Fi in sight. This could
end up being a frustrating situation, but there’s a simple workaround
that can get you online in a jiffy.
All you need is a device,
either Apple or Android, with a cellular connection. The connections are
slightly different depending on the device you use.
The
first thing you have to do is set up your personal hotspot. Apple and
Android mobile devices can share their data connections just like a
Wi-Fi hotspot. That means you can get your laptop online and enjoy
working with a full keyboard rather than tapping with your thumbs. Your
personal hotspot feature can also comes in handy when you don’t want to
use your computer on an unknown or unsecured Wi-Fi network. On Apple:
Go to Settings > Cellular.
Tap Personal Hotspot, then tap the slider to turn it on.
On Android:
Go to Settings.
Tap Network & Internet > Hotspot & tethering.
Tap Wi-Fi hotspot, then turn it on.
There
are three different ways you can hook your computer up to your internet
connection, a process known as “tethering.” Let’s take a look at all
three possibilities: Wi-Fi, Bluetooth, or USB, and how to choose which
method to use.
Wi-Fi
For most people, Wi-Fi tethering is the easy way to go. It’s simple and offers a fast connection. In Apple:
Verify
the name of your phone or tablet and your Wi-Fi password. Go ahead and
leave this screen open while you’re connecting your computer.
On your laptop, open your Wi-Fi settings and look for your iPhone’s name on the list of available networks. Select it.
Enter your hotspot password.
As far as your computer is concerned, this works just like a normal Wi-Fi hotspot. In Android:
Go to Settings on your other device.
Open the device's list of Wi-Fi options.
Pick the phone's hotspot name, enter the password and then click Connect.
While
Wi-Fi tethering works very well and should be your first choice, you
might consider Bluetooth instead if you’re concerned about battery
drain. The trade-off is that you may experience a slower connection, so
keep this option in reserve for those times when your battery is running
down and there’s no outlet available. In Apple:
Go to Settings > Bluetooth and stay on the screen to make sure your iPhone or iPad is discoverable.
Go to your computer and follow the directions to set up a Bluetooth network connection. It should be ready to go then.
Personal
Hotspot supports Bluetooth connections with Mac, PC and other
third-party devices. To connect another iOS device, use Wi-Fi. In Android:
Pair your phone with the other device.
Set up the device to connect by Bluetooth with the instructions that came with it.
Open Settings, then tap Network & internet, and then Hotspot & tethering.
Tap Bluetooth tethering, and you're set.
USB
In Apple:
Plug
your iPhone or iPad USB cable directly into your computer. You will
need to have the most recent version of iTunes installed on your laptop.
If you see an alert that says "Trust This Computer?," tap Trust. You're good to go.
In Android:
Connect your phone to the other device with a USB cable. A notification that says "Connected as a ... " will pop up at the top.
Open your device's Settings.
Tap Network & internet, then Hotspot & tethering.
Turn on USB tethering.
While
simply hooking up a cable can be convenient, there can also be a speed
trade-off with using USB tethering. You may prefer to stick with a Wi-Fi
connection unless you’re having a technical issue that prevents you
from using Wi-Fi.
Some carriers will throttle mobile hotspot data
after a certain amount of usage. Check your contract or talk to your
carrier if you’re unsure of what your plan allows. With occasional light
use, you probably won’t have to worry, but you may run into issues if
you’re using it to stream lots of high-quality video, or for other
data-intensive purposes.
Think of tethering as your internet pinch
hitter. It’s there when you need to call on it, but it might not make
sense as an everyday way to get your computer online.
3:52 PMHigh Tech House Calls, Expert Computer Consulting
Microsoft’s (MSFT) Surface line of products has been a continuous bright spot for the company ever since it transitioned from Windows 8 to Windows 10. The Surface 3 and Surface Pro
were fantastic tablet-laptop hybrids, and the Surface Laptop is a sleek
notebook. Meanwhile, the Surface Book is an impressive powerhouse of a
PC.
But
Microsoft’s offerings weren’t inexpensive. Until now, that is. Meet the
Surface Go, a $399, 10-inch version of the Surface tablet that’s meant
to be your, well, on-the-go machine. Commuting to work? Taking a flight?
Heading to class? This is the hybrid Microsoft believes can take on
Apple’s (AAPL)iPad Pro and Google’s (GOOG,GOOGL) various Chromebooks.
And it does so admirably. The Surface Go
can run a full desktop version of Windows 10 and offers the kind of fit
and finish you’d expect from a Surface device. But the Surface Go isn’t
perfect. Its keyboard is a bit too cramped for my liking, and if you
want to do anything that requires serious performance, you’re out of
luck.
View photos
Microsoft’s Surface Go is a pint-sized computer for working on the, well, go. But don’t expect it to replace your full-size PC.
The mini Surface
Microsoft’s
Surface division makes some of the best products ever to sport the
company’s logo. The brand’s trademark austere design, Alcantara
soft-touch keyboards and, of course, the built-in kickstand for its
2-in-1 laptop-tablet hybrids, make for some attractive and useful
devices. And all of that is present in the Surface Go.
It’s
as if Microsoft’s head of hardware Panos Panay somehow got a hold of
the shrink ray from “Honey I Shrunk the Kids” and decided to skip the
kids part and just shrink the 12.3-inch Surface Pro.
View photos
The Surface Go is a a much smaller version of the standard Surface Pro.
There
are a handful of notable differences. The edges of the Go are just a
touch more rounded than those found on the Surface Pro. There’s also,
mercifully, a USB C port. The Surface Pro still comes with a full-size
USB port, which, at this point, is blasphemous. Especially, when you’re
buying a device that starts at $799.
Outside
of that, the Surface Go sports the same vibrant PixelSense display
found on the Surface Pro, meaning you’ll get brilliant colors and sharp
features out off the 10-inch panel. In other words, downsizing the
Surface doesn’t mean you’re getting a subpar visual experience.
Smaller isn’t always better
But
using Windows in desktop mode on a 10-inch tablet can also be a pain.
For example, my father, who doesn’t have the best vision, would have
trouble viewing text on the slate. It’s not something most people will
run into, but it’s definitely worth taking into account.
In
fact, I found the slate to be the perfect size for watching movies on
the bus and in the car. It’s also just about the right size to prop up
on my belly while catching up on “The Bachelorette” in bed.
My
one complaint with the Surface Go’s size is its keyboard. Like the
Surface Pro, the Go doesn’t come with a keyboard. Instead, you have to
shell out an extra $99 on a basic Surface Type Cover or $129 for a Surface Go Signature Type Cover complete with soft-touch Alcantara. And you’re going to need that keyboard to use many of the Microsoft Store apps on the Surface Go.
View photos
The Alcantra-covered Surface Type Cover will cost you an extra $129.
As
far as usability, though, the Surface Go’s keyboard is on a par with
most Surface keyboards. There’s a good amount of key travel and the
angle at which it sits when magnetically connected to the Surface is
pleasant. But there’s a learning curve when it comes to typing on this
pint-size puppy.
When
I first began using the Surface Go’s keyboard, I regularly found myself
mistyping words or pressing the caps lock button when I wanted to press
the “A” key. Over time, though, I became more comfortable with the
keyboard and fell right back into my normal touch-typing habit. My
advice is if you have larger hands, or sausage-like fingers like me,
you’ll want to try the Surface Go Type Cover before making your
purchase.
Portable, not powerful
With
only so much room inside to pack a processor, storage and RAM,
Microsoft couldn’t pack the latest and greatest processor into the
Surface Go. Instead, the tech giant equipped the small slate with an
Intel Pentium Gold processor. That’s not going to give you the kind of
performance you’d expect out of a Core i5, or even Core i3 processor.
That’s
not to say that the Go crawls. On the contrary, I was able to have
multiple tabs open in Microsoft’s Edge browser, while running Spotify,
streaming Netflix and chatting on Slack without running into a problem.
That said, don’t expect to play any games on this thing outside of basic
tablet games.
But
the Surface Go comes loaded with Microsoft’s Windows 10 in S mode,
which limits you to only downloading apps from the company’s own
Microsoft app store. That means you’ll end up using the tech giant’s
Edge web browser rather than Google’s Chrome. You’ll get the best
performance out of the Go when it’s in S mode, since the hybrid was
specifically designed to work with it. But if you want to branch out to
different programs, you can always switch to full Windows mode.
View photos
The Surface Go is a solid machine that’s great for productivity while you travel.
The
process takes less than five minutes and doesn’t even require a system
restart. I didn’t even notice the change over, and I was staring at the
Go the whole time.
But
Google’s Chrome is a resource hog. When I went back to browsing with
several tabs open, while streaming Spotify and Netflix and chatting on
Slack, I began to notice performance issues with the Go. Specifically,
websites, especially image-heavy sites like Polygon.com and our own
Yahoofinance.com began to load more slowly.
It’s
important to note that my test machine came with 8GB of RAM, which is
an upgrade from the base model of the Go which starts at $399. That
upgrade will cost you, though, as the 8GB model starts at $549, plus
thee extra $99 for the base keyboard.
Still,
the fact that the Go gives you the ability to use full desktop apps
makes it more useful than any Chromebook or Apple’s iPad Pro.
Should you get it?
I
rank the Surface Go above the iPad Pro and any of Google’s Chromebooks
when it comes to overall productivity. The iPad Pro’s keyboard isn’t
nearly as good as the Surface Go’s, despite its size, and Chromebooks
can’t run full desktop apps. As a straight-up tablet, the Pro wins, but
that’s not why you buy a Pro to begin with.
I
wouldn’t recommend that you purchase the Surface Go as your primary
device, though. This is a machine meant for use as a secondary PC you
can quickly get work done on and then go back to watching Hulu — which
is exactly what I’m going to do now.
Disclosure: The writer’s spouse works for a public-relations agency that contracts with Microsoft’s Xbox division.
For your convenience Venmo and Zelle are also accepted for payment.
Fed up with Windows based computers?
Think an Apple Computer might be what the doctor ordered?
We can help you with that decision for free! Give us a call so we can discuss your computing needs!
Gift Certificates
What will you use your certificate for?
Making the move to an Apple laptop? My business has been running on an Apple laptop for 6 years.
You bought an iPhone. Now what? We have been working on iPhone problems since they came out and we can help.
Summer will be here before you know it. You want to surf on the internet on your wireless network from your pool. We are wireless network experts in both design and deployment.
Or you can use this gift card for any help needed (including training) for the computers in your home or small business.
The perfect present for any occasion:
Available in one hour increments.
No expiration date.
Can be used for service calls or training.
Giving a technology gift that requires setup or training? Why not add a gift certificate?