Life has changed there is no doubt and we wanted to reach out to see how you are doing.
As we go through this interesting time, we are trying to look at this as an opportunity to focus on our family and on friends like you. Let us use this extra time to catch up and talk more. Let us cook food that is not fast, but interesting and satisfying. Let us learn to enjoy a time to try new things. Let us find ways to enjoy time at home!
Computer Security
If my client base is any experience, anyone can be a victim of a Ransomware, Malware or Virus attack.
What can you do about it?
I conduct audits of your entire computer infrastructure and apply best practice solutions to plug the security holes on your computers, Smartphones and networks.
Now offering consultations to give you the best protection possible:
3:22 PMHigh Tech House Calls, Expert Computer Consulting
The iPhone's new Silence Unknown Callers feature is a great way to avoid annoying robo calls without having to keep your iPhone muted. Before iOS 13, iPhone users had to rely on third-party apps of varying effectiveness to block spam calls. The new feature is enabled by default, but if it's been disabled, you'll need to head to the Phone menu inside the Settings app to enable it. This is also where you will turn the feature off if you find you're missing important calls and don't want calls from unknown numbers to be silenced. Let's get started with how to silence unrecognized phone numbers on your iPhone.
3:17 PMHigh Tech House Calls, Expert Computer Consulting
iCloud acts as a repository of some data and the conduit through which other passes. For certain categories, it also retains a backup of items you delete or update. Here’s how to restore data when you’re using iCloud sync or iCloud Drive across these services.
iCloud Photos
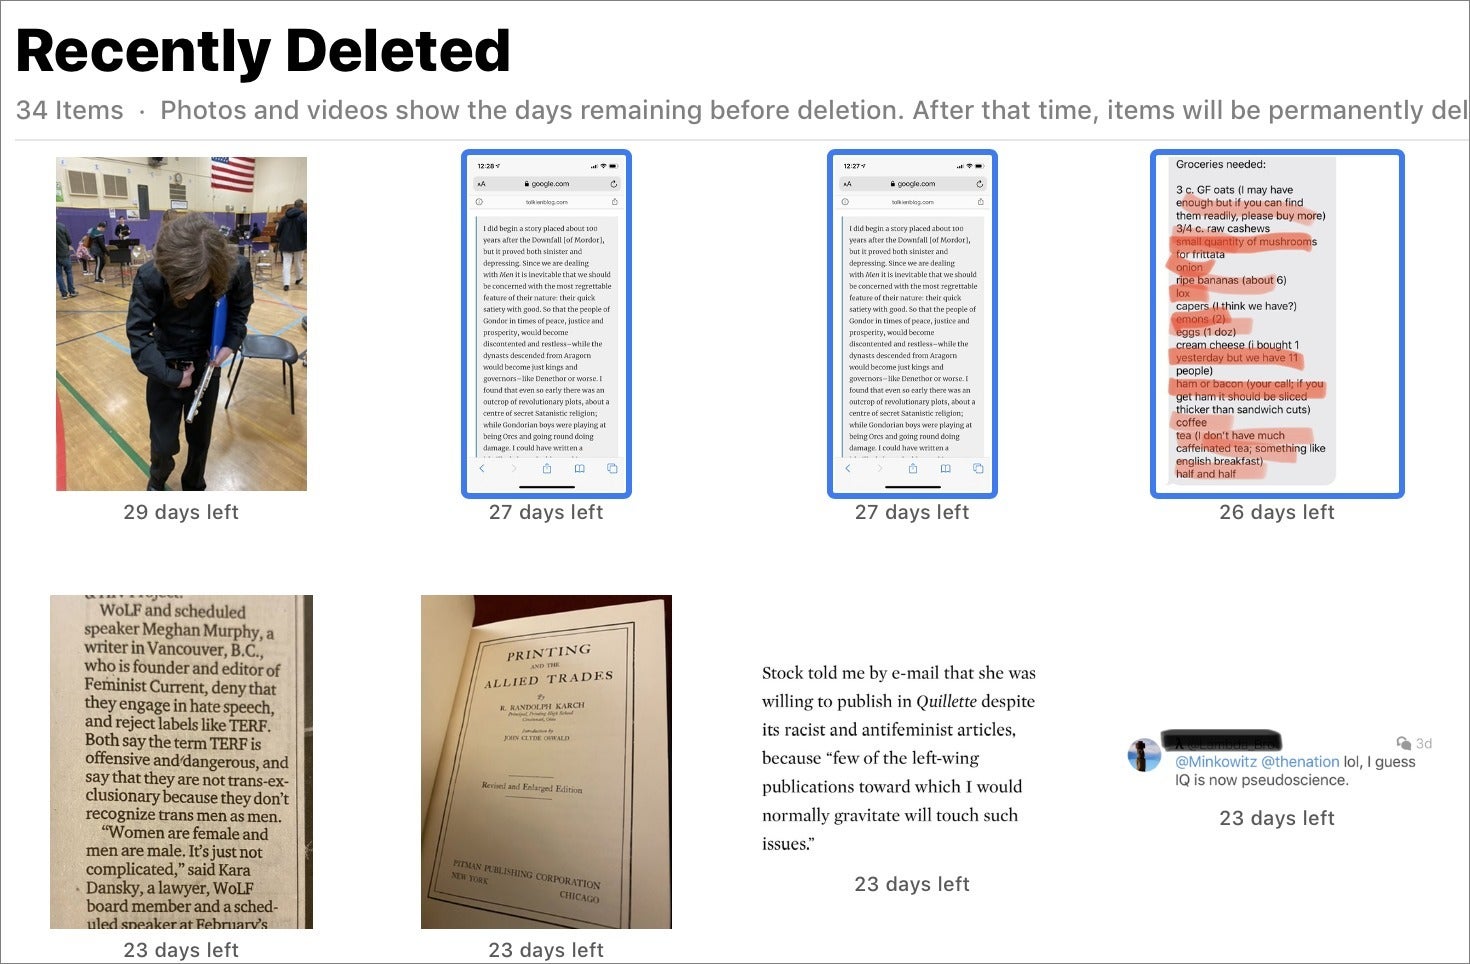
Delete photos and videos in Photos on any device and you’re prompted that the media will be deleted from all your devices linked to the account. However, the image or movie isn’t immediately tossed. Rather, it’s put in the Recently Deleted album, which is available from all your linked devices as well. (If you don’t use iCloud Photos, the album appears only on the device you deleted the image from.)
IDG
Photos retains deleted images and videos for up to 30 days in a conveniently accessible album.
A label overlaying or beneath each image or video lets you know how many days are left before it’s deleted permanently. (Depending on your region of the world and other factors, Photos may also note for data-retention disclosure purposes that images will not be permanently deleted for some period of time after they’re removed from your account.)
In Photos in iOS, iPadOS, macOS, or at iCloud.com, select the Recently Deleted album. You can then select one or more pieces of media and click or tap Recover. The media is now placed back in your main library.
iCloud Drive
iCloud Drive has two places from which you can restore recently deleted files.
For the first method, log into your account at icloud.com. Click Account Settings, and then, under the Advanced label in the lower-left corner of the screen, click Restore Files. It brings up a sort of pop-up dialog.
The Restore Files tab shows files that you can select and click Restore to retrieve to their original location.
3:13 PMHigh Tech House Calls, Expert Computer Consulting
The start of the new year is as great a time as any to take a quick tour through your iPhone’s settings and make sure you’ve customized its Emergency SOS feature to your liking. Heck, you should really take a few minutes and memorize—really memorize—how this feature works. I hope you don’t ever need it in 2020, but you’ll be glad you took some time to learn how it works if you ever do.
Make sure you’re running the latest version of iOS
First, Emergency SOS only works if you’re running iOS 11 or later. While most of you are probably running iOS 12 or iOS 13, those clinging to older iPhones might want to reconsider their “I don’t want to install a new version of iOS” mindset. At least, that’s something I frequently encounter when friends have devices that are a number of years old. And since iOS 11 works on devices as far back as the 2013-era iPhone 5S, odds are good that your device can at least use this version of Apple’s operating system.
Better still, try upgrading to iOS 12 if you can, which will ensure that your location is also sent to your local 911 center if, or when, you use Emergency SOS.
Learn the basics of Emergency SOS
If you have an iPhone 8 (or later), you activate Emergency SOS by holding your iPhone’s side button and one of its volume buttons. You can then call emergency services by either flicking the slider that appears, or you can keep holding down those two buttons to trigger a countdown. When that countdown hits zero, your device will automatically dial emergency services.
If you have an older iPhone (iPhone 7 or earlier), you have totap your iPhone’s top or side button five timessomewhat rapidly, and then drag the slider to dial emergency services. You don’t get a countdown feature, alas.
Tweak Emergency SOS’ settings to adjust how you summon help
Pull up your iPhone’s Settings app, scroll down a bit, and then tap on “Emergency SOS.” If you’re using an iPhone 8 (or later), you can use the“Call with Side Button”setting to enable a modified version of the aforementioned shortcut, which allows you to tap the side button five times to start the Emergency SOS process. (Holding the side button and one of your device’s volume buttons will work regardless of whether this setting is enabled.)
I also recommend keeping“Auto Call”enabled, which is the countdown that pops up if you continue to hold a side and volume button on an iPhone 8 or later. If you’re worried about triggering this accidentally, or prefer one final, physical check before your device rings 911, you can turn it off.
At the very least, you should make sure you’ve set up an emergency contact on your device (via theHealth > Medical IDsection of your Settings app). Once you’ve finished a call using the Emergency SOS feature, your device will automatically tell your emergency contact your location and continue to update them with your location for a period of time. You can cancel the first text if you didn’t mean to dial emergency services, but I think this feature is an incredibly powerful tool in instances where you need help, and need to tell someone where you are, but don’t want to make it obvious.
While you’re there, take some time to update your Medical ID, too. By inputting your blood type, at minimum, in addition to any medical conditions or allergies you have, you’ll be giving first responders valuable information (which they can easily access via your iPhone’s Emergency SOS screen). While you have the ability to remove this information from being shown on your locked device, I advise against it, given its usefulness in an emergency situation.
3:10 PMHigh Tech House Calls, Expert Computer Consulting
Customize a display picture in your Messages app profile and you’ll be able to share the face you choose with anyone you message. As of iOS 13, you can edit your profile picture and name; simply open messages, tap the three dots at the top of the screen, tap Edit Name and Photo, and swipe left or right to select an option. You can use a memoji or animoji, your initials with a custom color, or any picture on your iPhone. Once it’s set, you can choose whether to make your profile name and image visible to everyone in your contacts list, or only to select contacts. Let’s get started.
If you’ve never set up a Messages profile before, it’s super easy! Here’s how:
Open the Messages app.
Tap the three dots in the top right of the screen (the "more options" icon).
Enjoying Your Tip of the Day?
If you'd like to learn more about iPhone Life's premium paid subscription, click here
Tap Edit Name and Photo in the pop-up.
If you’re choosing a picture for the first time in iOS 13, then you’ll see the following screens (if you’ve set up your photo and name but want to change it, skip down to editing your Messages profile).
Swipe left or right to choose an option. The last on the right is More Options, and will let you select a photograph from your Photos or iCloud.
Tap your name to type in a Display Name.
Tap Continue when finished.
You'll be asked if you want to use the same photo and name in your Apple ID, and the My Card in contacts (your entry for yourself in your Contacts app roledex). Personally, I prefer all those different places to show the same name, since it keeps things simple. But they serve different functions, so you could set them to different things. You might set your messages display name to something quirky like Pineapple Pizza Master and leave your Apple ID and My Card with your actual name. It's up to you!
Last, you'll be asked if you want to share this profile with your Messages contacts automatically, or if you want to be asked every time. I chose to be asked every time, but it's up to you. Even if you set it to automatic, it still only shares with people in your contacts list, so text messages from unknown numbers won't get your name and picture until you add them as a contact.
Select Done to finish.
You've set up your Messages profile! Now you can present your personal brand with style.
If you want to Edit your Messages profile then as you did the first time, open the Messages app and click the More Options icon, which is three dots in the top right corner of the screen then select Edit Name and Photo.
This time you'll see your whole profile on one screen, including all the decisions you made during initial setup. Tap your name to type in a new one or edit it. To change your photo, tap Edit.
Choose an animoji from the list, tap the camera icon under Suggestions to take a new photo, or tap All Photos on the right to select from images already stored in your iPhone.
Once you've made your changes, tap Done to finish.
For your convenience Venmo and Zelle are also accepted for payment.
Fed up with Windows based computers?
Think an Apple Computer might be what the doctor ordered?
We can help you with that decision for free! Give us a call so we can discuss your computing needs!
Gift Certificates
What will you use your certificate for?
Making the move to an Apple laptop? My business has been running on an Apple laptop for 6 years.
You bought an iPhone. Now what? We have been working on iPhone problems since they came out and we can help.
Summer will be here before you know it. You want to surf on the internet on your wireless network from your pool. We are wireless network experts in both design and deployment.
Or you can use this gift card for any help needed (including training) for the computers in your home or small business.
The perfect present for any occasion:
Available in one hour increments.
No expiration date.
Can be used for service calls or training.
Giving a technology gift that requires setup or training? Why not add a gift certificate?