


In one obvious example of these new connections, some users have been startled when their Mac computer suddenly rings with an incoming phone call. More than once a friend has answered our phone calls with, "I didn't know it could do that," the first time her iPhone handed off a call to her Mac computer.
But Continuity does a lot more than just send phone calls to your Mac. In today's Apple Tip, we'll look at seven top tricks to using Apple's new operating systems both together and separately. From having all of your photos available across all of you gadgets, or starting an app task on one gadget and finishing on another, there are a lot of cool things you can do with these new capabilities.
Note: You need to have OS X Yosemite or El Capitan on your Mac and iOS 8 or 9 on your mobile gadget to make these work.
1. Handoff
Apple's Handoff feature allows you to seamlessly work on the same app and the same task on different Apple gear. For instance, if you started writing an email on your iPhone, you may now finish and send it from your iPad or Mac, provided they are within Bluetooth range of each other. Open a Safari webpage on one gadget and there it is available on your other devices.Handoff works with your native Apple apps like Calendar, Contacts, Mail, Maps, Messages, Notes, Reminders, Safari, Pages, Numbers and Keynote. Some third-party apps including New York Times and others are now or soon will be using Handoff.
To use
Handoff, your Mac must have OS X Yosemite or later, and your iOS devices
must have iOS 8 or 9. All of your gadgets must have Bluetooth turned on
and be signed in to iCloud using the same Apple ID.
To turn on Handoff:
- On your Mac: Choose Apple menu>>System Preferences, click General, then select “Allow Handoff between this Mac and your iCloud devices.” (If you don’t see the option below “Recent items,” your Mac doesn’t support Handoff.)
- On your iPad, iPhone, or iPod touch: Go to Settings>>General>>Handoff & Suggested Apps, then tap to turn on Handoff. (If you don’t see the option, your iOS device doesn’t support Handoff.)
To open up a Handoff on an iPhone or iPad, look for the icon of the app you're working in at the lower-left corner of the lock screen. Swipe up and you'll see your project in progress. If you aren't on the lock screen, double-press the Home button to bring up the multitasking view, and tap the banner at the bottom of the screen.
2. SMS text messages on your Mac
Apple's
iMessage has long allowed you to message other iPhone users from the
iMessage app on your Mac. Now, you can send and receive SMS text
messages right from your Mac. So when friends text you, regardless of
what brand phone they are using, you can now read and reply from your
Mac as well as your iPhone.
All
the messages that appear on your iPhone now show up on your Mac, too,
so your conversation is up to date on all your devices. You can also
start an SMS or iMessage conversation on your Mac just by clicking a
phone number in Safari, Contacts, Calendar, or Spotlight. Group chats
are now enabled, as well. Click Details to name a group chat, add or remove someone, and see friends who’ve shared their location on a map.
3. Make your pictures pop with Photos' powerful new edit tools
Earlier
this year, Apple brought its free Photos software to all of its iOS and
OS X devices. It turned out to be a very good thing. If you've ever had
to email photos from your iPhone to your Mac when a sync cord wasn't
handy, having all of your iPhone pictures just instantly appear on your
Mac is pretty incredible.
Also included in the new
Photos are powerful new editing tools to fine tune your pictures. Apple
Photos edit tools are not on the level of the professional standard,
Adobe Photoshop, but it does pack an all-new punch. You can make precise
edits by enabling the histogram, adjusting levels, adding definition,
and more.

Bonus Tip:
Want to email more than just a few of your favorite photos? Follow
along to see how you can now send up to 5GB of photos (or anything else)
in just one email right from your Apple Mail app.
4. Answer your iPhone on your Mac or iPad
As
we mentioned above, some users are surprised when their iPhone calls
ring through on their Mac. This also works on Wi-Fi-only (non-cellular)
iPads. However, to use this feature, each of your Apple gadgets must be
on the same Wi-Fi network and signed in to the same iCloud account.

Phone
calls on your iPhone will appear in the upper right corner of your Mac
offering you the option to accept or decline. To make a phone call on
your Mac or iPad tap or click a phone number in Contacts, Calendar, or
Safari.
Bonus tip: Want to change your Mac’s default call ringtone? To set a different ringtone, choose FaceTime>Preferences, then click the Ringtone pop-up menu.
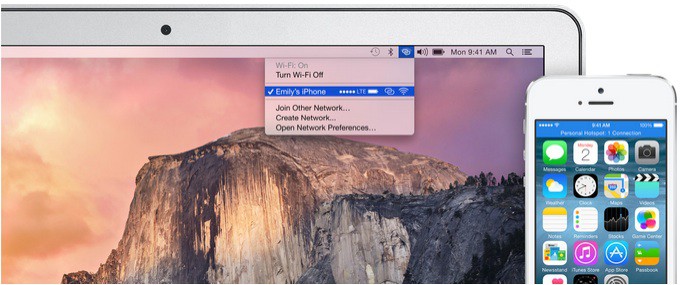
5. No Wi-Fi? No problem!
You can use Personal Hotspot on your iPhone to provide Internet access to your iPad or Mac. You'll need to sign in to iCloud using the same Apple ID as your iPhone. Also, your cell provider needs to support Personal Hotspot, but Apple's website lists 46 U.S. providers, including the majors, that support Apple's Hotspot.To get Internet access from your iPhone:
- On your iPad, go to Settings>>Wi-Fi on your other iOS device and select your iPhone or other iPad that has a cellular connection.
- On your Mac, go to the Wi-Fi menu at the top of your screen and select your iPhone or iPad that has a cellular connection.
6. Mail gets some great new features
Once you shoot your amazing vacation, graduation, birthday or other photos, chances are you'll want to share them with family or friends. But there's just one problem. As photo quality goes up, so does the file size of the photo.
A full resolution iPhone 6 photo can easily be as big as 3 megabytes or more. Why does that matter? Many email systems will not accept email attachments over 10MB, meaning you can only send about 3 iPhone photos per message. Often your only options are to be very picky about which few photos you share, or bombard your relatives with lots of separate email messages, carrying only about three pictures each. And forget about emailing a video! Depending on the length, videos can span hundreds of megabytes, far too big to ever email. That is, until now.
Apple Mail now offers a way to send large attachments. Or maybe we should say huge, enormous, gargantuan attachments. You may now send attachments up to 5 gigabytes in size. How much is 5GB? How about thousands of photos, or at least 3 to 4 full HD movies! It is probably safe to say that 5GB email limit will cover just about anything you might need to send.
Apple calls this new feature Mail Drop and it is built right into Apple mail. Mail Drop automatically uploads the attachments to iCloud. If recipients use Mail in OS X Yosemite or later, the attachments are automatically downloaded and shown in the message. If recipients use other email apps, they will see a link to download the attachments from iCloud. Your attachments stay in iCloud for 30 days and they do not count against your iCloud storage limit.

Bonus tip: When scrolling through a long list of Mail messages, skip the mouse and use your space bar instead. Use Shift-Space bar to scroll up through email messages or Space bar to scroll down.


7. Share your screen or see someone else's Mac screen
When you're trying to help a family member fix their computer, seeing the other person's screen or showing them how to do something on your screen cuts through 90% of the frustration of trying to explain something just verbally by phone.Sharing your screen or requesting to see another user's screen is a cinch in Yosemite and El Capitan. The first step is to ensure that both you and the person you’re trying to share with are using Apple’s Messages app. Open your contact’s message window and select the Details button on the top right hand corner.
The Details button is circled in red below.


