The limited path back
Because it comes as a surprise to a lot of people, it’s important to know the following from the get-go: Once you update your device to iOS 8 there’s very little chance that you’ll be able to revert to a previous version. Apple stops “signing” (authorizing) older versions of iOS just days after releasing a new one. Reverting during this brief window is possible (and we'll explain how at the end of this story). But once that window closes, there’s no going back.For many, the jump from iOS 6 to iOS 7 was jarring because of iOS 7’s new look. With regard to design, iOS 8 is more refinement than revolution. So if you’re comfortable with the way iOS 7 looks and operates, you should have little problem with iOS 8’s interface.
That said, as this is a brand-new version, there are likely to be glitches—some third-party apps may not yet be fully compatible with iOS 8, for example. For this reason you may wish to delay upgrading. Keep an eye on stories here and an ear open to friends, family, and colleagues who may have taken the step. When your key apps are updated, and you hear no complaints, it may then be time to upgrade.
Compatible devices
As excited as you may be to upgrade, make sure that the latest operating system will run on your device. Apple says the following are compatible with iOS 8:iPhone: iPhone 4s, iPhone 5, iPhone 5c, iPhone 5s, iPhone 6, iPhone 6 Plus
iPod touch: iPod touch 5th generation
iPad: iPad 2, iPad 3rd generation, iPad 4th generation, iPad Air, iPad mini, iPad mini with Retina display

Preparing your device for the upgrade
Before committing to the upgrade there are steps you should take before doing so. The first is to back up the data on it. You can do this in one of two ways: either by connecting your iOS device to your computer and backing it up to iTunes, or by backing it up to iCloud. In this case, I'd encourage you to choose the first option. If it comes time to restore your data and apps, you’ll find that doing so from iTunes is a lot faster than from iCloud. Let’s start with the steps for backing up to your computer.Back up via your computer
Launch iTunes on your Mac and, if you haven’t enabled Wi-Fi sync, string your device’s syncing cable between it and your iOS device. Select your device in iTunes, choose the Summary tab, and in the Backups area of the resulting window click on Back Up Now. If there are apps on your device that aren’t in your iTunes library, a window will appear asking if you’d like to back them up. The choice is yours, as you can always re-download any you’re missing from the iTunes store. iTunes will now set about backing up any apps on the device that aren’t in your iTunes library as well as other data the device contains.
Back up to iCloud
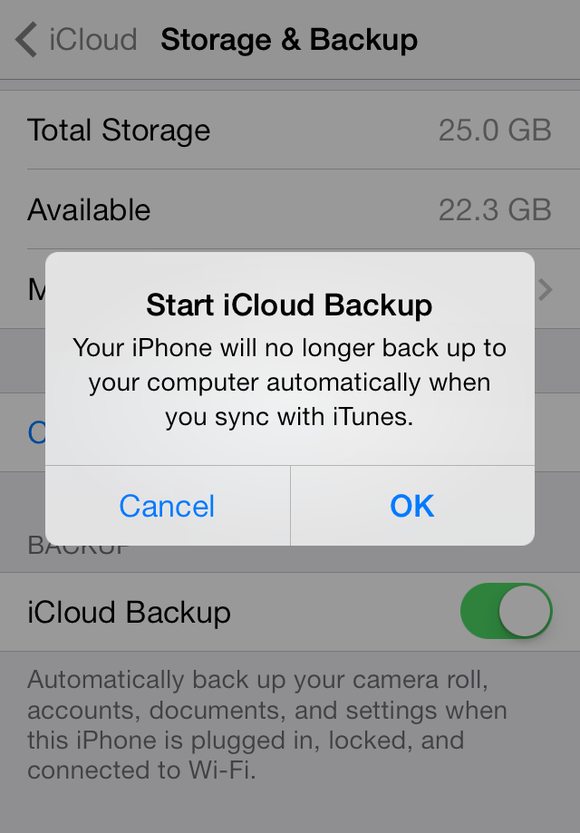
You do this by going to Settings > iCloud > Storage & Backup and in the resulting screen enabling the iCloud Backup option. An alert appears informing you that your data will now be backed up to the cloud. Tap OK to allow that to happen.
Turn off Find My iPhone/iPad/iPod
If you’ve enabled iCloud’s Find My [Device] feature to help you track it should it be lost or stolen, you’ll have to turn it off before you can upgrade to iOS 8. This is a security precaution introduced with iOS 7 to help prevent bad guys from wiping your device after stealing it.To do this, go to Settings > iCloud > Find My [Device]. Switch the toggle to Off and you’ll be prompted for your Apple ID password. (This is not the security code you may have set up for the device but rather the password you use with iCloud and with the various online Apple stores.) Enter that password, tap OK, and the feature will be switched off, allowing you to update your device.
Initiate the upgrade
Just as you can back up your device via iTunes or directly from your device to iCloud, so too can you update your iPhone, iPad, or iPod touch through an iTunes connection or via iCloud. The latter is easier as you can do it over any Wi-Fi network and needn’t be within cable-reach of your computer. Still, we’ll show you how to do it both ways.Install over the air
When a new iOS update becomes available, it isn’t long before your iPhone, iPad, or iPod touch learns about it. Similar to the way the App Store seeks out new versions of apps you own, your device checks in with iCloud to see if a new iOS update exists. When it learns of such an update, a small red badge appears atop the Settings icon on the home screen.To install the update, go to Settings > General > Software Update. On the resulting screen you’ll be told that iOS 8 is available. Tap the Install button to start downloading and installing the update. (If you don’t see the red badge on the Settings app but know that iOS 8 has been released, navigate to Software Update anyway. When you get there, your iPhone, iPad, or iPod touch will query the update server to see if a new version is available. If so, it will offer you the opportunity to install it.)

Install from your computer
If you happen to be within reach of your computer you’re welcome to install iOS 8 via iTunes. To begin, launch iTunes. If you’re not using the Wi-Fi Sync option, string the syncing cable between your computer and your iOS device. iTunes should tell you that a new version of iOS is available for your device and offer to install it for you. If you see such a notice, choose to install the update.If iTunes doesn’t mention the update, click on the Summary tab and then click the Check for Update button. This will cause iTunes to query Apple’s servers about the existence of any new updates. When it’s alerted to one, you’ll be told that the update is available. To install it, click the Update button. iTunes will then start downloading the appropriate version of iOS for your device. (Apple creates different versions of iOS 8 for each device and model. So even though you’ve download one copy for your iPhone 5s, you’ll need to download a different version for your iPad mini.)

Starting over with iTunes
If you’re the kind of person who uses a major iOS update as an excuse to start fresh—with a device that behaves as if it just came out of the box—you have the option to completely wipe the apps and data from your iPhone, iPad, or iPod touch; install iOS 8; and then operate it as if new (or restore it from a backup). One avenue for doing this is via iTunes.To proceed, in iTunes’ Summary tab, instead of clicking Check for Updates, click the Restore button (Restore iPad… or Restore iPhone…, for example). If Find My iPhone/iPad/iPod is switched on you’ll be asked to disable it (as described earlier). If you have purchased media on the device that hasn’t been backed up to iTunes, you’ll be prompted to do that. You'll then be asked if you're really sure that you want to restore the device to its factory settings. If you're certain you have a backup, go right ahead.

iTunes will display a series of messages, telling you it’s waiting for your device to get ready, verifying that the device can work with that version of iOS, and then telling you that it’s restoring your device.

Set up as a new device
Choose Set up as new iPhone/iPad/iPod and click Continue and you’ll be walked through the process of setting up the device just as you did when you first got it. The first thing you’ll see is your device welcoming you with a cheery “Hello” (or a greeting in another language). Do as the screen tells you and slide to the right to get started.
If you have an iPhone with Touch ID security you’ll be prompted to scan one finger during the setup process. You can skip this step if you like.
It takes about five minutes to walk through the process and the only information you'll need is your Apple ID and password and the password for your Wi-Fi network, if one is necessary.
Starting over via Wi-Fi
iTunes is just one way to set up the new OS. The other is to switch on your device, connect to a Wi-Fi network, and then start the setup process. When you do, you’ll arrive at a Set Up screen where you can choose to set up the device as a new one, restore it from an iCloud backup, or restore it from an iTunes backup. If you choose the last option, you’ll be prompted to connect your device to your computer. We’ll examine this option first.Restore from iTunes backup
If you choose to restore from an iTunes backup, connect the device to your computer, select it in iTunes, and from the Restore from this backup pop-up menu choose the latest backup for your device and click Continue. Your device will display the Apple logo and a progress bar, indicating that it’s being restored from the backup. When that’s complete the screen displays an Update Completed message. Tap Continue and you’ll be walked through a few steps—enabling location services, choosing accounts to use with iMessage and FaceTime, creating and confirming a passcode, and choosing to share analytics data with third-party developers.
Restore from iCloud backup
If you’ve backed up your iOS device to iCloud (rather than to your computer via iTunes), select Restore from iCloud Backup on the Set Up screen. You’ll be prompted for your Apple ID and password. Enter them and tap Next. Your device will sign into iCloud and you’ll be presented with the Terms and Conditions screen where you tap Agree twice.Choose the desired backup (you may have more than one depending on the number of iOS devices you’ve backed up), and then wait; the process can take anywhere from a few minutes to many hours, depending on how many apps you had installed and how much data you had stored in those apps. (As mentioned earlier, restoring from an iTunes backup is much faster than restoring from iCloud, which is why many people back up to iTunes periodically even if they normally back up to iCloud.)
When the restore is finished, your device restarts, and you see a screen explaining that you have a few more steps to follow. These steps include entering your Apple ID’s password again, selecting which identities you want to use for iMessage and FaceTime, creating a passcode, and setting up iCloud Keychain.
And back again
As we mentioned, Apple traditionally stops signing old versions of iOS just a day or two after releasing major updates (such as iOS 8). If you were to update to iOS 8 say, a week after it ships, you might find that you can’t go back to iOS 7. So, if you intend to be among the earliest adopters, it’s not a bad idea to have a copy of the iOS 7.1.2.ipsw file at hand.If you have a copy on your hard drive you will find it, by default, by following this path: youruserfolder/Library/iTunes/ and then within a folder called iPad Software Updates, iPhone Software Updates, or iPad Software Updates, depending on the devices you use. (You access the Library folder in your user folder by holding down the Option key in the Finder and choosing Go > Library.)

download ipsw. You’ll find a
number of sites that offer links to the file you need. Just be sure to
choose the correct one based on the device you’re using.If you revert before Apple stops signing iOS 7, the trip back shouldn’t be too painful. Just jack your device into your computer, launch iTunes, select your device, click the Summary tab, and while holding down the Option key, click on the Restore button. (If you’ve enabled the Find My feature you’ll need to disable it on the device first.)
Do so and a navigation window will appear. Use it to locate the iOS 7.1.2.ipsw file and click Open. If things go according to plan, the Mac will set about installing iOS 7 on your device. When it does, it will wipe out all the non-stock apps and data on it, so be sure to make a backup before you begin.

iTunes will report that your device is in Recovery mode. You should now be able to hold down the Option key, click the Restore button, navigate to the iOS 7.1.2.ipsw file, and install it on your device. Should you see an alert that this version of iOS is not compatible with your iPhone, iPad, or iPod touch, it means Apple has stopped signing it and you must run iOS 8.