Life has changed there is no doubt and we wanted to reach out to see how you are doing.
As we go through this interesting time, we are trying to look at this as an opportunity to focus on our family and on friends like you. Let us use this extra time to catch up and talk more. Let us cook food that is not fast, but interesting and satisfying. Let us learn to enjoy a time to try new things. Let us find ways to enjoy time at home!
Computer Security
If my client base is any experience, anyone can be a victim of a Ransomware, Malware or Virus attack.
What can you do about it?
I conduct audits of your entire computer infrastructure and apply best practice solutions to plug the security holes on your computers, Smartphones and networks.
Now offering consultations to give you the best protection possible:
1:00 PMHigh Tech House Calls, Expert Computer Consulting
App selection should be one of the biggest factors in choosing a
streaming media player, because all the fancy features in the world
don't mean much if you can't actually watch what you want.
The good news is that there's decent app parity among the major
streaming media devices, including Apple TV ($69 to $199), Amazon's Fire
TV ($99, or $39 for the Fire TV Stick), Roku ($50 to $130, depending on
the model), Chromecast ($35), and Android TV devices such as the Nexus
Player ($100) and Nvidia Shield Android TV ($200). If you're just
looking to watch Netflix or Hulu Plus, pretty much every device on the
market will have you covered.
Still, each platform does have its hang-ups, which you can see in the
chart below. Have a look, then keep reading for some takeaways and
caveats:
12:57 PMHigh Tech House Calls, Expert Computer Consulting
An iPhone is capable of taking some astonishing photos—look no further than Apple’s “Shot with iPhone” campaign
for proof—but as always, understanding your tools is the first step to
creating great things with them. Of course you’ll know how to take snaps
with your iPhone, but there are all sorts of oft-forgotten little
features that you can use which unlock a whole range of tricks for
getting photos that are more accomplished, more creative, or just plain
more fun.
We’re going to assume you know the basics of opening the camera app and
taking a shot, and that you know you there are great apps such as Instagram, VSCO, Pixelmator and Waterlogue
that can apply filters or do desktop-style image editing to make your
photos really shine. What we’re interested in here is the pro stuff—some
of which, to be sure, will be limited to more recent models, but most
will be applicable to most iPhones still in use. Ready? Say cheese!
Set focus and exposure—and apply exposure compensation
You probably know that you can tap somewhere on the screen when you’re
in the Camera app to tell your iPhone specifically where to focus (even
if it has recognized faces in the scene and decided to prioritize them)
but this also sets the exposure, that is, how bright or dark the image
is.
So for example if you’re photographing someone inside a room with their
back to a window, by default the iPhone’s automatic exposure will likely
turn them into a silhouette (as it tries to balance the bright
backlight and the dark subject) but if you tap on them, it knows what
you want to prioritize, so it makes the scene brighter. The view out the
window will get “blown out”—that is, made too bright and so detail will
be lost—but at least your subject won’t look like they’re in a witness
protection program.
Traditional (and now of course digital) photography has a concept called
exposure compensation, the idea that you let the camera decide how best
to expose the scene, but then you give it a nudge—expressed usually in
thirds of a “stop”—brighter or darker, to better reflect the shot you
want to take. You can do this on an iPhone too, but it’s much less
technical; tap on your subject, then drag the little brightness
(sunburst) symbol next to the focus square up to make the picture
brighter, or down to make it darker.
Lock focus and exposure
Usually the iPhone will focus and expose a shot fresh each time, since
that is indeed what you usually want, but there are times, usually for
creative reasons, that you want to lock the focus and exposure.
To do this, tap and hold on the screen; you’ll see a series of
contracting rectangles around your finger which is your cue that the
exposure and focus are now locked even if you move the camera a little
or to a completely different part of the scene. Tap anywhere on the
image to unlock them again.
Use a hardware shutter
You can use the physical volume buttons on the side of your iPhone to
take the shot rather than the big onscreen button—handy if you’re
holding the phone at an awkward angle—but this also extends to
headphones (including the bundled ones) that have inline volume controls
on the cable.
Christopher Phin
Pro photographers would use something like this with big fancy SLRs
especially as a way of reducing camera shake; the act of pressing a real
or on-screen button can shake the camera at the very instant you want
it to be still, so by triggering a shot using a button which is on a
cable, usually with the camera held in a tripod, you’re removing that
shake completely.
You can go one better: there are remote controls that connect over
Bluetooth (whisper it: selfie sticks), but if you have Bluetooth
headphones with volume controls already, they should work too as a
completely wireless shutter trigger.
Using your Watch as a viewfinder and trigger
If you have an Apple Watch, remember that you can use it to see what
your iPhone’s camera is seeing—useful in surprising situations, such as
when checking the tops of cupboards for lost items or contorting
yourself down the back of the TV trying to take a shot of its serial
number—and for triggering a shot.
As a remote shutter, you can either have it take a shot immediately or
after a short delay—you can imagine setting up for a group shot,
sauntering into the scene yourself, checking the composition on your
Watch, hitting the three-second delay timer then putting your hands in
your pockets and a grin on your face.
The self-timer
There’s a self-timer on the iPhone as well, either a two-second one—more
on this below—and a 10-second one which is great for those
press-the-shutter-run-back-into-shot-then-hold-a-grimace-way-past-the-point-you-think-it-should-have-triggered
shots. You might be able to prop your iPhone up against something for
these, but consider a tripod for more control and better results if the
shot is important. (See the last section for more on tripods.)
Reduce camera shake
Although things have improved dramatically, the iPhone can still
struggle in low light, such as at dusk or indoors. To compensate for the
low light it will often take longer exposures, and so if you’re not
holding your iPhone completely still the scene will get a bit smeared.
(The 6 Plus and 6s Plus have optical image stabilization to help
mitigate this.)
Christopher Phin
You can reduce camera shake with some old-fashioned techniques that
literally stop your hands from moving as much: pushing the side of your
body against a vertical surface to steady it, resting your elbows on a
low wall, or even simply bracing your iPhone by holding it in both hands
and tucking your elbows into your body.
Or you can use the two-second self-timer. With this, so you’re not actually pressing a shutter when
you’re taking a shot and so shaking the camera with the simple act of
doing so, you enable the timer, press the shutter, then in the two
seconds before the camera actually takes the shot, brace yourself and
hold the iPhone firmly.
Use Burst mode
One of the reasons pros are able to get such great portrait shots for
magazine covers is because some take many dozens or hundreds of shots
and just pick the one that captures a fleeting expression or a moment of
delight or seriousness. You can do the same with your iPhone, and it’s
great for getting the perfect shot of your kid grinning or your dog’s
guilty look when you discover him tearing up a cushion.
All you do is hold the shutter down (whichever shutter you use) and let
the camera just keep shooting. Of course this uses up loads of space on
your device, but once you get a quiet moment go to that burst of shots
in your Camera Roll and tap Select. Now scrub through all the shots, tap
the ones you like then tap Done; you’ll be given the choice of saving
everything or just the ones you selected, and in the latter case all the
other, rubbish shots get deleted.
Quickly jump to a specific shooting mode with 3D Touch
If you have an iPhone 6s or 6s Plus, press hard on the icon for the
Camera app on your Home screen and you’ll get the option of jumping
straight to slo-mo, video, selfie, or regular photo mode. (It’s worth
reinstating the Camera app back to your first screen of apps if you’d
previously banished it because of the Control Center button for
launching it, partly for this direct-mode-launch feature but also
because Touch ID is so fast on the 6s-generation devices that you never
get the chance to see Control Center from the Lock screen!)
Add a macro mode to your iPhone
This is the only time we’ll recommend a third-party app here, and
although it does have filters (such as the dramatic, lovely Clarity
Pro), we’re not strictly recommending this app for that. No, one of Camera+’s
best shooting features is that it can lock the lens elements in your
iPhone so that it can take photos much closer to its subjects than the
built-in app can. The focal range is small so you have to have a steady
hand and a compliant subject, but the results can be terrific—and it has
a 3D Touch Quick-Launch menu like the regular Camera app, including an
option to go straight to macro mode.
Turn on the Rule of Thirds grid
Though shots can look great with their subject dead center, you can
usually make your shots look better, more dynamic and flat-out more
professional if instead you embrace the “Rule of Thirds”—and you can
easily do this if you switch on the grid in Settings > Photos &
Camera. Now, use those lines as a guide, positioning a horizon along the
bottom horizontal line, lining up a standing subject with one of the
verticals, or the eyes of a close-up portrait at one of the upper points
where the guide lines cross, say.
Take shots in HDR—but keep the original too
Even if you have a tiny-capacity iPhone, if it’s capable of taking HDR
shots, turn that feature on (or leave on Auto so the iPhone decides when
to use it) but also turn on the option in Settings > Photos & Camera to save the original shot too.
This way you can take advantage of High Dynamic Range photos—which mix
together three different exposures of a scene so that you still see
detail in very bright and very dark areas—but also have the regular,
non-HDR version as well, since HDR shots can look either a bit flat or a
bit peculiar. Basically, this way you have options.
Go nuts with filters
You might think that the filters you can apply when you’re taking
photos—look for the three-overlapping-circles icon at the bottom
right—mean that the effect is permanently “baked into” your shot, but
that’s no so. Even though the filter looks like it’s applied when you
view your photo in your Camera Roll, actually what your iPhone has done
is save the unfiltered photo along with an invisible tag that says
“shove the filter in front of this image when displaying it.”
Tap Edit and you can change the filter or remove it completely. This
goes for the Light, Color, and B&W controls you can tweak too.
Add accessories—but be choosy
There is a dizzying array of additional bits of hardware you can buy to
take your iPhoneography—blast, thought we’d get to the end without using
that word—further, but a great deal of it is frankly a bit, well, novelty. Here’s some genuinely great buys that we both like a lot and use a lot:
Christopher Phin
The Glif adapter works with any smartphone, and lets you mount it on a standard tripod thread.
The lenses from Olloclip
can be easily slipped onto your iPhone, and give you creative options
such as macro, telephoto and wide angle. But although they’re not as
easy to slip on and off, we really love the lenses from Moment; really bright, clear glass, and the camera case (above) and accompanying app are useful too.
Manfrotto SMT LED light
is a rechargeable, three-level LED lamp. It’s never gonna replace
proper pro lighting rigs, but it gives a nice little boost, especially
when you’re shooting video. The tripod mount lets you position it where
you like.
The Mophie spacestation
comes in especially handy when you’re taking photos with your iPhone on
vacation, say. Not only is it a 6,000mAh battery to keep you shooting
for longer, but it comes in 32 or 64GB capacities, so you can offload
photos and videos to it so you won’t run out of space on your iPhone.
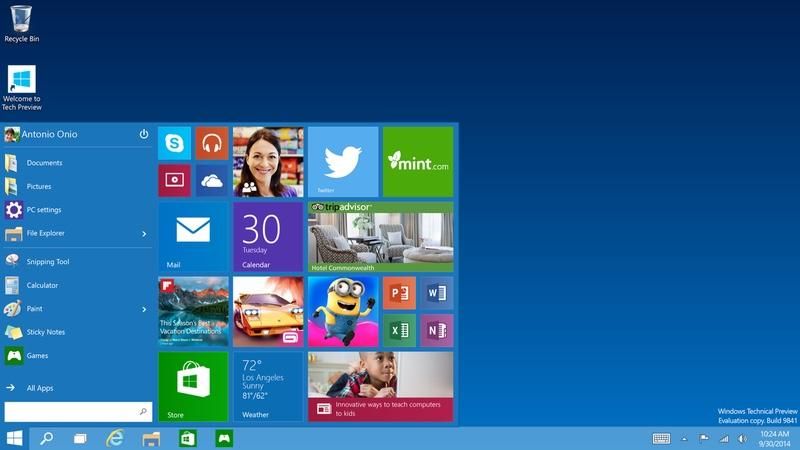
Microsoft’s
Corporate Vice President of Windows and Devices Yusuf Mehdi announced
the latest count via a blog post on January 4. Mehdi noted that
Microsoft added more than 40 percent of the total number of active
devices running Windows 10 since Black Friday.
(WinBeta said a week ago its sources were hearing the 200 million devices-installed figure.)
Back
in October, Microsoft didn’t yet have any Windows 10 phones in market
in October, nor had it yet pushed the Xbox One update that brought the
Windows 10 operating system to Xbox One.
Microsoft’s blog post today
doesn’t explicitly state whether the company is counting the Lumia 950,
950 XL and 550 (all running Windows 10 Mobile), but a a company
spokesperson confirmed the 200 million figure includes Xbox One
consoles. And “active” means Windows 10 devices that have been “active”
in the last 28 days, the spokesperson said.
Of
the 200 million devices running Windows 10, more than 22 million of
those are on devices run by enterprise and education customers,
Microsoft officials said. The company claims 76 percent of its
enterprise customers are in “active pilots” of Windows 10.
Mehdi
also said today that Windows 10 is on the “fastest growth trajectory of
any version of Windows – ever.” He said it outpaced Windows 8 by nearly
400 percent, and Windows 7 by nearly 140 percent.
It’s
tough to do an apples-to-apples comparison, as Microsoft reported
Windows 8 numbers as “licenses sold,” which meant copies sold into the
channel, not copies activated on devices.
For
users with automatic updates enabled, the “Recommended” setting may
cause the Windows 10 upgrade to automatically initiate on their devices.
However, users will not be upgraded to Windows 10 until they
proactively choose to do so, even once it’s pushed as a Recommended
Update, Microsoft officials have said.
On the devices side of the house, starting tomorrow, users will be able to pre-order the Microsoft Surface Book
in Austria, Australia, UK, France, Germany, Switzerland, and New
Zealand. It also will be “coming soon” to Japan, today’s blog post says,
as will the Surface Pro to India (which will happen “in the coming
weeks”). The Surface Book was made available for preorder recently in
Hong Kong and China.
Mehdi
also says “demand outstripped supply” for the new Lumia 950 and 950 XL
phones and that Microsoft is working to restock those devices in stores
where they sold out.
3:26 PMHigh Tech House Calls, Expert Computer Consulting
Do you watch streaming TV shows and movies? If so, you're like a lot of people.
In
fact, about 56% of people now say they stream movies and 53% stream TV
shows, according to a survey that came out earlier this year. Just 45%
of people now say they prefer to watch TV shows as they're airing.
No doubt, many of that streaming is from legal services that you pay for, like Netflix,
which has 69 million worldwide subscribers. But, even if you are
visiting only legal streaming sites, you probably know someone who
streams illegal content, like current box office movies on sites you've
never heard of.
Of course, that's not the right thing to do. But,
as it turns out, it's incredibly dangerous, too. About one-third of
these sites contain malware, according to a study by cybersecurity
experts.
In
fact, people who visit illegal, or pirate, sites are 28 times more
likely to be infected with malware than people who don't visit them.
This is big business, too.
These
pirate sites earn about $70 million from cybercriminals. They pay them
to infect digital devices, like yours, with malware.
In exchange, the cybercriminals gain access to your ID and your devices. They steal your credit card information, or demand ransom before they'll give you access to your computer.
9:20 AMHigh Tech House Calls, Expert Computer Consulting
If you get a Netflix subscription for the holidays, you'll quickly
learn that the struggle is real when trying to figure out what to watch.
There are thousands of movies and hundreds of TV shows to choose from.
On top of that, Netflix regularly adds new titles every month.
In
January, you'll have to make the tough choice of choosing between Season
7 of "Parks and Recreation," "Meet the Parents," "Sharknado 3," "2 Fast
2 Furious" and 73 other new additions. But who am I kidding? It's cold
outside and you can have a marathon and watch them all!
But, there
are also lots of selections leaving Netflix in January, too. Be sure to
watch all of the "Tomb Raider," "Rambo," "Rocky" and "Mission:
Impossible" series before they all disappear. Lots of great Disney
titles are leaving too, including "Dumbo," "James and the Giant Peach"
and "Pocahontas."
See the full lists:
** - Netflix Original
Arriving
January 1
2 Fast 2 Furious (2003)
Along Came Polly (2004)
American Girl: Grace Stirs up Success (2015)
Angry Birds Toons: Season 1
Bring It On: Fight to the Finish (2009)
Bring It On: In It to Win It (2007)
Catwoman (2004)
The Celebrity Plastic Surgeons of Beverly Hills: Season 1
Constantine (2005)
Forensic Files: Collection 2
Friday Night Tykes: Season 1-2
The Good Road (2013)
House of Wax (2005)
How to Change the World (2015)
Ice Age 2: The Meltdown (2006)
Intolerable Cruelty (2003)
Journey to Le Mans (2014)
Loins of Punjab (2007)
Meet the Fockers (2004)
Meet the Parents (2000)
Nanny McPhee (2006)
Piku (2015)
Pooh's Heffalump Movie (2005)
Pride and Prejudice (2005)
The Rundown (2003)
Shout Gladi Gladi (2015)
Smokin' Aces 2: Assassins' Ball (2009)
Something New (2006)
Stephen Fry Live: More Fool Me (2014)
Stewart Lee's Comedy Vehicle: Season 3
Swordfish (2001)
The Tale of Despereaux (2008)
Under Arrest: Season 1: "Put Some Clothes On"
We Need to Talk About Kevin (2011)
The Wedding Date (2005)
The Whole Ten Yards (2004)
January 2
30 for 30: Four Falls of Buffalo
I'll Have What Phil's Having: Season 1
January 3
Sofia the First: Season 2
January 4
Blunt Force Trauma (2015)
Training Day (2001)
January 5
It's Always Sunny in Philadelphia: Season 10
New Girl: Season 4
January 8
Adult World (2014)
Dragons: Race to the Edge: Season 2**
Tom Segura: Mostly Stories (2015)**
January 10
Dos Hermanos (2010)
El Hombre de al Lado (2009)
Esperando La Carroza (1985)
The Marziano Family (2011)
Rosario Tijeras (2005)
Un Oso Rojo (2002)
January 11
Littlest Pet Shop: Season 4
January 12
The Ladykillers (2004)
January 13
Parks and Recreation: Season 7
January 14
The Testimony (2015)
January 15
Degrassi: The Next Class: Season 1**
The Last Five Years (2015)
Moonwalkers (2015)
Occupied (2015)
The Overnight (2015)
Sirens: Season 2
January 16
Hyde Park on Hudson (2012)
January 17
Z Nation: Season 2
January 19
Curve (2015)
January 20
Drone (2014)
January 21
When Calls the Heart: Season 2
January 22
Sharknado 3 (2015)
January 23
Chelsea Does (2016)**
January 25
From Dusk Till Dawn: Season 2
Turbo Kid (2015)
January 28
Frozen Planet (2011)
Frozen Planet: On Thin Ice (2011)
Frozen Planet: The Epic Journey (2011)
The Making of Frozen Planet (2012)
January 29
Ever After High: Dragon Games**
January 31
Words and Pictures (2013)
What's Leaving Netflix
January 1
A Clockwork Orange (1971)
Almost Famous (2000)
American Psycho (2000)
American Psycho 2 (2002)
The Bourne Identity (2002)
The Bourne Supremacy (2004)
Charlie and the Chocolate Factory (2005)
Coach Carter (2005)
Conan the Barbarian (1982)
Corpse Bride (2005)
Coyote Ugly (2000)
Criminal Minds: Suspect Behavior: Season 1
Four Brothers (2005)
Gladiator (2000)
The Graduate (1967)
Grandma's Boy (2006)
Harriet the Spy (1996)
Heartbreakers (2001)
The Hours (2002)
The Italian Job (2003)
Jackass: The Movie (2002)
Jerry Maguire (1996)
Lara Croft: Tomb Raider (2001)
Lara Croft Tomb Raider: The Cradle of Life (2003)
Lawrence of Arabia: Restored Version (1962)
The Longest Yard (2005)
The Machinist (2004)
Max Steel: Seasons 1-2
Million Dollar Baby (2004)
Mission: Impossible (1996)
Mission: Impossible II (2000)
The Patriot (2000)
Planes, Trains and Automobiles (1987)
Rambo: First Blood (1982)
Rambo: First Blood Part II (1985)
Rambo III: Ultimate Edition (1988)
The Rescuers (1977)
Risky Business (1983)
Rocky (1976)
Rocky II (1979)
Rocky III (1982)
Rocky IV (1985)
Rocky V (1990)
Rosemary's Baby (1968)
Serpico (1973)
Sesame Street: Animals and Nature: Season 1
Sesame Street: Classics: Vol. 1-2
Sesame Street: Cookie and Friends: Season 1
Sesame Street: Creativity and Imagination: Season 1
9:15 AMHigh Tech House Calls, Expert Computer Consulting
Apple's recent updates to both its mobile operating system and its
computer system not only give your iPhone, iPad and Mac computer new
features, they also make it easier than ever to use them all together.
Apple calls this integration between mobile gadgets and Mac computers as
"Continuity."
In one
obvious example of these new connections, some users have been startled
when their Mac computer suddenly rings with an incoming phone call. More
than once a friend has answered our phone calls with, "I didn't know it
could do that," the first time her iPhone handed off a call to her Mac
computer.
But Continuity
does a lot more than just send phone calls to your Mac. In today's
Apple Tip, we'll look at seven top tricks to using Apple's new operating
systems both together and separately. From having all of your photos
available across all of you gadgets, or starting an app task on one
gadget and finishing on another, there are a lot of cool things you can
do with these new capabilities.
Note: You need to have OS X Yosemite or El Capitan on your Mac and iOS 8 or 9 on your mobile gadget to make these work.
1. Handoff
Apple's Handoff
feature allows you to seamlessly work on the same app and the same task
on different Apple gear. For instance, if you started writing an email
on your iPhone, you may now finish and send it from your iPad or Mac,
provided they are within Bluetooth range of each other. Open a Safari
webpage on one gadget and there it is available on your other devices.
Handoff
works with your native Apple apps like Calendar, Contacts, Mail, Maps,
Messages, Notes, Reminders, Safari, Pages, Numbers and Keynote. Some
third-party apps including New York Times and others are now or soon
will be using Handoff.
To use
Handoff, your Mac must have OS X Yosemite or later, and your iOS devices
must have iOS 8 or 9. All of your gadgets must have Bluetooth turned on
and be signed in to iCloud using the same Apple ID.
To turn on Handoff:
On
your Mac: Choose Apple menu>>System Preferences, click General,
then select “Allow Handoff between this Mac and your iCloud devices.”
(If you don’t see the option below “Recent items,” your Mac doesn’t
support Handoff.)
On your iPad, iPhone, or iPod touch: Go to
Settings>>General>>Handoff & Suggested Apps, then tap to
turn on Handoff. (If you don’t see the option, your iOS device doesn’t
support Handoff.)
Now, if you've started a project in an app
on your iPhone or iPad, simply open the same app on your Mac to
continue or press Command-Tab to find the document in progress.
To
open up a Handoff on an iPhone or iPad, look for the icon of the app
you're working in at the lower-left corner of the lock screen. Swipe up
and you'll see your project in progress. If you aren't on the lock
screen, double-press the Home button to bring up the multitasking view,
and tap the banner at the bottom of the screen.
2. SMS text messages on your Mac
Apple's
iMessage has long allowed you to message other iPhone users from the
iMessage app on your Mac. Now, you can send and receive SMS text
messages right from your Mac. So when friends text you, regardless of
what brand phone they are using, you can now read and reply from your
Mac as well as your iPhone.
All
the messages that appear on your iPhone now show up on your Mac, too,
so your conversation is up to date on all your devices. You can also
start an SMS or iMessage conversation on your Mac just by clicking a
phone number in Safari, Contacts, Calendar, or Spotlight. Group chats
are now enabled, as well. Click Details to name a group chat, add or remove someone, and see friends who’ve shared their location on a map.
3. Make your pictures pop with Photos' powerful new edit tools
Earlier
this year, Apple brought its free Photos software to all of its iOS and
OS X devices. It turned out to be a very good thing. If you've ever had
to email photos from your iPhone to your Mac when a sync cord wasn't
handy, having all of your iPhone pictures just instantly appear on your
Mac is pretty incredible.
Also included in the new
Photos are powerful new editing tools to fine tune your pictures. Apple
Photos edit tools are not on the level of the professional standard,
Adobe Photoshop, but it does pack an all-new punch. You can make precise
edits by enabling the histogram, adjusting levels, adding definition,
and more.
Bonus Tip:
Want to email more than just a few of your favorite photos? Follow
along to see how you can now send up to 5GB of photos (or anything else)
in just one email right from your Apple Mail app.
4. Answer your iPhone on your Mac or iPad
As
we mentioned above, some users are surprised when their iPhone calls
ring through on their Mac. This also works on Wi-Fi-only (non-cellular)
iPads. However, to use this feature, each of your Apple gadgets must be
on the same Wi-Fi network and signed in to the same iCloud account.
Phone
calls on your iPhone will appear in the upper right corner of your Mac
offering you the option to accept or decline. To make a phone call on
your Mac or iPad tap or click a phone number in Contacts, Calendar, or
Safari.
Bonus tip: Want to change your Mac’s default call ringtone? To set a different ringtone, choose FaceTime>Preferences, then click the Ringtone pop-up menu.
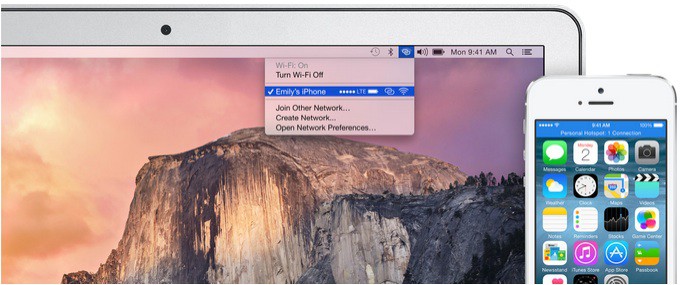
5. No Wi-Fi? No problem!
You can use Personal Hotspot
on your iPhone to provide Internet access to your iPad or Mac. You'll
need to sign in to iCloud using the same Apple ID as your iPhone. Also,
your cell provider needs to support Personal Hotspot, but Apple's
website lists 46 U.S. providers, including the majors, that support
Apple's Hotspot.
To get Internet access from your iPhone:
On
your iPad, go to Settings>>Wi-Fi on your other iOS device and
select your iPhone or other iPad that has a cellular connection.
On your Mac, go to the Wi-Fi menu at the top of your screen and select your iPhone or iPad that has a cellular connection.
6. Mail gets some great new features
Apple
Mail gets a major step up with two new features that we really like.
We've written before about the explosion of smartphone photography all
over the world as we all shoot more pictures than ever.
Once you shoot
your amazing vacation, graduation, birthday or other photos, chances are
you'll want to share them with family or friends. But there's just one
problem. As photo quality goes up, so does the file size of the photo.
A
full resolution iPhone 6 photo can easily be as big as 3 megabytes or
more. Why does that matter? Many email systems will not accept email
attachments over 10MB, meaning you can only send about 3 iPhone photos
per message. Often your only options are to be very picky about which
few photos you share, or bombard your relatives with lots of separate
email messages, carrying only about three pictures each. And forget
about emailing a video! Depending on the length, videos can span
hundreds of megabytes, far too big to ever email. That is, until now.
Apple
Mail now offers a way to send large attachments. Or maybe we should say
huge, enormous, gargantuan attachments. You may now send attachments up
to 5 gigabytes in size. How much is 5GB? How about thousands of photos,
or at least 3 to 4 full HD movies! It is probably safe to say that 5GB
email limit will cover just about anything you might need to send.
Apple calls this new feature Mail Drop
and it is built right into Apple mail. Mail Drop automatically uploads
the attachments to iCloud. If recipients use Mail in OS X Yosemite or
later, the attachments are automatically downloaded and shown in the
message. If recipients use other email apps, they will see a link to
download the attachments from iCloud. Your attachments stay in iCloud
for 30 days and they do not count against your iCloud storage limit.
Bonus tip: When scrolling through a long list of Mail messages, skip the mouse and use your space bar instead. Use Shift-Space bar to scroll up through email messages or Space bar to scroll down.
Another
cool new feature in Apple Mail is called Mark Up. When sending
attachments, say photos or PDFs, you can now add notes, circles, arrows
or even your signature right on the file without having to open it in
another program.
To use Markup on an image or PDF, just hold the pointer over the attachment, click the down arrow, then choose Markup.
The attachment will open with a basic tool bar across the top. To add a
signature to your file, click on the signature icon (below) and choose
from existing signatures or upload a new one.
7. Share your screen or see someone else's Mac screen
When
you're trying to help a family member fix their computer, seeing the
other person's screen or showing them how to do something on your screen
cuts through 90% of the frustration of trying to explain something just
verbally by phone.
Sharing your screen or requesting to see
another user's screen is a cinch in Yosemite and El Capitan. The first
step is to ensure that both you and the person you’re trying to share
with are using Apple’s Messages app. Open your contact’s message window
and select the Details button on the top right hand corner.
The Details button is circled in red below.
A new window will pop up where you will see the Share Screen icon. It is the overlapping blue rectangles next to the camera icon above. To share your screen, just click the Share Screen icon and you can send a request to your contact to either share your screen or ask for access to theirs.
9:09 AMHigh Tech House Calls, Expert Computer Consulting
Have you ever spent hours trying to hunt down your child, friend or
potential romantic partner's social media accounts? You know they're
there, but finding them is something else.
Facebook, Instagram
and others all include search bars that let you look up people by
name. You could also run a Google search for the person's name along
with "Facebook" or "Instagram."
Unfortunately, if the person has a
common name, it might return hundreds or thousands of results to sift
through. Fortunately, there are a few ways you can speed up the process.
Before
we tell you how, though, let's clarify that we're not telling you this
so you can cyberstalk someone. We're telling you how to do it so you can
keep your child safe, or make sure that your potential romantic partner
isn't hiding some devastating secret, like that they're married.
Along
those lines, be careful because you can turn up accounts from unrelated
people with the same name. Take whatever you find with a grain of salt
until you're sure you have the right account.
Also, we encourage
you to use these techniques to look up your own accounts and see just
what other people can find if they go looking. You might need to take
steps to hide information you don't want seen.
1. Google Image Search
A
Google search for the person's name is a good start, but an image
search can be faster. That's because instead of clicking on result after
result and loading page after page, an image search puts everything you
need right in front of your eyes.
Go
to images.google.com to start, and then simply search for the person's
full name. If you want to narrow down the results, add information like
the city they live in, the school they go to, or some other
identifying tidbit.
Next, scroll down the page looking for the
person's image. There's a good bet you'll come across their profile
picture for Facebook, Twitter, Instagram, Pinterest or another
site. Once you find an image of them, click it and select View Page
to open up the social media page.
In the cases of linked accounts,
such as the person posting images from Instagram on their Twitter feed,
you can follow those images back to the other account. Sometimes the
person will also place links to other accounts in their social media
profile, so be sure to check there.
2. PeekYou
You can also turn to a people search site like PeekYou.
People search sites collect publicly available information and combine
it into a profile you can find if you search for a person's name and
location. Handy hint: If you want to look up a neighbor and aren't sure about their full name, White Pages Neighbors has you covered. It helps you look up people in your immediate area.
You
usually have to pay if you want to get the full information,
but PeekYou gives you the person's known social media accounts for free.
It also gives you the username on the account(s), and that's important.
3. Username
Something
not many people think about is that they use the same username for
every account. PeekYou lets you click on the person's username to pull
up other social accounts that have the same username. Or you can type
the username manually into Google.
Note that you can usually get
the username on any social media account from the Web address as well.
For example, Kim's Facebook page is https://www.facebook.com/kimkomando,
which means my username is "kimkomando."
Sure enough, if you add
"kimkomando" to the address for Twitter
(https://twitter.com/kimkomando), Instagram
(https://instagram.com/kimkomando/) or Pinterest
(https://www.pinterest.com/kimkomando/), you'll see she has accounts
there too.
This username hack is a good way to turn up someone's
accounts, even if the person has chosen not to include their real name.
Of course, if that's the case they'll probably also have their privacy
locked down tight, and you should, too.
8:08 AMHigh Tech House Calls, Expert Computer Consulting
Microsoft’s latest update aims to improve the stability of its Type Cover keyboard for its 2-in-1 device Surface Pro 4. It also throws in a few improvements to the touchpad and keyboard on the Surface Book.
On the Surface Pro 4 some users are saying they’ve experienced slow
boot issues with the keyboard attached. And some of our staff have
reported that the keyboard seems to work randomly, and only a reboot
resolves the issue. Far from preferable for a device that should assist
during stressful situations.
Users
who have suffered from these issues might benefit from downloading the
latest update. The update won’t patch every bug and glitch, but it might
get rid of some of the most glaring issues. To check if the update is
available you only need to check the Windows Update section on your
device.
The
update arrives in the midst of a constant influx of new bugs and
glitches, as is usually the case with fresh hardware. The Microsoft team
responsible for the Surface recently issued an apology to the early adopters of the Surface Book 4.
Earlier
Surface releases have been criticized for hardware issues, but that
seems to have gone in reverse with the latest iteration. In November the
company released an update to fix freezing issues, another update in
early December got rid of graphics errors, and now another software patch is being released.
While
our initial review took great joy in the solid yet elegant design of
the device along with its capable hardware, the software has become an
ever more glaring issue. We have even take the step of altering the
review score to reflect this. Consumers don’t have any responsibility to
wait for their hardware to finally work, so the question remains as to
whether this will hurt the blossoming Surface line, or if Microsoft will
take care of the problems before they become indelibly associated with
the brand.
8:06 AMHigh Tech House Calls, Expert Computer Consulting
Here's the scenario: You open that rectangular present sitting under
the Christmas tree. One whiff of that new tablet smell and you know it’s
going to be great.
You quickly power it up, get it on Wi-Fi, set
up Facebook, login to Netflix and play around for a while. Then you set
it down to go do other things, and that's about as far as you go with
learning what your tablet can do. (Note: Here are 10-must have apps for your new tablet.)
While
some people don't really need to know more than this, it really helps
when you do. Here are five tricks your tablet can do that will make
using it so much better.
1. Make text easier to read
A
tablet gives you quite a bit more screen space than a smartphone, but a
lot of the text can still be too small for some people. Fortunately, you
can bump up the size to something a little easier to see.
iPad
Go to
Settings>>General>>Accessibility and turn on "Bold Text"
and "Larger Text." You can choose either one or both, depending on your
preferences. You will need to restart your phone for Bold Text to take
effect.
Android
Go to Settings>>Accessibility. Under
"Vision," tap "Font size" and set it to "Large." Some phones include
the even bigger "Huge" option if you really want to get crazy.
2. Take a screenshot
Did you get a seriously hard question right in Trivia Crack or spell an amazing word in the Scrabble app
and want to share it on Facebook? Maybe your friend posted something
unintentionally hilarious on Facebook and you want to snag it before
they edit it away. You can take screenshots of your tablet's screen with
a simple button press.
iPad
Press and hold the Sleep/Wake
button, then press the Home button to take a screenshot or two. You
should hear a shutter click every time. The screenshots will appear in
your Camera Roll or Saved Photos section.
Android
Press the
Power button and Volume Down button at the same time. You should hear a
shutter click and/or see a white border flash around the edges of the
screen. The image is saved to the Captured Images folder in your Gallery
app.
3. Use a real keyboard
Touch
screens are nice for zipping around Facebook, play games or scrolling
websites, but they're lousy for typing anything more than a quick
Facebook status update. Fortunately, tablets let you hook up a real
physical keyboard.
You can find a variety of Bluetooth keyboards on the market
that connect wirelessly to most tablets. Some of these are full-size
computer keyboards and others are built into tablet cases for easier
travel. Either way, they'll help you write longer emails, journal
entries or even that novel with much less frustration.
While
you can always make the text on the screen bigger (see point 1 above),
sometimes it would be nice to not look at the screen so much. Both iPad
and Android can read what's on the screen and even give additional
information you wouldn't immediately notice otherwise.
iPad
Go
to Settings>>General>>Accessibility and turn on
"VoiceOver." You have the option to practice with VoiceOver, set the
speaking rate and other tweaks to make it easier to understand. And you
will need to do some playing around to get used to it.
For example
you can touch and drag your fingers around the home screen to have it
read what's there. Note that in VoiceOver mode, you have to double tap
to activate an app. A single tap will give you details about the app.
VoiceOver will
read directions to you in Maps, have your camera tell you how many
people are in your shot, and get spoken photo descriptions. It will also
read you the text from Web pages and text messages.
Android
Go
to Settings>>Accessibility and tap TalkBack. If you don't see it,
you can download it from the Google Play store. Once you turn it
on, your phone will read whatever you touch on the screen, along with
incoming notifications. Hint: To perform a regular swipe gesture, you have to use two fingers instead of one.
To
adjust your TalkBack settings, go to Settings>>Accessibility and
tap "Text-to-Speech" options. You can adjust the voice engine and speed
it speaks. To turn TalkBack off without going in to the settings, you
just need to press and hold the power button until your Android
vibrates.
You can also go into Settings and turn on "Hands-free mode." This will tell you who is calling or messaging.
You
can also have TalkBack read eBooks to you if you bought them through
the Google Play store. Open the Google Play Store application. You can
find this on your main list of applications. Once you do, go to
Books>>Book settings (three horizontal lines icon)>>My
Books>>My Books settings (three vertical dots icon)>>Enable
Automatic read aloud. Then load up an eBook and go.
5. Turn off music automatically
If
you like to listen to music to fall asleep, you might find that a
tablet makes a great music player, as long as you have it hooked up to
an external speaker like the Komando Connect Bluetooth Speaker. However, once you fall asleep you don't want it to keep running all night, especially if it isn't plugged in.
iPad
Go
to the Clock app and tap on "Timer," then "When Timer Ends." From here,
scroll all the way down to the bottom of the screen and select "Stop
Playing." Then just set how long you want the Timer to run.
Android
Depending
on the music player you're using, you may or may not see this option.
Samsung's default music player, for example has it under Settings as
"Music auto off." However, Google's Play Music app doesn't have an
auto-off options.
However, you can get a third-party app like Sleep Timer that works on a timer, or Music Off that has a timer or detects your body movements to know when you go to sleep. Warning: If you're setting your gadget on your bed, make sure it doesn't get covered or it can overheat and become a fire hazard.
Bonus: Use Google Maps offline
Google Maps
is great tools for navigating on a smartphone, but they don't work on
the go when you're using a Wi-Fi-only tablet. Fortunately, you can
download offline maps of an area while at home so you can navigate later
even without a signal. Just note that Google will delete the maps after
30 days to save space on your gadget.
In Google Maps for Android,
put in a location then tap on the icon with the three horizontal lines
to bring up the sidebar menu. Tap "Offline areas" and then the plus sign
in the lower-right corner. Choose what area you want then tap the
"Download" button. Give it a name and tap Save. You can now find it in
the side bar menu when you need it.
Google Maps on iOS used to
have this ability, but the latest update doesn't. It might be coming
back in a future update, in which case the process will be similar.
8:02 AMHigh Tech House Calls, Expert Computer Consulting
Man’s
hands weren’t designed to type on a tiny screen. Just compare the size
of your fingertip to the miniscule letters we’re expected to tap to
answer texts and emails. “Hi” ends up as “Go”; “Thanks!” as “Rjsmka!”
But that doesn’t mean we can skip replying to messages or searching for
random tidbits of info while we’re away from our computers. We just have
to find better ways to type on a tiny screen. For those of us with
thicker digits, there are a few ways to overcome our handicap. RELATED: 10 Siri Tricks You Never Knew About
Up Your Screen Size
The simplest (though most expensive) option is to get a bigger smartphone. The increased screen space of phablets translates into more room for your fingers. For Android users, the $450 Google Nexus 6P features a 5.7-inch screen — that’s half an inch more real estate than the Nexus 5X; Apple’s $750 iPhone 6s Plus has a 5.5-inch screen versus the 4.7-inch screen of the 6s.
In addition to getting bigger keys, you get the added bonus of
supercharged phone performance: Phablets tend to have more horsepower
than regular-sized phones.
Install a Different Keyboard
If
you can’t change your hardware, you can change the way your existing
phone’s keyboard works. Both Android and iOS let you install third-party
keyboards. First you need to find a keyboard you like, and there are
plenty to choose from. Fleksy includes
an option for larger keys — the keyboard takes up more of your screen,
but it also makes it easier to hit the right letter. SwiftKey doesn’t
have bigger letters, but it does have better autocorrect, so your
mistakes don’t matter as much. To add a keyboard, first download the app
and then install it as a keyboard option. In iOS, go to Settings >
General > Keyboard > Keyboards. In Android, look under Settings
> Language and Inputs to choose a different keyboard. RELATED: 10 Google App Tricks You Need to Know
Add an External Keyboard
If
you miss the tactile feel of keys beneath your fingers, you can opt for
a real keyboard. If you want an integrated keyboard, going old school
is your best bet: BlackBerry still produces models with physical
keyboards. The $699 Priv runs
Android and features a slide-out keyboard. If you want to keep your
existing phone, external keyboard cases replicate the slide-out keyboard
of BlackBerries and connect to your phone via Bluetooth, but few do a
great job of it. A better option may be a foldable Bluetooth keyboard
that you can stash away and bring out when you need to do some serious
typing. The $70 ZAGG Pocket Keyboard works for two years on a full charge, so you won’t have to worry about it running out of power.
Say It
Maybe fingers and smartphones just
weren’t meant to work together. That’s why Apple and Google have spent
so much effort improving voice-to-text. If you haven’t tried dictating
your message recently, give it another shot — you’ll likely be surprised
at how well it works. At the very least it will be as accurate as your
typo-filled attempts at typing.
7:59 AMHigh Tech House Calls, Expert Computer Consulting
Microsoft Edge, the company's new browser, has more in common with
Internet Explorer than you might think -- especially when it comes to
security flaws.
An analysis of the last five-months' worth of monthly software updates shows that Edge had 25 vulnerabilities shared with versions of Internet Explorer, which had a total of 100 vulnerabilities.
Earlier this month on its scheduled Patch Tuesday update offering, Microsoft released MS15-124, a cumulative update for Internet Explorer, and MS15-125, a near-identical patch for Edge. Of the 15 flaws patched in Internet Explorer, 11 of those were also patched in Edge.
Four additional bugs in December's monthly update list were unique to Edge, and did not affect Internet Explorer.
December saw the highest number of patched vulnerabilities since Edge was released in Windows 10 earlier this year.
With a quarter of all IE bugs affecting Edge, at least one commentator questioned if Edge was built on a "rotten old foundation." Given that the number of vulnerabilities found in Edge is far
below Internet Explorer, it's reasonable to say Edge looks like a more
secure browser. But is Edge really more secure than Internet Explorer?
According to a Microsoft blog post
earlier this year, the software giant's newest browser, an exclusive
for Windows 10, is said to have been designed to "defend users from
increasingly sophisticated and prevalent attacks."
In doing that,
Edge scrapped older, insecure, or flawed plugins or frameworks, like
ActiveX or Browser Helper Objects. That already helped to cut a number
of possible drive-by attacks traditionally used by attackers. EdgeHTML,
which powers Edge's rendering engine, is a fork of Trident, which still powers Internet Explorer.
However, it's not clear how much of Edge's code is still based off old Internet Explorer code.
When asked, Microsoft did not give much away. In a statement that we snipped for clarity, a spokesperson said:
"Edge
shares a universal code base across all form factors without the legacy
add-on architecture of Internet Explorer. Designed from scratch,
Microsoft does selectively share some code between Edge and Internet
Explorer, where it makes sense to do so."
Tyler Reguly, manager of
security research and development at security firm Tripwire, explained
in an email that overlapping libraries are where you get vulnerabilities
that aren't specific to either browser.
"When you're working on a
project as large as a major web browser, it's highly unlikely that you
would throw out all the project specific code and the underlying APIs
that support it, there's bound to be overlap in these situations," he
said.
"There are a lot of APIs that the web browser
will use that will still be common between the browsers. If you load
Microsoft Edge and Internet Explorer on a system, you will notice that
both of them load a number of overlapping DLLs," he said.
Dan
Caselden, manager of research science at FireEye, said if the same bug
is patched between the two browsers, it's typically because of shared
code.
"A few here and there could be because of the same error
introduced into two different implementations -- such as a design level
flaw," said Caselden, "but I'd wager that occurs infrequently."
The
big question is how much of that Internet Explorer code remains in
Edge, and crucially, if any of that code has any connection to the
overlap of flaws found in both browsers that poses a risk to Edge users.
The bottom line is that it's hard, if not impossible to say if browsers are more or less secure than another.
A
"critical" patch, which fixes the most severe of vulnerabilities, is a
moving scale, has to consider the details of the flaw, as well as if
it's being exploited by attackers. With an unpredictable number of flaws
found each month coupled with their severity ratings, a browser's
security worth can vary month by month.
Older versions of Internet Explorer will be retired by mid-January, giving millions of users about a month to upgrade to Internet Explorer 11, or to Edge on Windows 10.
7:42 AMHigh Tech House Calls, Expert Computer Consulting
Twitter isn't just a place where people post Throwback Thursday
photos. With over 170 million active users, it has become a major source
for news and real-time updates around the world. In 140 characters, or
less, Twitter users are able to spread ideas and trends like wildfire.
When
you first start wading through your Twitter feed, there are certain
aspects that can seem overwhelming. But thankfully, Twitter has been
around long enough that some "best practices" have finally been
established. So, here are five totally tweetable tips to help you use
Twitter like a boss.
1. Learn the lingo
Beyond the basic
navigation functions, Twitter is the place where a lot of new
terminology was born. So, to communicate effectively, you'll need to
understand it. Right of the top, you'll first need to know the
following:
Tweet: Messages on Twitter are called "tweets”
Timeline: As you tweet, your messages will show on your timeline
Follow: Tweeting interesting and relevant content regularly will attract followers
Beyond
those basics, there also several symbols and acronyms you'll see often
in Twitter. I've created a quick guide to help you understand them:
Although
these are some that you'll see most often, there are others that might
stump you if you're not ready for them. Here are some extras to watch
out for:
b/c = because
BFN = bye for now
BTW = by the way
EM = email
FB = Facebook
FTW = for the win
FWD = forward
FWIW - for what it's worth
HTH = hope that helps
IRL = in real life
J/K = just kidding
LMK = let me know
LOL = laugh out loud
OH = overheard
TMB = tweet me back
TMI = too much information
YW = you're welcome
CX = correction
TL;DR = too long, didn't read
2. Customize your header to create your own brand
You
don't have to own a business to create your own personal brand, and
customizing your Twitter header is one of the easiest ways to do it. Use
your header to show off your personality, but still look professional.
And, if you don't feel comfortable creating your own graphics, use a
site like Canva that has hundreds of designs that will work for you.
To update your header image, follow these steps:
Log in to your Twitter account.
Click "Edit profile"
Click "Change your header photo"
Follow the prompts to upload your photo, click "Open"
Adjust the position and scale of your photo, then click "Apply"
If
you'd like to personalize your profile even more, be sure to include a
profile photo, personal bio and a link to your personal website. You can
also customize your theme (or Twitter background) in your profile
settings.
3. Search for things happening locally
Twitter has so many users that it's now being used to report illness outbreaks, and even earthquakes. And while that's pretty impressive, it also means that on any given day, there are millions of tweets to sift through.
But you don't need to be a super computer to find out what's happening locally. You just need to use this clever search trick.
To find local content on Twitter, type the following when you search:
near: "[city] [state]" [search term]
Here's an example: near: "Phoenix Arizona" music
Using
this search trick will cause Twitter to return results of tweets from
nearby Twitter users about the topic you've specified. The results from
my search "near: 'Phoenix Arizona' music" pulled up local bands, event
listings and even a musician looking for a new lead singer.
You
can also search locally by typing in your search term, hitting "Enter,"
then clicking on the "More options" drop down. There, you'll find the
option to filter your search results by clicking "Near you." It's a
great way to stay on top of what's happening in your community.
4. Use keyboard shortcuts to save time
To
make navigating the site easier, Twitter has included several keyboard
shortcuts for you. But, chances are, you haven't learned them all. Using
these shortcuts reduces the amount of time it takes to complete tasks
on Twitter, because you don't have to jump back and forth from your
mouse to your keyboard.
Here are some of the best keyboard shortcuts to use:
j = next tweet
k = previous tweet
Enter = drill down into, or close a selected tweet
Space bar = page down
Shift + Space bar = page up
/ = jump to search box
. = jump to top of page
g + h = go home
g + r = go to your mentions
g + p = go to your profile
g + m = go to your direct messages
g + u (then search) = view any user's timeline
f = favorite a tweet
r = reply to a tweet
t = retweet a tweet
m = send a direct message
n = compose a new tweet
Escape = cancel
? = pull up a cheat sheet with all of these keyboard commands
5. Shorten links to save space in your tweets
One
of Twitter's key features is the 140 character limit on all tweets, and
while this limit does save us all from excessive Twitter rants, it also
means there's not much space. And, if you'd like to share a link in one
of your tweets, that means your character count is even lower.
To
combat this, rather than copy and paste links directly into your tweet,
paste links into a link shortener first. Link shorteners do exactly as
they say, they take long links and shorten them. The links will still
take you to the same place, they'll just be reworked into a compact
form.
Here's an example: Full URL: http://www.komando.com/tips/337309/top-5-money-tips-of-2015 Shortened: http://bit.ly/1mdVVIm
To create this link, I used a free link shortening site called Bitly.com.
With Bitly, you simply paste your link into the shortener and a shorter
link will be generated in seconds. You can also create a free account
to keep track of each shortened link you create. This is beneficial
because Bitly then tracks the traffic, and you can see how many people
clicked your link.
Other services like Bitly include Ow.ly and Google's URL shortener. And, even social media scheduling platforms, like Buffer, will shorten your links automatically.
Alright,
now you've learned how to use Twitter like a boss - but there's still
one thing left to do. When you start using Twitter, before you get
caught up in the tweets and the hashtags, take a few seconds to follow @KimKomando.
For your convenience Venmo and Zelle are also accepted for payment.
Fed up with Windows based computers?
Think an Apple Computer might be what the doctor ordered?
We can help you with that decision for free! Give us a call so we can discuss your computing needs!
Gift Certificates
What will you use your certificate for?
Making the move to an Apple laptop? My business has been running on an Apple laptop for 6 years.
You bought an iPhone. Now what? We have been working on iPhone problems since they came out and we can help.
Summer will be here before you know it. You want to surf on the internet on your wireless network from your pool. We are wireless network experts in both design and deployment.
Or you can use this gift card for any help needed (including training) for the computers in your home or small business.
The perfect present for any occasion:
Available in one hour increments.
No expiration date.
Can be used for service calls or training.
Giving a technology gift that requires setup or training? Why not add a gift certificate?