


 Long-time readers of the Rocket Yard have probably heard us mention Apple’s FileVault Encryption, which is a way to encrypt the startup disk on your Mac. In this Mac 101 article, we’ll take a detailed look at FileVault, how it works, things to watch out for when using it, and why owners of Mac laptops should consider using FileVault. The current implementation of FileVault is known as FileVault 2 — for the purpose of brevity in this post, it will just be called FileVault.
What’s Encryption?
When a Mac stores information on a hard disk drive (HDD) or solid-state drive (SSD), it is generally written in a format that can be easily read by anyone with a computer. In other words, if someone stole a Mac, removed the unencrypted startup disk, and connected it to another computer with the proper cable, they would have access to read all of the files on that computer. Encrypting the disk means that the information stored on it is encoded using an algorithm (also known as a cipher) that scrambles the data and makes it readable only by someone holding a decryption key. That “key” can be a password or some biometric means of identification.
How Good Is FileVault Encryption?
FileVault uses an encryption method known as “XTS-AES-128 encryption with a 256-bit key” to encode the information on a disk. That method is quite secure; a Wikipedia search showed that “Breaking a symmetric 256-bit key by brute force requires 2128times more computational power than a 128-bit key. Fifty supercomputers that could check a billion billion (1018) AES keys per second (if such a device could ever be made) would, in theory, require about 3×1051 years to exhaust the 256-bit key space.” It is very unlikely that a typical laptop thief could break FileVault encryption before the end of the universe, by which time the information stored on the disk would be quite irrelevant anyway.
What Macs Can Use FileVault Encryption?
FileVault is actually a feature of Mac OS X and macOS, not a hardware function. Beginning with Mac OS X 10.7 “Lion” and continuing up to the present-day macOS 10.14 “Mojave”, FileVault has been available for anyone who wishes to have the best possible physical security for their information. Many corporations have a policy of requiring employees with MacBooks to enable FileVault, and it’s an excellent security measure for anyone using one of Apple’s laptops.
How to Enable FileVault
When FileVault is turned on, you’ll need to use your account password or Touch ID to log into your computer. It is not possible to set a FileVault-enabled Mac to log in automatically with no password. Here’s how to enable FileVault:
1) Launch System Preferences from the Apple ( ) menu > System Preferences, from the macOS Dock, or from the Applications folder.
2) Click the Security & Privacy button.
3) Click the FileVault tab
4) Click the lock icon (🔒), then enter an administrator name and password.
5) Click “Turn On FileVault…” (see screenshot below)

(The FileVault tab of the Security & Privacy pane in System Preferences)

(Each user account must be enabled to use FileVault by entering a password)
1) For Mac OS X 10.10 “Yosemite” and later, you can choose to use your iCloud account to unlock the disk and reset your password.
2) For Mac OS X 10.9 “Mavericks” only, you can choose to store a FileVault recovery key with Apple. To unlock that recovery key and make it possible to unlock the disk, you must provide three security questions and the answers…all of which you need to remember.
3) You can create a local recovery key. You do NOT want to save this recovery key on your encrypted startup disk. Instead, it should be saved somewhere else safe, like printed and stored in a personal safe or safety deposit box, or stored in the Notes app on an iPhone or iPad in a password-protected note.
Apple makes a point of letting you know that if you lose your account password and the FileVault recover key, you will not be able to log in to the Mac or access the data on the startup disk. This is important to remember!
What Happens Once FileVault Is Enabled?
Once FileVault is enabled, it encrypts the startup disk as you use the Mac but only when the computer is awake and connected to AC power. That’s important to note — FileVault will not encrypt a MacBook’s disk when the computer is asleep or on battery power.
To check the progress of FileVault encryption, just look at the FileVault tab of Security & Privacy Preferences. As you create new files, they’re automatically encrypted while being written to the startup disk.
After FileVault has finished encrypting the startup disk and you restart the Mac, entering your account user ID and password unlocks the disk and lets the Mac finish startup.
How To Change the FileVault Recovery Key
To change the recovery key that’s used to encrypt the startup disk, turn off FileVault in Security & Privacy preferences. Turn it on again, and a new key is generated. All older keys are disabled.
How to Reset Your Password Using the Reset Password Assistant
In the unlikely event that you forget your account password or it just doesn’t work, there’s a way to try to reset your password using the Reset Password Assistant. This assistant only appears if FileVault is enabled.
1) Once the Mac has been turned on or restarted, wait (it could take up to one minute) until a message appears saying that you can use the power button on your Mac to shut down and then start up again in Recovery Mode. If this message doesn’t appear, then FileVault isn’t on.
2) Press and hold the power button until the Mac turns off.
3) Press the power button again to turn the Mac back on.
4) The Reset Password window appears. Follow the instructions on the screen to create a new password (see screenshot below)

(The Reset Password assistant only appears if FileVault is enabled)
6) Now you should be able to log into the account with the new password. You may need to create a new login keychain if you see an alert that the system was unable to unlock. your login keychain. Usually, a Create New Keychain button appears in the alert, and clicking it resolves the issue.
How to Reset Your Password Using a FileVault Recovery Key
When FileVault is enabled and you have a FileVault Recovery Key, that key can be used to reset your password.
1) Keep trying to enter a password at the login screen until a message is displayed saying that you can reset your password using the Recovery Key. That message will not appear if FileVault is disabled.
2) Next to the message is a small triangle button; click it, and the password field changes to accept a Recovery Key.
3) Enter the Recovery Key using uppercase characters, and be sure to include the hyphens in the key.
4) Follow the onscreen instructions outlining how to create a new password, then click Reset Password.
If you still can’t log in with the new password after the Mac has been restarted, try these additional steps:
1) Restart the Mac again and enter Recover Mode by pressing Command ( ⌘ ) – R or one of the alternate keyboard shortcuts (Option – ⌘ – R or Shift – Option – ⌘ – R). Release the keys when the Apple logo, a spinning globe or a firmware password prompt appears. The macOS Utilities window appears (see screenshot below)
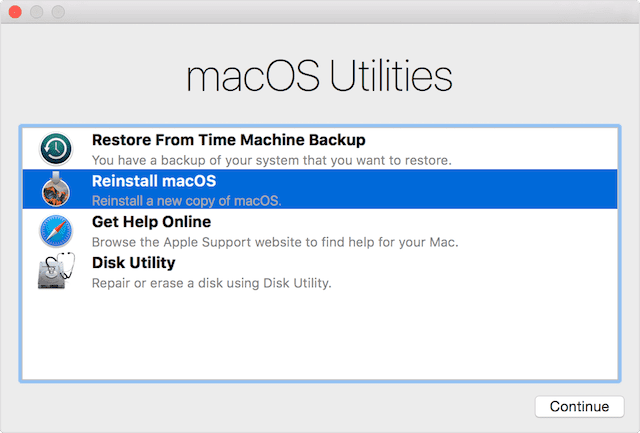
(macOS Utilities)
2) You don’t want to select any of the utilities that are listed. Instead, select Utilities > Terminal from the menu bar.
3) In the Terminal window, type “resetpassword” (no quotes) and press Return to open the Reset Password Assistant. On the Assistant screen, click the radio button next to “My password doesn’t work when logging in”, then click Next and follow the instructions to reset the password for your user account.
Disabling FileVault
When you’re going to sell or turn over a computer to another person and you’ve enabled FileVault, you’ll want to disable it as the new owner will not know the password. It’s a much better idea in this case to reinstall macOS over the existing copy using Recovery Mode and the Reinstall macOS command as seen in the screenshot above. However, if you to need to actually disable FileVault, it’s quite simple.
1) Launch System Preferences, click the Security & Privacy button.
2) Click the FileVault tab.
3) Click the lock (🔒) and enter an administrator name and password.
4) Click Turn Off FileVault.
Now give the Mac time to decrypt the startup disk. As with the encryption process, this usually takes place in the background as the Mac is being used, and the Mac must be plugged into AC power. Like the encryption process, decryption progress can be checked in the FileVault section of System Preferences.
When You Can’t Enable FileVault
There are some situations that prevent enabling of FileVault, and those are situations where a local Recovery System (also known as macOS Recovery) is not installed on a Mac. FileVault requires a Recovery System to encrypt the startup drive.
What will cause macOS to install without a Recovery System? Generally, it happens in two circumstances: first, when RAID partitions have been created on the startup drive or second, when a non-standard Boot Camp partition is on the startup drive. In both of those situations, it is necessary to either remove the RAID partitions or the non-standard Boot Camp partition before re-installing macOS with a Recovery System.


