Let there be hope...
Life has changed there is no doubt and we wanted to reach out to see how you are doing.
As we go through this interesting time, we are trying to look at this as an opportunity to focus on our family and on friends like you. Let us use this extra time to catch up and talk more. Let us cook food that is not fast, but interesting and satisfying. Let us learn to enjoy a time to try new things. Let us find ways to enjoy time at home!
Computer Security
If my client base is any experience, anyone can be a victim of a Ransomware, Malware or Virus attack.
What can you do about it?
I conduct audits of your entire computer infrastructure and apply best practice solutions to plug the security holes on your computers, Smartphones and networks.
Now offering consultations to give you the best protection possible:
Jack of All Trades, Master of Many
Jack of All Trades, and Master of Many
We provide technical support for:
Homes and small businesses
Windows and the Mac OS platform
iPhones and Android Smartphones
Wireless and wired networks
New device setup
Old device upgrade or repair
One-on-one training
Remote assistance
How To Stop Malware
Home » Archives for May 2016
Monday, May 30, 2016
Sunday, May 29, 2016
Top Story: Windows 10's nasty new trick will make you furious By Kelli Uhrich
Of course, that incident was just a poorly-timed accident. But, all jokes aside, the tone of Microsoft's push to Windows 10 is beginning to become aggressive.
Just two weeks ago we let you know about the $119 fee Microsoft will charge to anyone who wants to upgrade after July 29. The upgrade is free before then, but you have to do it by the deadline.
Lately, we've been hearing complaints from people who are getting the Windows 10 upgrade overnight, even if they don't want it. This is all part of Microsoft's nine-month push to get users to update their software. The company announced its plans for this push back in October.
"Windows 10 will be offered as a 'Recommended' update for Windows 7 and 8.1 customers whose Windows Update settings are configured to accept 'Recommended' updates," a Microsoft spokesman explained.
Just last week, Microsoft announced that the Windows 10 upgrade had been added as a "Recommended Update," instead of an "Optional Update," which is one of the reasons why people are now finding Windows 10 installed on their computers. This change means that Windows 10 will automatically be installed, unless those with older versions of Windows say otherwise.
There is a way you can stop this from happening. Click here for step-by-step instructions.
But there's another reason that Windows 10 is suddenly appearing on computers, even when people thought they had deleted the prompt to upgrade. When you look at the message more closely, you'll see the error they're making. Here's a hint: It has to do with that red X.

If you look carefully, you'll see the words, "Click here to change upgrade schedule or cancel scheduled upgrade." It's not hidden, but it certainly doesn't jump off the screen like the date that's posted right above it.

For the most part, users are generally interested in upgrading to Windows 10. But some still have their reservations. If you're still on the fence, check out 10 reasons why you might not want to make the switch to Windows 10 or read Windows 10 new features for an overview.
Saturday, May 28, 2016
The Complete Guide to iPad Multitasking: Split Screen, Slide Over & Picture-in-Picture By Conner Carey
You May Also Like: How to Use iPad-Only Gestures
Slide Over on iPad allows you to use a third of the screen to open another app, but you can only use one app at a time. Split Screen (or Split View) allows you to split the screen in half with one app on either side, and you can use both simultaneously. With Picture-in-Picture on iPad you can watch a video in the corner of your screen while working within an app. For example, if you find a video in Safari you want to watch, you can activate Picture-in-Picture then check your emails while the video plays.
Table of Contents:
How to Use Slide Over
How to Use Split Screen
How to Use Picture-in-Picture
Which iPad models can Multitask?
I’m going to list each multitask function along with the models of iPad each works with below. But to summarize, the iPad Air 2 or later & iPad mini 4 can use all multitask functions. While iPad Air and iPad mini 2 or later can use Slide Over and Picture-in-Picture. The original iPad and iPad mini are not capable of multitasking.Slide Over:
iPad Pro, iPad Air, iPad Air 2, and iPad mini 2 or later.
Picture-in-Picture:
iPad Pro, iPad Air, iPad Air 2, and iPad mini 2 or later.
Split Screen:
iPad Pro, iPad Air 2 or iPad mini 4.
How to Use Slide Over
Slide Over on iPad allows you to open a second app on the right-third of your iPad’s screen.
To open Slide Over,
-
Swipe left from the right of the screen. Your previously opened app will open.
-
To switch which app is open, swipe down from the top of the Slide Over screen.
How to Use Split Screen
Split Screen is an extension of Slide Over. To open Split Screen,
-
Swipe left from the right of the screen as though opening Slide Over.
-
Then continue your swipe, dragging the edge of the Slide Over screen to the middle, creating Split Screen.
-
Slide down from the top of the right screen to change which app is open.
-
To close one of the apps, slide the center divide over until the app you want to close is edged out.
How to Use Picture-in-Picture
Picture-in-Picture allows you to watch a video or chat on FaceTime while working in other apps. . To use Picture-in-Picture,
-
Locate a video in Safari and look for a new icon that looks like two overlapping squares.
-
Tap this icon to scale the video down and place it in the corner of the app.
-
You can drag the video to another corner and make it larger or smaller by pinching two fingers.
-
The video will have three buttons: Pause, Return, and Exit. To return
to the page where the video was playing, tap the same icon you tapped
to begin Picture-in-Picture. To simply close the video and continue what
you’re doing, tap the X.
How to Use (& Turn Off) Split Screen on iPhone 6 & 6s Plus By Jim Karpen
The iPhone 6 and 6s Plus with its 5.5-inch display gives you a lot more viewing space. Apple takes advantage of that extra display space by giving the devices a split-screen feature in apps such as Messages, Mail, and Calendar. You can utilize the extra iPhone 6 & 6s Plus features when you’re in landscape mode. In Mail, for example, you'll see the list of messages on the left and the text of a selected message in the space on the right. We’ll cover how to use split view on the iPhone 6 & 6s Plus as well as how to turn split screen off if you'd like to use the extra display space to make the text larger instead.
You May Also Like: Reachability Lets You Use Your iPhone 6 or 6 Plus One Handed
To utilize your extra screen space, you can use split screen view by turning your iPhone on its side, which automatically activates landscape mode. This allows your iPhone’s display to feature more content on a single screen and more closely mimics the way these apps look on iPad or Mac.
Common apps that use split view include Mail, Calendar, Messages, Stocks, Reminders, Voice Memos, Contacts, Clock, and you’ll notice a change on Home Screen as well. Let’s take a look at different ways you can use split view with an iPhone 6 or 6s held in landscape mode.
Rather turn split screen off? Click here to jump to those directions.
Calendar
Split screen in the Calendar app shows you your daily schedule and event details simaltaneously.Messages
Similar to Mail, Messages shows you your list of messages and the current one you're replying to in landscape mode.Stock
Need to check multiple stocks? Split view makes it easy.As you can see, split view displays more information on the same screen. This feature is only available on Plus phones, which are currently the iPhone 6 Plus and iPhone 6s Plus.
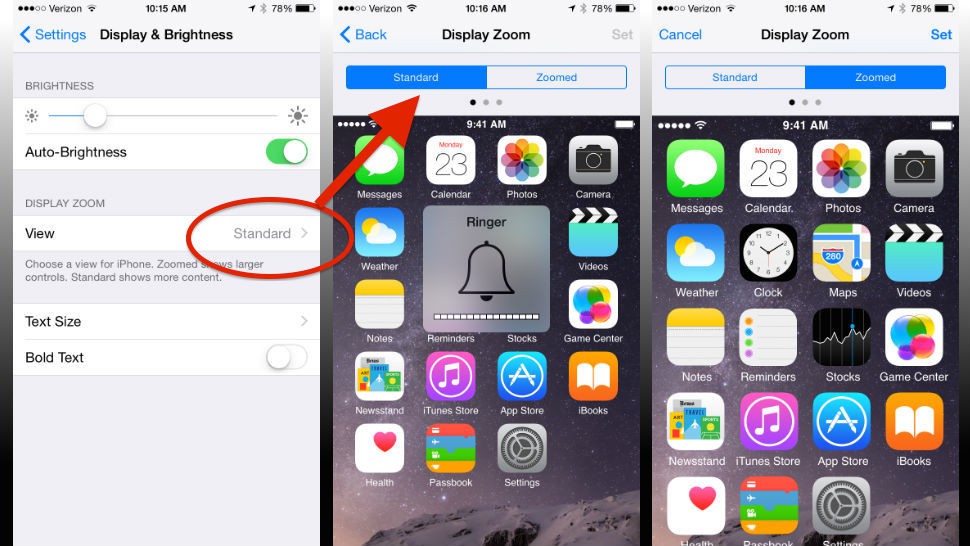
Conversely, if you’d rather turn this split view feature off, follow the steps below. Keep in mind that you will also lose other features like the landscape-oriented home screen and the extra buttons on your keyboards, but it will turn split screen off in all of the apps listed above.
How to turn off split screen:
-
Open the Settings app.
-
Tap Display & Brightness.
-
Select View.
-
Tap Zoomed at the top.
-
Select Set.
-
Confirm Use Zoomed. The message will inform you that changing the display will restart your iPhone.
Once your iPhone has restarted you should no longer see the split screen in your apps. Instead you will see one big window when you hold your iPhone 6 Plus or iPhone 6s Plus horizontally.
Now I Get It: Snapchat by David Pogue

Function 1: Self-destructing messages
Function 2: Standard chat program

Function 3: A news app

Snapchat the Unknowable

How to use Snapchat


- Seconds: The lower-left icon specifies how many seconds your recipients will have to view your masterpiece before it disappears. (They’ll see a countdown.)
- Save: Your friends aren’t supposed to keep a copy of your photo, but it’s OK for you to keep one. Tap Save to preserve it in your phone’s Photos collection.
- Post to your Story: Again, Story is Snapchat’s name for your timeline or newsfeed. It’s a way for you to make your snaps viewable to your entire social circle (which you specify in Settings) — for 24 hours.
- Choose recipients. When everything’s ready to go, tap here to view your friends list, so you can specify who gets your masterpiece.
Now you get it?
My 7 favorite tricks you'll use time after time By Komando Staff
1. Display zoom
2. See every photo and video you've sent
Do you ever look back over the photos and videos you've texted someone? We all have. After all, no one takes more meaningful pictures about your life than you. Or, maybe you'd love to look through the collection of photos that someone has texted you.You may not realize there's a really simple way to take a look back at all the photos and videos you've sent someone. It's like a scrolling timeline that'll make you laugh and bring a tear to your eyes.
Here's how: From Messages, open the message thread with that person >> press Details in the upper-right corner of the screen. From there you can view all the photo attachments sent to that person.
3. Speed up your iPhone with a better restart
Your iPhone will open up a refreshed homepage. It'll look unchanged, but when you tap on any of your apps, they'll reload. The best part is, you should notice your iPhone running faster, too.
4. Charge fast in a pinch
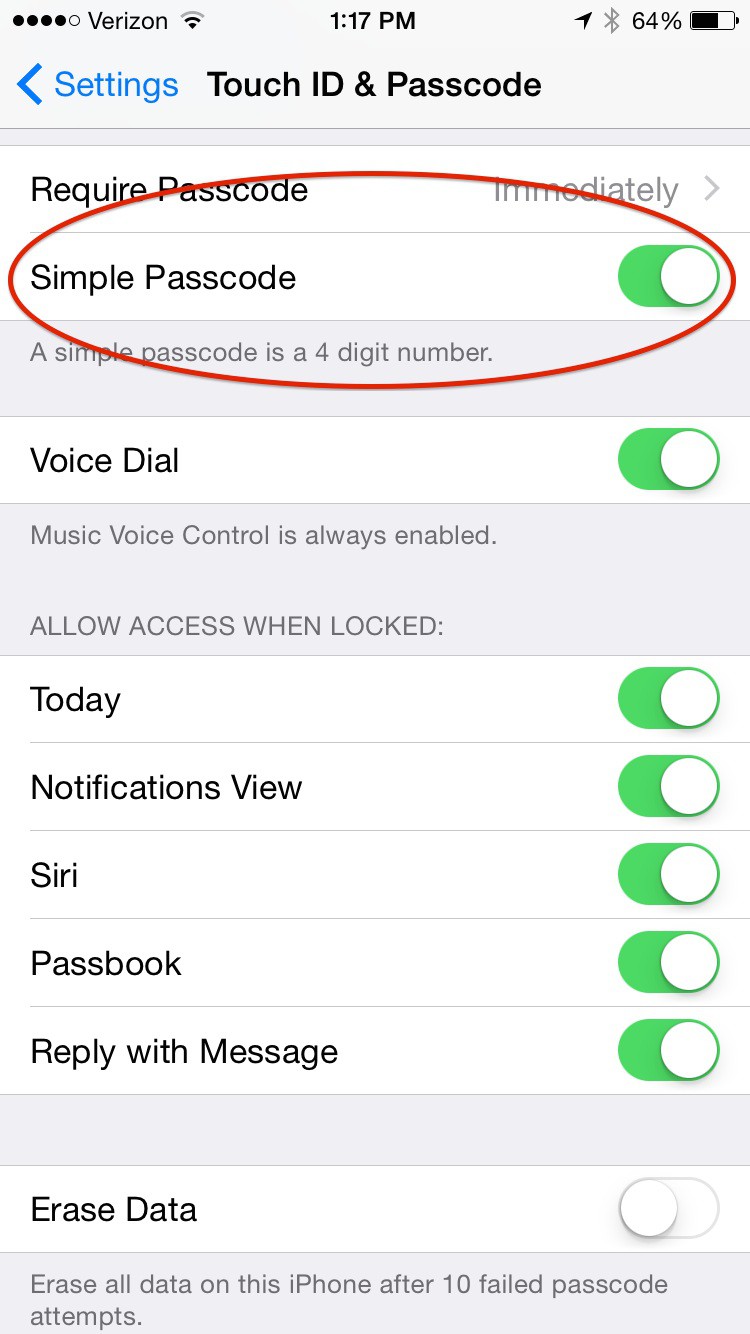
5. Use safer passcodes with letters
6. Take a photo without unlocking your screen
Is
there anything worse than missing a great photo? You know how it goes.
Your dog or cat or your kid does something so incredibly adorable that
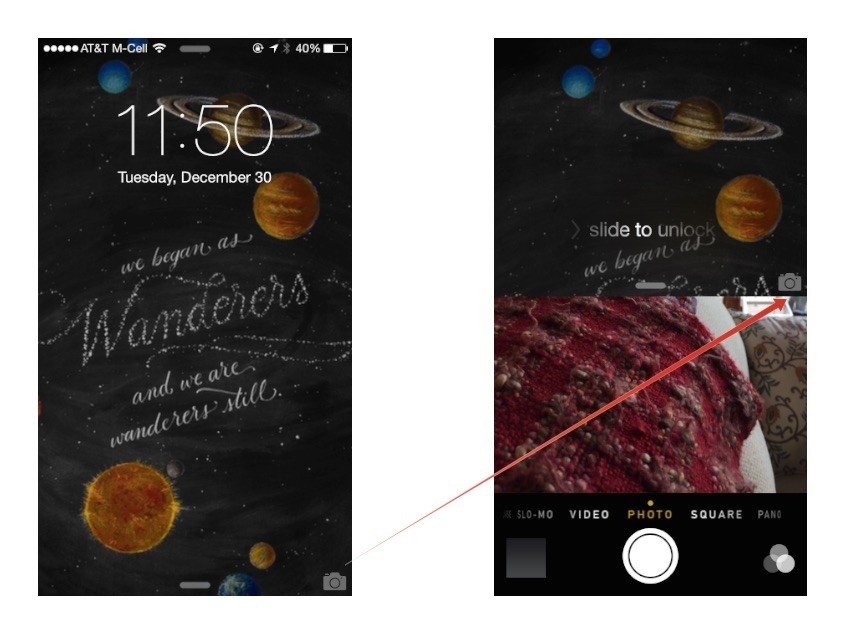
you just have to share it with the world.But, a lot of times you miss the shot. By the time you grab your iPhone, unlock the lock screen, tap your photo app and take the shot, that cute moment where your kid is looking up at you with a big smile on her face has passed.
Don't miss another spontaneous shot. Instead, from your lock screen, swipe up from the little camera icon on the lower right-hand corner of your screen. Your camera is open and ready to go.
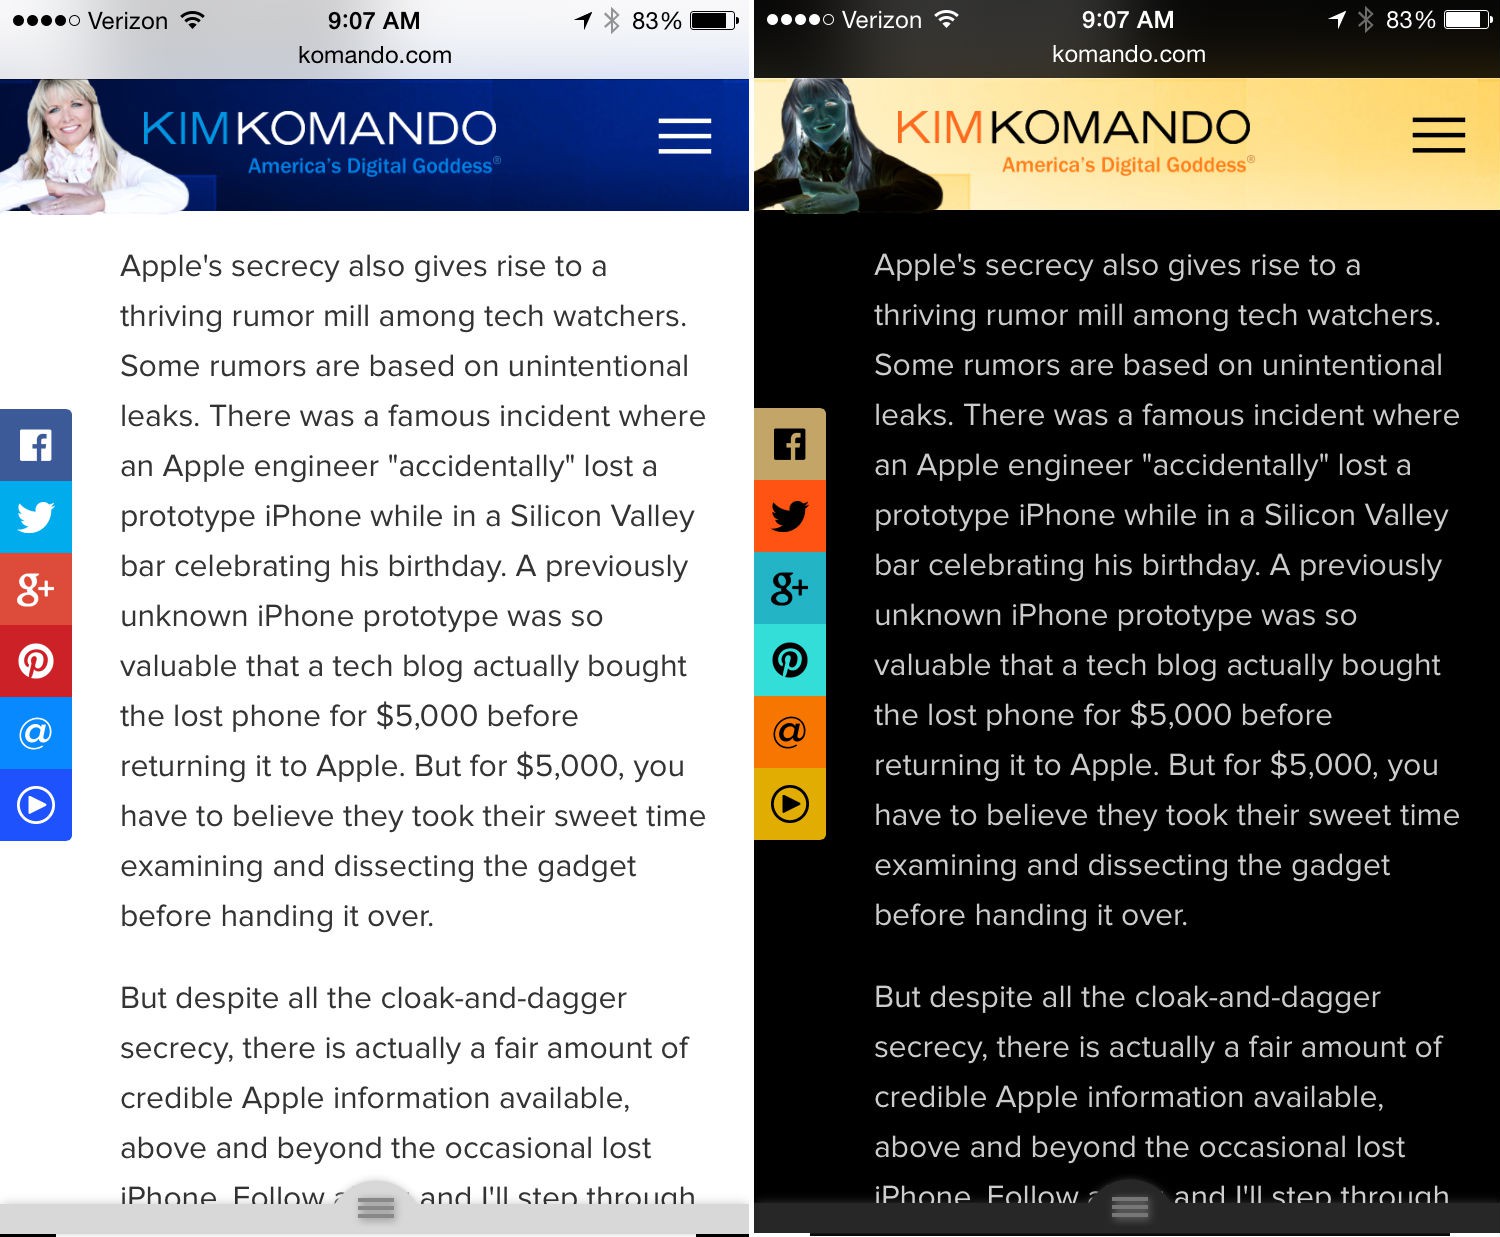
7. Invert your screen colors
Windows 10 is about to slap you with a $119 charge By Kevin Downey
Do you use Windows? If so, you're definitely not alone.
Microsoft says its newest version, Windows 10, has been downloaded 300 million times in less than a year. There are good reasons for that. Windows 10 is fast, safe and it'll soon have browser extensions that diehard Windows users have been asking for for years.
For one thing, Microsoft is moving away from older versions of Windows. Plus, Windows 10 has features that make it easy to use, like the Start button that disappeared on Windows 8.
Note: Microsoft's Windows 10 Anniversary Update will be released in two phases this summer and fall. This will be Microsoft's first major overhaul of Windows 10 since launching the OS last year. Among other upgrades, the Anniversary Update will have improved features for mobile surfing. Keep reading Happening Now for Windows 10 updates.
One easy way to NOT pay $119. Click here to get the FREE Windows 10 upgrade.
Grab the one-handed keyboard app for easier typing on the go By Meredith Cunningham
Most smartphone keyboards have tiny letters and little room for error for adult-sized fingers. And if you're texting with one hand, throw in even more typos and frustrations. Even the most careful writers can end up with embarrassing spelling mistakes. And you don't want to rely on autocorrect to fix them - usually it just makes things worse.
Next, you'll need to allow the keyboard full access for all of its functions to work - such as Arc mode - but let me show you why that might not be the best idea:
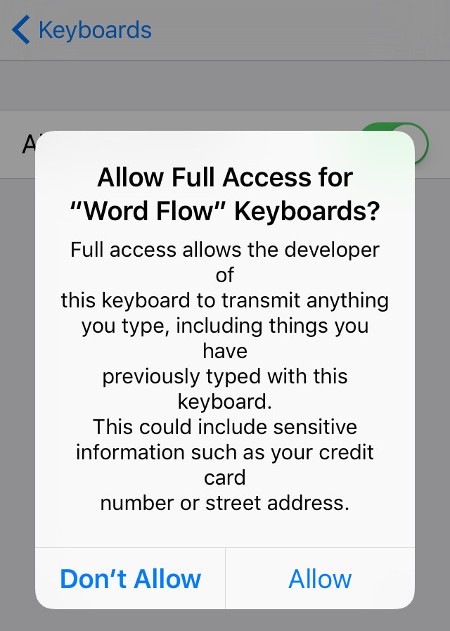
However, what you might not know is that all third-party keyboards have the same policy.
So once you've downloaded the app and decided to give permission - or not - you'll have to choose the theme and then you're on your way to smoother, one-handed typing. You can swipe instead of type and avoid embarrassing mistakes all at once!
Apps Links
How to Transfer Photos from iPhone to Computer: 5 Methods for Downloading By Conner Carey
The days of physical photo albums are behind us, and amazing cameras can be found in the palm of our hands in the form of a smartphone. Transferring your pictures from your iPhone to a computer is a great way to figure out which photos are important enough to keep, and downloading them to your Mac or Pc is smart way to keep them safe. However, getting photos off an iPhone isn’t always the easiest process, and I’ve heard from lots of our readers about the frustration this causes them. So here’s five different methods for importing your photos.
The classic way we think of syncing photos to a computer is with a USB cable, but unless you’re planning to download a lot of photos at once, there are much easier ways. But the classics are always beloved, so we’ll start with getting those pictures of yours onto a computer, then we’ll check out some alternative options you might want to adopt.
Table of Contents:
How to Download Photos to a Computer (Mac & PC)
How to Automatically Transfer Photos Using iCloud
How to Import Pictures Using Mail
How to Sync Photos Using Dropbox
How to Copy Pictures with Google Photos
How to Download Photos to a Computer (Mac & PC)
This is the tried and true method that hasn’t change much regardless of whether you use a Mac or a PC. Of course, for this method you’ll need the USB charging cord that came with your iPhone. The only difference between offloading photos onto a Mac versus a PC is the program you’ll use to import them. Let’s break it down.Mac OS X — Yosemite or later
-
Using your USB cord with lightning connector, plug your iPhone into your computer.
-
The Photos app will automatically launch once plugged in. If it
doesn’t, open your Applications folder and select Photos. There’s an
alternative method that uses Image Capture instead, which you can check out here if you prefer.
-
Click Import at the top. The program will instantly figure out how
many new photos there are to upload. To quickly import all the new
photos, click Import New. If you’d rather download select photos, you
can choose the ones you want to import and click Import Selected.
-
If you want the transferred photos to delete from your iPhone once
they are on your computer, check the box next to Delete items after
import. This is smart practice if you’re low on iPhone storage.
If you want to view the pictures you’ve uploaded, select Albums at the top.
PC — Windows 8 or later
Newer versions of Windows, such as 8 or 10, shouldn’t have any problems transferring iPhone photos to a PC computer. The process is nearly identical to a Mac, except you’re using Microsoft's version of the Photos app. However, if you are using a PC with an older version of Windows, check out this tip for using AutoPlay to import your photos.
-
Using your USB cord with lightning connector, plug your iPhone into your computer.
-
The Photos app will automatically launch once plugged in. If it
doesn’t, launch the program using the Windows Start menu or search bar.
-
There will be an Import icon in the top right corner represented by a downward-facing arrow within a box.
-
Individually select the photos you’d like to transfer from your iPhone and click Continue.
-
The next pop-up window will tell you where the photos will be saved
and give you the option to delete the uploaded photos off your iPhone.
Check the box to do so, if desired. If you want to save the photos in a
different location than specified, click the grey text: Change where
they’re imported.
-
Afterward, to view the photos you just uploaded, click Albums on the
left-hand navigation bar. Then select Last Import at the top. From here,
you can share and edit your newly downloaded photos!
How to Automatically Transfer Photos Using iCloud
You can use iCloud to automatically transfer new photos to all of your iCloud devices when connected to Wi-Fi using either iCloud Photo Library or Photo Stream; although, we recommend using them in conjunction. You get 5 GB of free iCloud storage, so if you’re going to use iCloud Photo Library, be aware that it does count towards that storage limit. You can pay a dollar a month to upgrade to 50 GB. You can also use Photo Streaming on its own, if preferred. Should you choose to use one over the other, simply check only iCloud Photo Library or Photo Streaming when prompted below instead of both.For both methods, when you take pictures outside of a Wi-Fi zone, those photos will automatically transfer once you are in a Wi-Fi zone. To do this,
-
First you need to enable iCloud Photo Library and Photo Streaming on
your iPhone. Open the Settings app, and tap iCloud. Tap on Photos from
the iCloud menu. Toggle on iCloud Photo Library and My Photo Stream.
-
If you’re using a PC, download iCloud for Windows to
continue. If you’re using a Mac, log-in to iCloud on your computer.
Open System Preferences on your Mac and open iCloud. Next to Photos,
click Options. Make sure the iCloud Photo Library and My Photo Stream
boxes are checked, and click Done.
-
To view the photos in your Photo Stream, open the Photos app on your
computer. Tap Albums at the top and select My Photo Stream. You’ll find
your iCloud Photo Library photos in the Photos app on any of your
devices as well; you can also access your photo library online here.
Photo Stream won’t transfer videos you take but iCloud Photo Library will. And remember that you need to connect to Wi-Fi before the most recent photos you’ve taken will appear. But when you have this setup, it’s a great way to transfer photos to your computer automatically.
How to Import Pictures Using Mail
If you have a small batch of photos you want to transfer to your computer, sharing them to Mail is a quick way to get them on your computer. I use this option a lot when I’m writing tips. To do this,-
Open the Photos app on your iPhone.
-
Tap Select and choose the pictures you want to download.
-
Tap the Share icon.
-
Select Mail.
-
A New Message for email will pop up. Send the photos to your own
email account and tap Send. It will give you the option to resize them,
but I usually select actual size.
-
Open the email you send yourself on your computer. Download the images in whatever folder you’d like.
There’s no limit on the amount of images you can send through Mail if your iPhone is running iOS 9 or later. For older operating systems, the maximum amount you can send is five. This isn’t the best option to select if you have a large amount of photos to import, but for a select group, it’s one of the fastest (non-automatic) ways to transfer pictures that I’ve found.
How to Sync Photos Using Dropbox
Dropbox is an awesome platform that allows you to easily access photos, documents, and more across any device with the Dropbox app or in a browser. You can also set up Dropbox to automatically copy photos to Dropbox, which means those photos are quickly accessed from your computer anytime. We’ll cover your manual and automatic options with Dropbox.Manual
-
Download the Dropbox iOS app from the App Store on your iPhone. If you don’t already have an account, create one and log-in.
-
In Files, choose the folder you want your picture to go in. Tap the
three dots in the top right corner. Select Upload File. Choose Photos.
Select all the photos you want to transfer to Dropbox and tap Upload.
-
On your computer, either download an app for Dropbox, or go the the
Dropbox website in your preferred browser and log-in. From there,
navigate to the folder you placed your newly synced photos in. You can
then download them from Dropbox to your computer if desired.
Automatic
-
Download the Dropbox iOS app from the App Store on your iPhone. If you don’t already have an account, create one and log-in.
-
Navigate to Settings in the Dropbox app.
-
Select Camera Upload.
-
Toggle on Camera Upload.
-
Now, new photos will automatically upload to the Camera Uploads
folder in your Dropbox, which you can access via your computer on the
Dropbox website.
When you turn on Camera Upload, you’ll see the option to automatically Upload Videos too. There will also be an option to turn on Use Cellular Data. I don’t recommend turning that on unless you have an unlimited data plan. Dropbox offers limited space for free, so that’s something to aware of if you plan to adopt this method. However, you get 2.5 GB of free space through the iOS app, which can hold a lot of awesome photos.
How to Copy Pictures with Google Photos
Unlike Dropbox, Google Photos gives you unlimited space for all of your pictures, so long as each photo is under 16 megapixels. Similar to Dropbox, you can set it up so that your pictures sync manually or automatically. We’ll cover both options below.Manual
-
Open the App Store on your iPhone and download Google Photos.
-
Open the Google Photos app and log-in.
-
If it’s your first time using the app, it will ask to access your photos, tap OK.
-
Navigate to Photos.
-
Tap the three vertical dots in the upper corner.
-
Create a New Album or Select Photos.
-
Once you’ve selected the photos you want to upload, tap Done if
creating a New Album and the photos will upload. You’ll then be prompted
to name the album.
-
If Selecting Photos, check the photos you want to upload. Then tap
the three dots in the upper corner, and select Back up. The photos will
upload.
-
On your computer, open Google Photos. The pictures you uploaded will be there!
Automatic
-
Download the Google Photos app on your iPhone.
-
Open the app and log-in.
-
If it’s your first time using the app, it will ask to access your photos, tap OK.
-
Tap the three horizontal bars in the upper corner.
-
Tap Settings.
-
Select Back up & sync
-
Toggle on Back up & sync.
-
All of your photos will begin backing up and syncing to Google Photos.
-
Once all your photos are synced, you can access Google Photos on your computer and see them sorted by date.
If you want to make sure all the photos you take are available across your devices, this is a great way to go. When you launch the app, all your recent photos will backup as long as you’re connected to Wi-Fi. In Settings of Google Photos, you can use cellular data to back up photos too, but unless you have unlimited data, I don’t recommend it.


