Google+ High Tech House Calls
Expert Computer Consulting for Homes and Small Businesses

Let there be hope...

Life has changed there is no doubt and we wanted to reach out to see how you are doing.

As we go through this interesting time, we are trying to look at this as an opportunity to focus on our family and on friends like you. Let us use this extra time to catch up and talk more. Let us cook food that is not fast, but interesting and satisfying. Let us learn to enjoy a time to try new things. Let us find ways to enjoy time at home!

Computer Security

If my client base is any experience, anyone can be a victim of a Ransomware, Malware or Virus attack.

What can you do about it?

I conduct audits of your entire computer infrastructure and apply best practice solutions to plug the security holes on your computers, Smartphones and networks.

Now offering consultations to give you the best protection possible:


404.229.0839
carlthorne@hthcatlanta.com

Jack of All Trades, Master of Many

Jack of All Trades, and Master of Many

We provide technical support for:


Homes and small businesses

Windows and the Mac OS platform

iPhones and Android Smartphones

Wireless and wired networks

New device setup

Old device upgrade or repair

One-on-one training

Remote assistance


How To Stop Malware

Wednesday, December 14, 2016

How to buy a new HDTV without getting ripped off by Daniel Howley

It’s the holiday season, and whether you’re heading out with the unstoppable horde of shoppers on Black Friday, or purchasing gifts online from the comfort of your home — or, let’s be real, your office — one of the most lusted after big-ticket items will be TVs.

Every brick-and-mortar store and online retailer is sure to offer some kind of ridiculous discount on televisions. But before you head out for that new TV there are a few things you need to keep in mind: like that curved screens are useless and how paying for a 4K display isn’t worth it if your TV isn’t larger than 50 inches. Oh, and avoid smart TVs. They’re just plain dumb.
Sony's HDR 4K TV.

Sony’s 4K, HDR TV. Don’t worry, I’ll explain what that means.
You know what, just follow these tips and thank me later.

Bigger is better, except when it’s not

If you’re in the market for a TV, the biggest decision you’re going to have to make is its size. Too big and it’ll dominate your room. Too small and you’ll spend most of your time squinting at the screen.

A number of publications point to specific formulas you can use to determine what size TV you should buy, depending on how far you’re sitting from the screen. And while they’re all helpful, the truth is your best bet is to simply go with the biggest TV that fits your particular room.

You can, for example, cut a piece of cardboard into the same dimensions as your potential set and pin it to your wall to see if you’ve got the right size TV. If you don’t have cardboard handy — because why would you? — you can use a tape measure to get a rough idea of how large your prospective television will be.

Resolution: Push it to the limit

Screen resolution all comes down to how close you’re planning to sit to your TV. That’s because the closer you are to the screen, the easier it is to see individual pixels — and seeing pixels ruins the image. Conversely, the farther away you sit, the harder it is to see pixels.

Older and cheaper sets that are 40 inches or smaller may still feature a resolution of 1280 pixels wide x 720 pixels high — referred to as 720p. Most sets larger than 40 inches bump the resolution up to full HD: 1920 pixels wide x 1080 pixels high (1080p). The majority of screens you’ll see this year that are 50 inches and larger will sport resolutions of 3840 x 2160 pixels, commonly known as 4K.

I sit aggressively close enough to my 42-inch 1080p set — like close enough to reach out and touch it — and I can barely make out individual pixels. If it were a 720p screen, though, chances are I’d be seeing those pixels all the time.
4K TVs.
View photos
If you’re getting a big-screen TV, for for 4K.
What about 4K TVs? Good question. A 4K screen has four times the resolution of a full HD display. That means images look sharper when viewed up close compared with a similarly sized 1080p screen.

But unlike me, most folks don’t watch TV at arm’s length. People usually sit about 8 to 10 feet from their screen, which makes seeing individual pixels on a TV with a 1080p resolution nearly impossible.

So, if you’re getting a 50-inch or smaller TV, 1080p is still totally fine. In fact, as CNET points out, it’s actually hard to see the difference between a 1080p and 4K even when sitting 8 feet from the screen.

Bottom line: If you can buy a 4K panel for the same price as you were going to get a 1080p panel, go for it. But if you’re shopping for a TV that’s 50 inches or smaller, and the 4K option is pricier than the 1080p version, go with the 1080p set.

HDR makes for beautiful colors

This year you’ll likely see a lot of HDR, or high-dynamic range, TVs. This isn’t some nonsense technology like 3D, though. HDR TVs actually provide a major boost to image quality versus non-HDR sets. In fact, it’s more of a benefit than even 4K resolution.
Samsung HDR TV.
View photos
Samsung’s SUHD TV’s offer HDR technology.
That’s because HDR TVs are capable of displaying deeper blacks and brighter whites than standard TVs. They also offer wide color gamuts, meaning these TVs can show more colors than their predecessors. The difference is striking when you see it in person. So far, there isn’t much content that supports HDR technology, but it’s coming, and fast. In fact, both Microsoft’s (MSFT) Xbox One S and Sony’s PlayStation 4 Pro support HDR, as well as 4K. And Netflix (NFLX) is now offering HDR content.

In other words, if you’re shopping for a TV and want it to be relatively future-proof, make sure it’s an HDR TV.

Refresh rates aren’t what they seem

Outside of resolution, the next most confusing number you usually see when shopping for a TV is refresh rate. Expressed as hertz (Hz), refresh rate is the number of times a TV refreshes the image on the screen each second.

The higher the refresh rate, the smoother onscreen movement looks. The lower the refresh rate, the jumpier movement looks.

The refresh rate standard for TVs is 60Hz, or 60 times a second. To improve image quality, manufacturers can increase refresh rates to 120Hz or 240Hz.
An LG TV.
View photos
Stay clear of low refresh rates.
But the refresh rate you see listed on the box isn’t always the TV’s actual refresh rate. Because TV makers know that most people equate bigger numbers with higher quality, they use different techniques to come up with ridiculously high refresh rates that don’t make any sense.

CNET has a fantastic breakdown of this, explaining how companies like LG, Panasonic, and Samsung use marketing language like TruMotion and Image Motion to fudge their TVs’ refresh rates to higher numbers.

If you can find a TV with a 120Hz refresh rate, that’s the way to go. But before you buy, make sure that when the box says the refresh rate is 120Hz, it really is 120Hz. You can usually do this by checking your TV’s technical specifications. Just make sure you’re looking at the real refresh rate and not the “effective refresh rate.” If you can’t find the actual refresh rate, check out CNET’s post or Rtings.com.

LED or OLED?

The two most common TVs on the market are LCD sets with LED (light-emitting diode) backlights, which we’ll just call LED TVs, and OLED (organic light-emitting diode) TVs. So what’s the difference besides one word? Light, or rather, how they produce it.

LED TVs create images onscreen by passing light through a series of red, green, and blue pixels. Some manufacturers place LEDs on the sides of their TV (edge-lit LEDs), while others use full-array backlighting, which puts the LED backlight directly behind the screen.

Some screens feature a technology called local dimming, which allows the TV to brighten or darken the backlighting in parts of the screen to make images look lighter or dimmer depending on what you’re watching.
LG OLED TV.
View photos
LG’s OLED TVs are beautiful, but pricey.
Both edge-lit and full-array LED TVs can use local dimming, but full-array TVs offer a better visual experience, as they are able to better control which parts of the image they lighten or darken.
Unlike LED TVs, which use a backlight to light its pixels, the pixels in an OLED TV light themselves. That means they can also turn themselves off completely, which improves power efficiency and allows for dynamic colors and incredibly deep blacks. The images truly are spectacular.

But OLED screens can’t get as bright as LED TVs. So if you like to watch TV during the day or with the lights on (like, say, during a major sporting event), you’re going to want an LED TV. What’s more, OLED TVs are still from two to three times more expensive than comparable LED TVs, putting them out of the price range of most consumers.
Sharp LED TV.
View photos
One of Sharp’s many LED TVs.
Companies like Samsung and LG also offer LED TVs with special “quantum dot” screens that are supposed to offer color quality comparable to OLED panels. See, regular LED panels produce light using a blue LED covered in yellow phosphorus to create the illusion of a pure white light, which then passes through red, blue, and green pixels. But those colors don’t always look perfect and can appear dim.

Quantum-dot technology uses nanocrystals, which produce pure red, blue, and green pixels. The process results in more vibrant colors and deeper blacks that are nearly on par with OLED TVs but not nearly as expensive.

The bottom line is that if you’ve got the cash and want a TV that can produce blacks as dark as Cthulhu’s heart and colors as vibrant as the language you’ll be spewing at the screen when your team loses the big game, you’re going to want an OLED panel.

If, however, you don’t want to empty your bank account but still want a beautiful image, look for an LED TV with local dimming and full-array backlighting.

Smart TVs are dumb

TV manufacturers have been selling so-called smart TVs for quite some time, and none of them have been all that great. Smart TVs are televisions that come loaded with their own operating systems and apps like Netflix and Hulu, as well as sports and weather apps.

But by and large, smart TV software is clumsy and confusing. And even when that’s not the case, navigating menus and opening apps is often unbearably slow.
LGs Smart TV.
View photos
You’re better off avoiding smart TVs if you can.
Instead of getting sucked into buying a smart TV, you’re far better off opting for a Roku, Amazon (AMZN) Fire TV, or Apple (AAPL) TV media streaming box. Such devices allow you to download more apps than those found on most smart TVs, providing you with more content, and are infinitely faster and easier to navigate.

What I’m saying is that there’s no reason to specifically shop for a smart TV. If the one you’re looking at happens to come with built-in apps and software, then by all means get it. Just make sure you also get a set-top box for those times when you actually want to “Netflix and chill.”

Leave curved flat

I’ve talked about the ridiculousness of curved TVs before, but in case you haven’t had the opportunity to read my previous rant, here goes nothing.

Curved TVs are silly and unnecessary. The reason they exist is to simulate the experience of watching a movie in a theater. But theater screens are curved for a reason: Projectors in theaters send light out from a central location, usually lined up with the middle of the projection screen.
Samsung curved TV.
View photos
Curved TVs are largely pointless. Go flat.
The screen curves toward the projector at the edges, to ensure that the light from the projector hits the screen at the same time in every spot. If it wasn’t curved, the image would look distorted.
A TV doesn’t have the same problem as a movie projector. In fact, curving the screen can just make it harder for people sitting anywhere near the middle of the TV to see the complete picture.
So just avoid the curve.

Now go forth on your shopping excursion, and stay safe out there. The hordes are hungry … for savings.

iOS Hidden Feature: Photos automatically sorted by person by David Pogue

When Apple released iOS 10, the latest system software for the iPhone/iPad, it made a big deal out of the major features, like a redesigned Music app and contextual predictions in autocorrect.

But Apple’s engineer elves worked for a year to overhaul iOS 10, and they’ve planted lots of hidden gems. Today, I’m happy to present another of the best iOS 10 features that Apple forgot to mention.
The iOS 10 Photos app can now auto-group the people in your photos, using facial recognition—for example, all pictures of your mom appear in a clump.

To see it at work, open Photos, tap Albums, and tap People. You can even drag your favorites into the top of the screen for quick access later.

This feature doesn’t work until iOS 10 has analyzed your photos, which can take at least a day (during which the phone has to be plugged into power).

Apple proudly points out that all of this analysis is done on your phone. (That’s in contrast to services like Google Photos, which offers similar features but requires that Google access your photo library.)

How Photos removes media from albums By Glenn Fleishman

Doug Dean writes:
I can’t find recently deleted photos in Photos. I have the Recently Deleted trash can icon in my Photos sidebar, but the photos I have recently been deleting are nowhere to be seen. In the edit menu, I am able to select Undo Remove Photo from Album and have the image reappear.
Photos doesn’t make the distinction as clear as it could between deleting from an album and deleting the media file. When you’re viewing an album, selecting one or more items and pressing the Delete button corresponds to Remove [X Photos/Videos] from Album. The media remains present in Photos, but it’s no longer part of that album. That’s why the Undo option works and displays Undo Remove Photo from Album. You can find the images by searching or browsing in your library.

Apple makes it harder to delete a photo or video. You have to select one or more items, and then right-click and select Delete [X Photos or Videos]. Pressing the Delete button on the keyboard doesn’t make anything happen. And, if you have iCloud Photo Library enabled, you’ll be prompted after choosing the Delete item to make sure you understand it will be deleted on all your linked devices and from iCloud.com. At that point, the deleted images wind up in the Recently Deleted album.
mac911 deleted photos album
The Recently Deleted album only contains images that you went through hoops to get rid of.

Top 10 Productivity Tips and Tricks for iPhone 7 By Sarah Kingsbury

Our iPhones and iPads are powerful productivity tools. These 10 iPhone 7 productivity tips will help you learn how to use the iPhone Calendar, iOS Mail, Notes, and Reminders apps to get the most out of your iPhone or iPad.
Related: 

1. How to Use iOS Mail's VIP Feature


Use iOS Mail’s VIP feature to group messages from specific contacts into a folder and receive notifications when they email you. In the Mailboxes view of the iOS Mail app, tap Edit and select VIP, then tap Done. Tap the info icon next to the new VIP mailbox and tap Add VIP to designate contacts as VIPs. Now you can find all your important emails in one place. Next, tap VIP Alerts to enable VIP notifications. Turn off other Mail notifications in Settings > Notifications > Mail so you only get notifications for VIP emails.

2. How to Email Attachments from Your iPhone Like a Pro


First, make sure your files are saved in Photos or iCloud Drive. Then, when composing an email, tap the body of the email and choose Insert Photo or Video or Add Attachment. Next, select the file you want to attach from the Photos app or iCloud Drive. Attachments from other apps must be shared to Mail from within those apps. For example, to email a PDF file from iBooks, open the PDF, tap the share icon, and select email.

3. How to Save Drafts in iOS Mail


Save an email draft on your iPhone by tapping Cancel in the upper right corner and selecting Save Draft. You can find it later in your Drafts folder. If you want to close the email temporarily while you refer to another email, just press on the email subject and swipe the draft down out of the way. Only the title will be visible at the bottom of the page. When you’re ready to return to it, just tap the title again.

4. How to Set Location-Based Reminders


Setting reminders based on time or location makes them even more useful. After you enter a reminder, tap the info icon to set specifics. To set a day and time for your reminder, turn on "Remind me on a day" then tap on Alarm. To set a location-based reminder, turn on "Remind me at a location" and then either tap on your current location or type in a location. Then choose to be reminded when you arrive at or you leave that location.

5. How to Reschedule Events in Your iPhone Calendar


In the iPhone Calendar app, press and hold on the event until it becomes opaque in color and then drag the event up or down to a new time or left or right to a different day. You can also place your finger on one of the small circles on the top or bottom and drag to adjust the event's start or end time. Using Siri to edit Calendar events is even faster. Just say something like, “reschedule my haircut from Tuesday at 2 p.m. to Wednesday at 3.”

6. How to Add Events to Your iPhone Calendar from the Mail App


There’s a feature in Settings that allows for Events Found in Mail to automatically be added to your Calendar app. Go to Settings > Mail, Contacts, Calendars and toggle Events Found in Mail on, if it’s not already. Now when you receive an email with an event in it, a notification will appear at the top of the email. Tap Add to create the event in your Calendar app. Tap Add again to save the event.

7. How to Password Protect Individual Notes on Your iPhone


Go to Settings > Notes > Password. You’ll be prompted to create a password with a hint. If you have Touch ID, enable it as well. Tap Done. In the Notes app you can now lock a note by tapping the Share icon and choosing Lock Note. Enter your password or use Touch ID. A lock icon will appear in the upper right corner. Tap to lock. To unlock it, tap View Note and enter your password, or use Touch ID.

8. How to Share Reminders


Sharing a reminder list lets others also add and check off items from the list. A shared Family Reminders List is automatically created when you use Family Sharing. But any list can be shared with another iOS user. Just open the list you want to share and tap Edit > Sharing > Add Person and enter the email address associated with the person’s iCloud account. You will receive a notification once they have accepted your request.

9. How to Search All Your Notes Folders at Once


Search in the Notes app is limited, since you can only search within one folder at a time. Fortunately, you can use Spotlight to search all your notes at once.  Go to Settings > General > Spotlight Search and enable Notes. The next time you want to search Notes, swipe down from the center of your Home screen to open Spotlight and then type your search term. The note should appear in the search results. Tap the note to open it.

10. How to Integrate Travel Time into Your Calendar Events


Open the event in the Calendar app and tap Edit.  Enter the event’s location. Allow Calendar to access your location if prompted to do so. Next, tap Alert and select Time to Leave. Now you will receive a reminder to leave based on travel time from your location. Tap Edit Event and choose Second Alert. Here you can set a reminder for up to two weeks in advance. When finished, tap Edit Event and then Done.

How to Stop Getting Messages on Mac By Conner Carey


Personally, I find getting text messages on Mac to be annoying and useless. My iPhone tends to be right next to me anyway. Getting messages on Mac is just distracting, and receiving messages from a group text on Mac is the worst. If you want to stop messages on Mac, I have got an awesome tip for you. We’ll quickly turn off iMessages at the source. Here’s how to stop getting messages on Mac.
Related: How to Search Message Conversations on iPhone: iMessage, Facebook, and Whatsapp

How to Stop Receiving Messages on Mac

  • On your Mac, open the Messages app.
  • Click Messages in the top bar and select Preferences.
How to Stop Receiving iMessages on Your Mac
  • The Accounts window will pop up, tap your Apple ID on the left column.
  • Uncheck Enable this account.
How to Stop Receiving iMessages on Your Mac
That’s all it takes to stop getting messages on Mac. When you attempt to open the Messages app on Mac in the future, you’ll have to login. Doing so will allow messages to be received by your Mac once again. But you can always use this tip to make it stop.

How to find out if your iPhone 6s is eligible for free battery replacement By Bob Brown


When my iPhone 6s started shutting down earlier this month even though it still had 20 percent or 30 percent battery life showing, I suspected maybe it was just getting too cold. After all, I’ve seen my iPhones be temperature sensitive in the past.

But it turns out that the problem really stemmed from a bug in version 10.1 or 10.1.1 of Apple iOS, and now Apple is offering free battery replacement by those affected. The weird thing that those of us affected by this have experienced is that after charging the phone back in, it almost immediately turns back on, back at its 20 percent or 30 percent battery level.

This iPhone 6s battery issue differs from an earlier, overblown iPhone 6s battery problem story. It also is separate from an issue earlier this month in which Apple began offering to repair, for $149,  iPhone 6 Plus smartphones with display flickering or multitouch issues (i.e., “touch disease”).

To determine whether your iPhone 6s is eligible for a free battery, hop over to the ”iPhone 6s Program for Unexpected Shutdown Issues” page on Apple’s website and plug in your phone’s serial number, which can be found by going to Settings>General on your device and scrolling down. Apple emphasizes that the battery issue is not a safety concern, and that the problem affects only devices within a limited serial number range made between September and October last year.

How to download and watch movies and TV offline By Kelli Uhrich


The holiday season is a prime time for catching up on the shows and movies you've missed this year. Whether you have a few hours to kill while waiting for your flight at the airport, or just need some time to unwind after visiting family or the in-laws, Netflix, Amazon Prime Video and other streaming services are making it easier than ever to watch on the go. Anytime, anywhere.

Streaming services have already transformed the way we watch TV shows and movies, but one of the biggest downfalls was that streaming required a strong internet connection. If you were offline, you were just out of luck. But now, some of the top streaming services have introduced features that let you download videos to your tablet or smartphone.
Here's how you can download everything you'd like to stream offline from Amazon Prime Video, Vudu and Netflix.

Amazon Prime Video

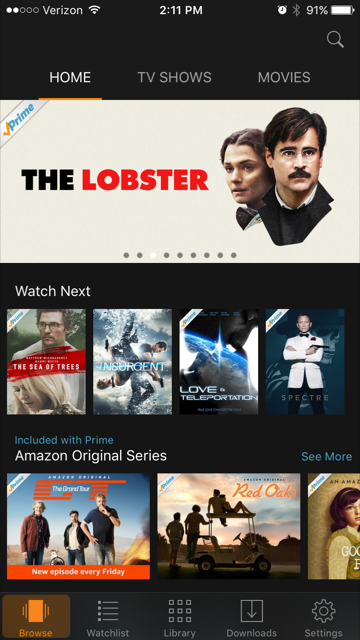
1. Open the Amazon Video app on your smartphone or tablet.
img_0892
From here, you can either browse through Amazon's video selection or tap the Library icon to see videos you've previously purchased.
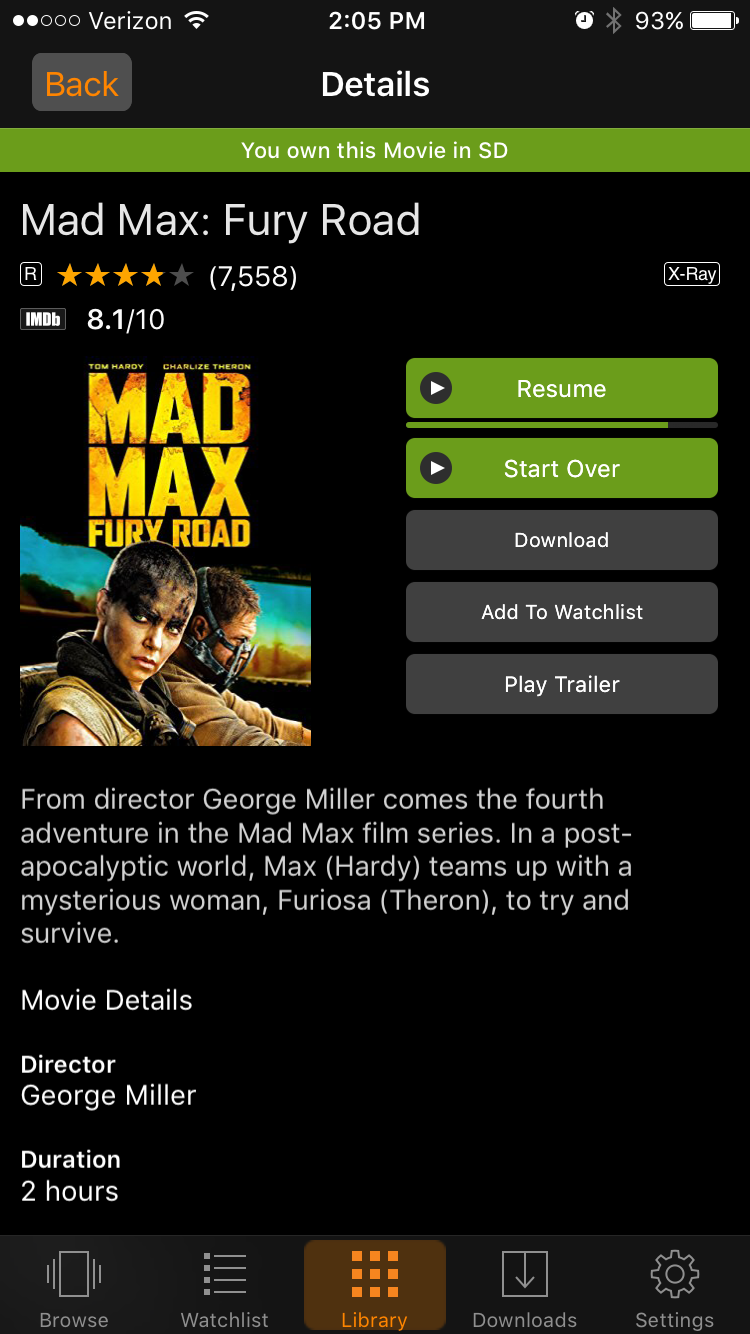
2. Tap on the video you'd like to download.
img_0889
Not all titles are available to download and some devices are not compatible. If the video is available to be downloaded and is compatible with your device, you'll see a button that says "Download" within the video details.

3. Tap Download.
img_0891
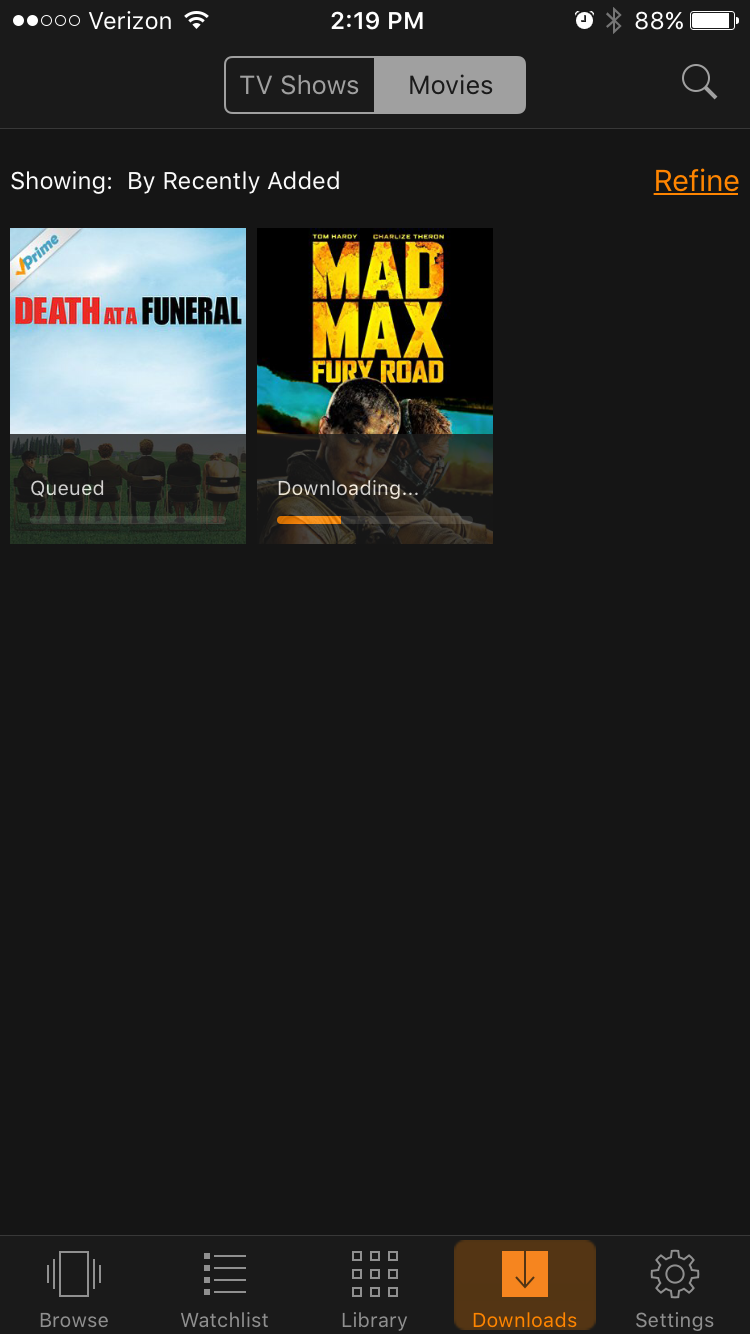
Your video will begin to download once you've tapped the Download button.
If you'd like to download additional videos, tapping Download will add them to your queue, and they'll be downloaded in the order you requested.
img_0893

Vudu

1. Open the Vudu app and go to your My Movie section.
vudu-1
2. Tap the Download icon beneath the video details.
vudu-3
You'll see the option to download the SD version of the video to your device. There is no HD option in Vudu.
vudu-2
It's important to note that Vudu only allows you to download videos that you've already purchased. This means you can't download anything from Vudu's free streaming library.

After you've selected Download SD your video will begin to download.

Netflix

This feature was just barely added to the latest version of the Netflix app, so make sure you've installed the updates for your iOS or Android device.
Netflix update
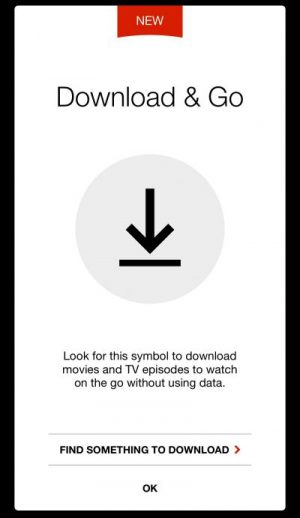
Once you're updated, you will be greeted by a short  "Download & Go" tutorial.
netflix download and go
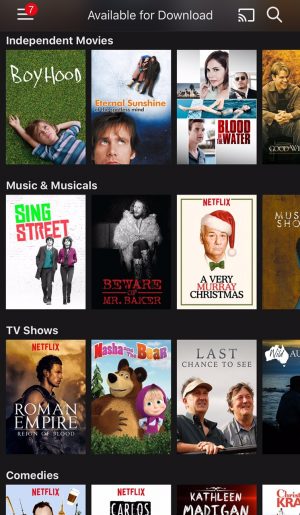
Click on the three-striped Menu button in the upper-left corner and you'll see a new "Available for Download" section.
fullsizerender-6
If a TV Show or a movie is available for download, a download icon will be displayed on the movie page or alongside it if it's a TV series episode.
fullsizerender-03
You can check your content's Download progress by going to the My Downloads section.
Netflix settings
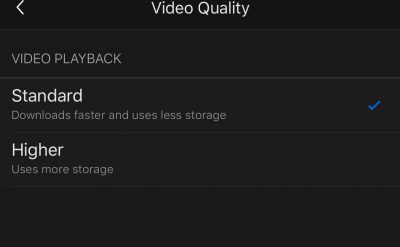
There are two video quality settings you can choose from: "Standard," which uses a slightly lower resolution, and less storage space so it downloads faster, and the "Higher" setting, which has better quality but takes more space and longer to download.
fullsizerender-05
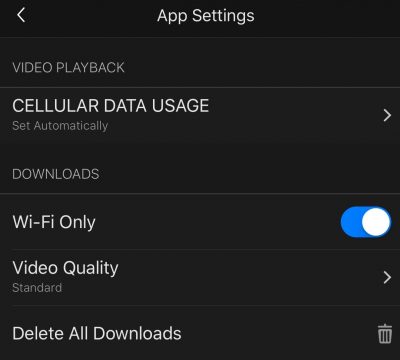
Other download options you can tweak under App Settings are "Wi-Fi Only" downloads.
fullsizerender-06
Your download speed may vary, of course, but we tested a Standard quality download of "Eternal Sunshine of the Spotless Mind" and it took about 10 minutes to complete the 407.7 MB download (the movie is about an hour and 48 minutes long). For that file size, the quality of Standard is actually good.

And the best thing is, once you've downloaded these videos, you can watch them over and over without eating through your data plan!

How to get rid of spam in iCal and iCloud By Kelli Uhrich

Your calendar is supposed to offer convenience. It's a place to keep all of your appointments in one place, and it even prompts you to stay on task by sending you reminders.

The same is true for the iCloud. It serves a different purpose but makes it easy to access the files and photos you've stored there from any Apple device.
What you don't want in either your iCal or iCloud is spam. But that's what millions of iOS and macOS users have been experiencing for the past few weeks.

If you're starting to see annoying ads promoting products such as boots and sunglasses, you're not alone. Spammers figured out a way to use a feature in iCloud that pulls invites from your email and sends you notifications in your calendar.

In some cases, these events are so intrusive that they generate a new appointment for each day in your calendar.

This spam is spreading and there's no "ignore" button for it. Hitting "Accept," "Decline" or "Maybe," will only make matters worse.

Apple has finally acknowledged this issue and, as of right now, all the company can say is "We're sorry." The statement reads: "We are sorry that some of our users are receiving spam calendar invitations. We are actively working to address this issue by identifying and blocking suspicious senders and spam in the invites being sent."

In the meantime, until there's an official fix, people with Apple devices are being driven crazy. Luckily, there's a setting you can change that will address the problem until a more permanent solution has been found.

Here's what to do:

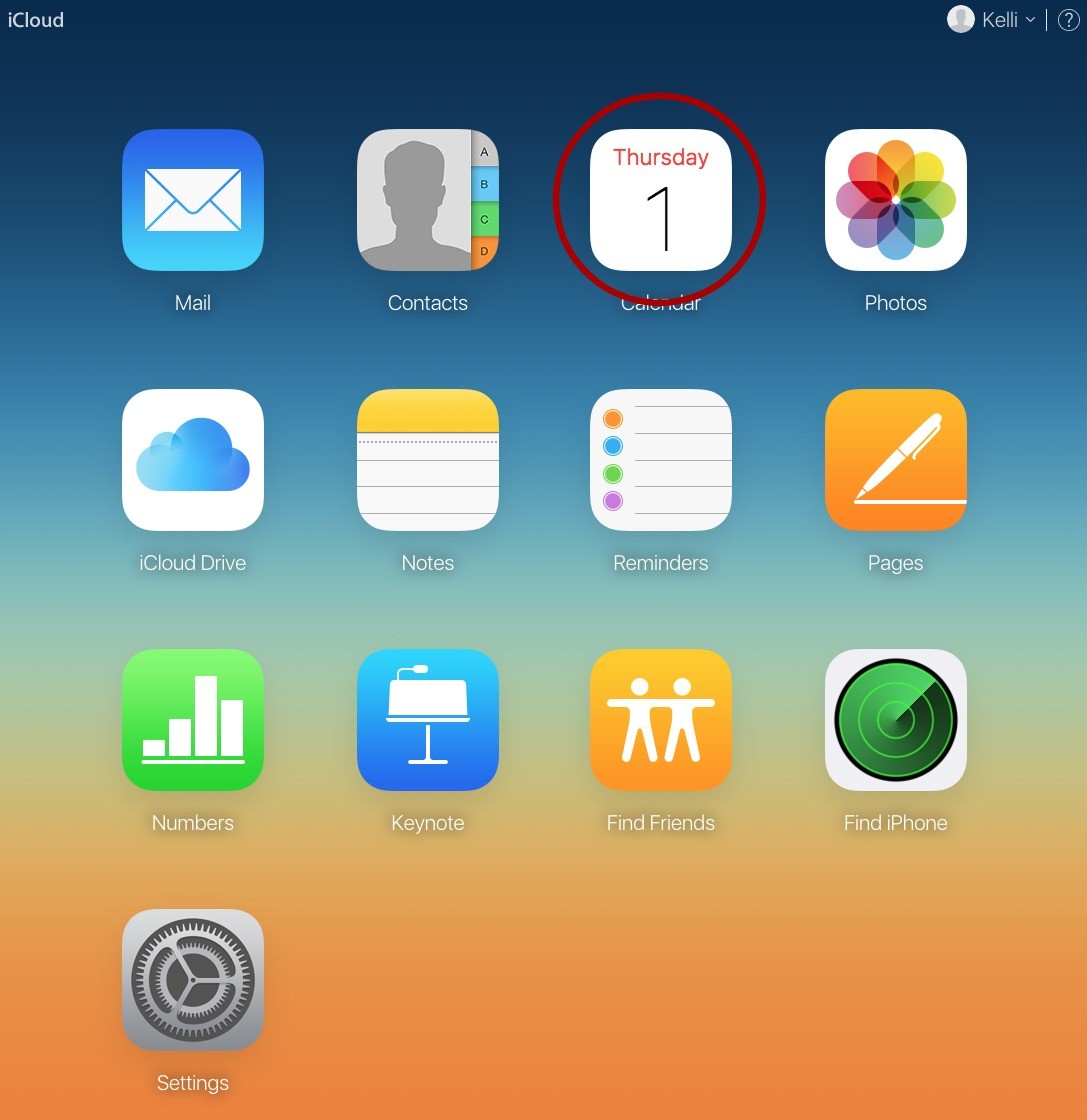
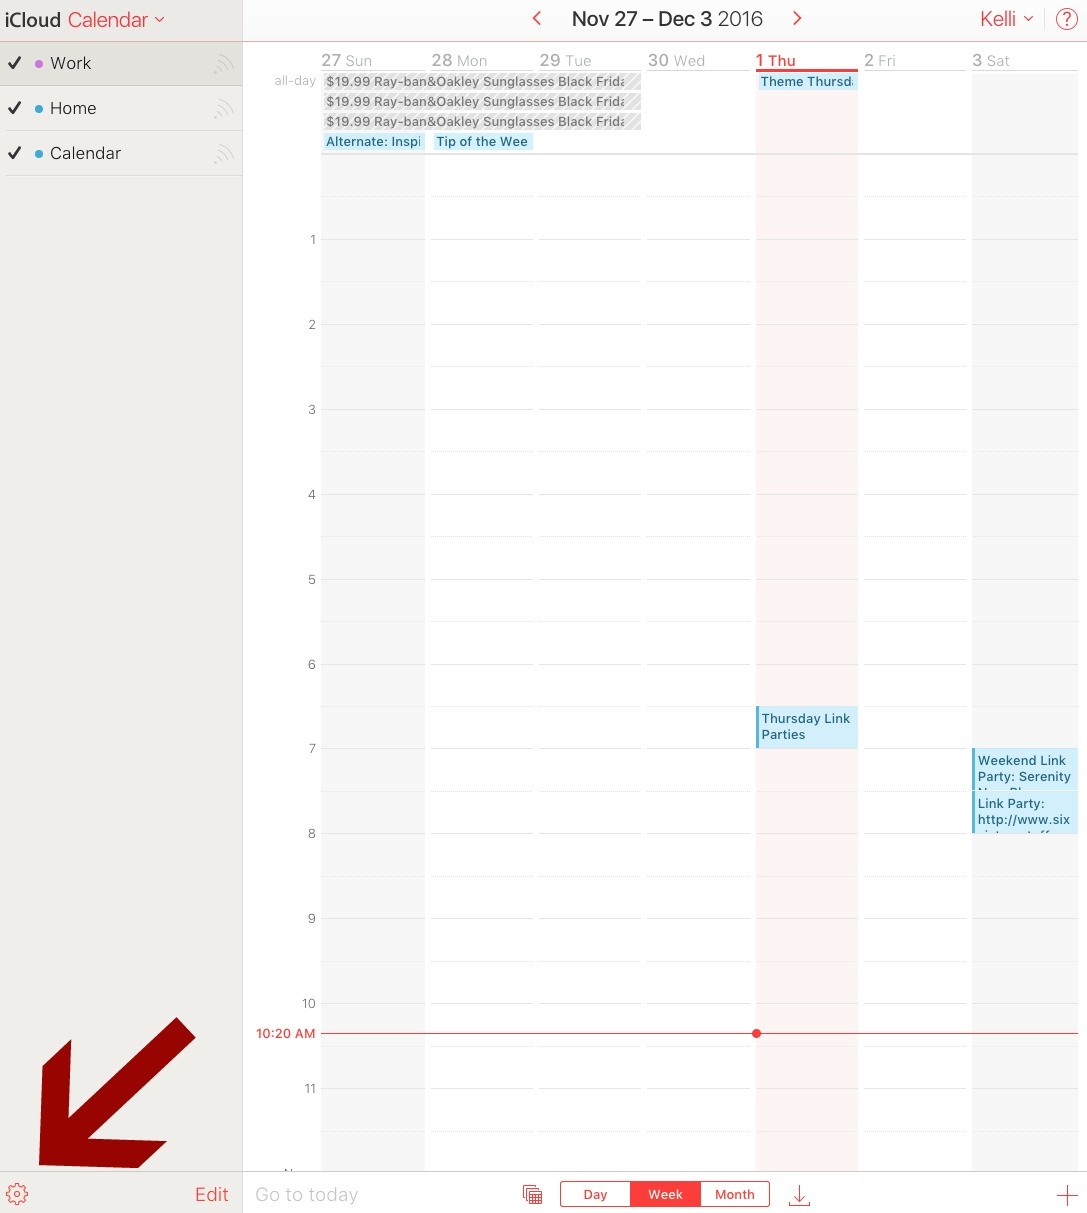
1. Using your desktop browser, access your iCloud Calendar page.

ical-1
2. Click the gear icon in the lower-left corner.
ical-2
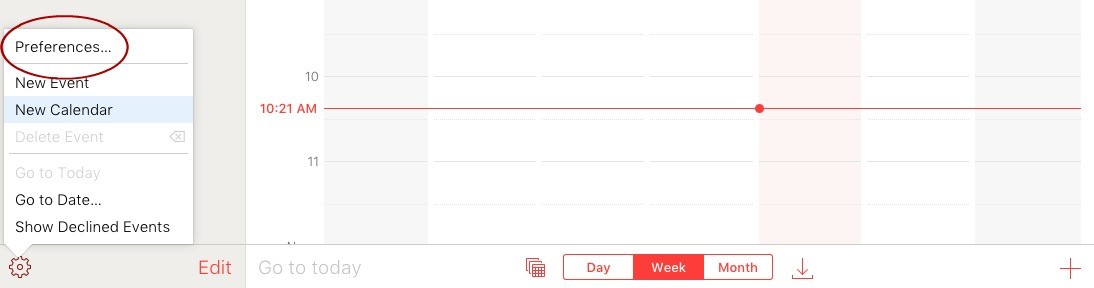
3. Select Preferences.

ical-3
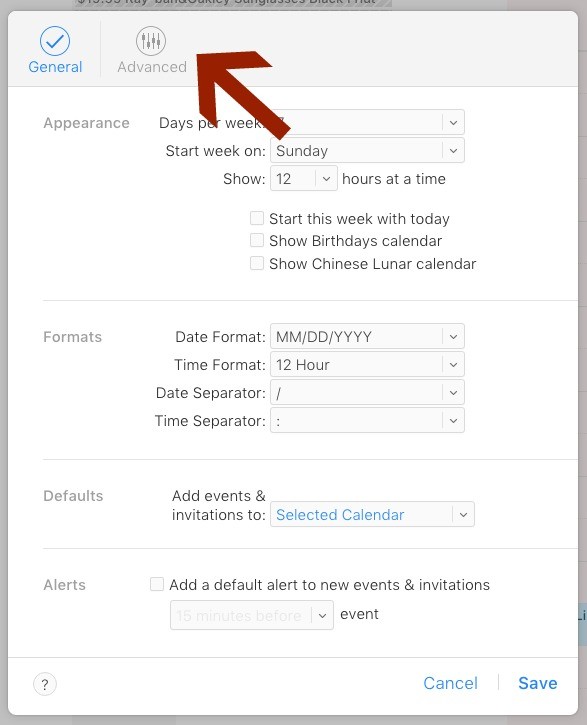
4. Click the Advanced icon.

ical-5
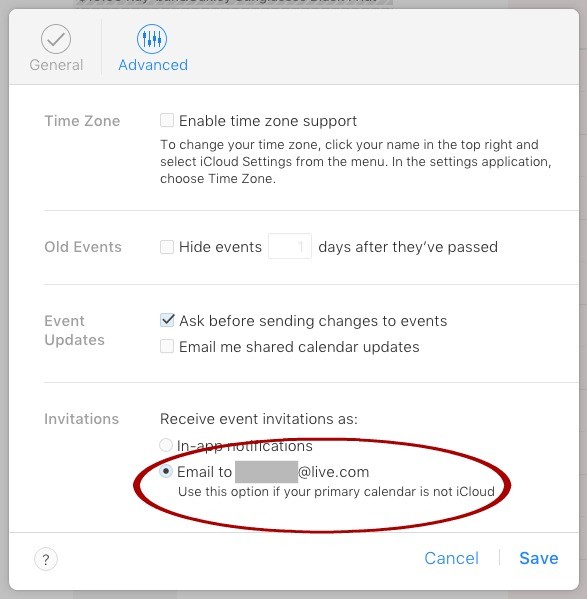
5. In the Invitations section, change the option from In-App Notifications to Email to iCloud Address.

ical-6
Making this change will redirect the spam notifications to your inbox. However, spam filters on your email account should filter them out automatically.

How to get rid of image burn-in on an LCD display By Michael Connell

 A reader asks:
“I use a 32-inch LCD TV for my home office display, connected to my PC using HDMI. I also use it for my PS3 and Wii to prevent a Shining ‘all work and no play’-type incident, so it gets quite a lot of use every day. I left town over the weekend and unthinkingly left a fixed image on the display. When I got back, I found that the image had burned in. I thought LCD displays wouldn’t do that, but I was clearly mistaken. The ocean image that was displayed left shadows of the waves across the display. Is there a way to get rid of this problem, or at least minimize it?”
It was a widespread myth for a while that transmissive displays like LCDs weren’t subject to image persistence (a.k.a. burn-in), but it is more accurate to say that they are less subject to burn-in than phosphor-based displays such as CRTs and color plasma. The good news is that on an LCD it can usually be reversed but on a CRT it is usually permanent.

To start, power-down your display for at least 48 hours. If the image is still persistent, try this tip from Lifehacker, which involves using an all-white screen to overwrite the first burn. You could also display static on your screen instead, or make a screensaver that alternates between black and white images.

The theory here is that the rapidly cycling white/black essentially resets the offending parts of the display with stuck pixels. It may take a long time—perhaps a few days—to fade the persistent image away, but it should improve. However, please note that this is not a guaranteed fix.

Another thing you could try: Edge of our Pants has a quick-fix DVD that aids in removing things like screen burn-in, image retention, and even dead pixels. You can either purchase a physical DVD for $10, or a download for $3. can download and burn to a DVD on your side so you don’t have to wait for it to arrive by mail.

3 proven formulas for creating hack-proof passwords By Kelli Uhrich


Hacks and data breaches are a dime a dozen. Still, you'd be surprised by how many people make critical mistakes when creating their passwords.

Whether your passwords are too short, too simple or have been used time and time again, these mistakes can put your private information at risk. So, here are three easy ways to create solid passwords you can still remember.

1. Unique phrases

You've probably heard that good passwords require at least eight to nine characters, a few capital letters, random symbols, etc. But a recent study conducted by Carnegie Mellon University proved there are other options.

Unique passphrases, such as "ilovefreshsashimituna," were found to be just as effective. In fact, these passphrases can be more effective since they don't contain confusing numbers, symbols or long strings of odd letters.

The key to creating a secure passphrase is to make it as long as possible, while still remaining meaningful. The ideal passphrase should be 16-64 characters long, and should say something you find funny, sentimental or has another form of personal meaning. Click here for more tips on creating passphrases that are completely secure.

2. Add deliberate spelling mistakes

One trick that makes passphrases even more secure is to use deliberate spelling mistakes.
Let's go back to the previous example. This could be written a few different ways, or you could replace some of the letters with numbers that read as the same phrase. Take a look at these examples:
  • iluvfreshsashimituna
  • il0vefre5ha5himituna
  • 1lovefreshash1m1tuna
These variations add an extra layer of complexity to a password that's already difficult to crack.

3.  Use alternatives to passwords instead

Google has been promising us all that passwords will soon be a thing of the past. With a development named Project Abacus, the tech giant aims to use your entire life as the password. In other words, using your smartphone's sensors and its services, Google wants to keep track of everything you do at all times and assign a "trust score."

For Project Abacus to work, Google would need to track your schedule, your favorite places to eat, how fast you normally walk, the sound of your voice, what types of sites you visit and everything else. As long as you do what you normally do, your trust score is high and you can log into your phone and from there into other accounts.

If there's a sudden change in your behavior, such as going to an atypical part of the city and walking around with an unusual gait, your trust score goes down and Google will lock everything up until you verify that you're actually you.

What's the downside? Well, Project Abacus will only work as long as you keep to your usual patterns. So, if you got injured and walked funny or had to use your off-hand, you might find yourself locked out.

For now, we don't have to worry about that. Project Abacus is still in development but is expected to make password-free logins possible by the end of 2016.

How does your password stack up? Before you start using a new password for any of your accounts, confirm that it's secure by using a password strength checker. Our sponsor, Kaspersky Lab, offers a secure password check that's free to use. Click here and see if your password is strong enough to serve as your first line of defense against online threats.

How to keep your Mac’s camera from spying on you, no tape required By Glenn Fleishman


It’s the staple of all hacker and government-conspiracy fiction, not to mention quite a number of horror films: You’re being watched through your hacked computer or phone or through a hijacked surveillance camera feed. And, unfortunately, this is well-reasoned paranoia in the real world, because to an operating system, a camera is just another file that can be read and relayed.

Earlier this year, in response to the news and to reader queries, I went into detail with a few ways you could disable microphone input in software and hardware on a Mac. Video is surprisingly (or not so surprisingly) easier to block: You can simply put a piece of tape over a lens.

Security guru Christopher Soghoian, principal technologist at the ACLU, told an interviewer in August, “the best bang-for-buck when it comes to privacy…is putting a sticker or a Band-Aid over your webcam on your laptop.” That’s what Mark Zuckerberg did, and he also covered his mic—which, as I noted in the previous article, doesn’t help nearly as much as audio will still bleed through.

Audio and video tapping don’t lend themselves per se to mass surveillance, despite the NSA reportedly recording enormous amounts of phone calls and video sessions and using software to find words and people of interest. Even its alleged efforts represent a fraction of all conversations, much less when you’re not actively engaged in an online A/V conversation with someone.

Soghoian explained in the above interview the likelihood of you being spied upon individually, which is worth a glance. Most people are unlikely targets, but any activist, any member of a group that finds itself in the minority, and anyone who someone else might feasibly have a grudge against could find themselves in the crosshairs of audio- and video-tapping malware or products.Students and workers with equipment provided to them could also be monitored without their knowledge. The best-known incident, but absolutely not the only case, is when a school near Philadelphia revealed to a student they were watching him at home on a school-owned computer. The school district later settled for over $600,000.

So what you can do besides tape? Some new and existing software for macOS can help.

Scotch that recording

There’s a bit of chicken-and-egg problem with software tools that monitor, report on, and block access to microphones and cameras: they’re susceptible to malware, too. Software designed to hijack your A/V would likely be savvy enough to check whether kernel extensions or other software is also monitoring devices, and would try to disable or mislead them.

But the more widely spread malware is—that is, the less targeted for a very high-value individual or group—the less sophisticated it is, and the more likely it will give itself away.

Micro Snitch alerts you when mics and cameras activate.
I wrote about Micro Snitch ($4) in my column on microphones, and it alerts you when built-in and some third-party video cameras activate as well.

privatei oversight menu
The OverSight menu lets you know what it’s monitoring and what’s in use.
Security researcher Patrick Wardle has a passel of free apps designed to help you protect your privacy and system integrity, and his OverSight will monitor not just for usage, but “piggybacking.” This is a technique seen in malware that can tap into a stream being used for FaceTime, Skype, or local recording, so the camera, mic, or both are already active when the surveillance starts. OverSight will pop up an Allow/Block warning with details about what triggered it.


And a free version CameraGuard alerts you to use of your camera. A paid version ($30) adds microphone blocking, and its maker says it uses heuristics to identify likely unwanted audio and video uses.

It’s hard to recommend one above another, except for cost, because until malware strikes (or you intentionally install a known example to test on an unpatched system), it’s impossible to predict whether one will perform better than another.

privatei oversight piggyback
OverSight can also warn you if an app tries to tap into an active audio or video stream.
But whichever you pick, pairing it with new software like Little Flocker and Wardle’s BlockBlock, which I wrote about recently, could help prevent software from running that tries to disable monitoring software or hijack active streams.

But what about an iPhone or iPad?

It’s much more complicated in iOS, because you don’t have access to the operating system’s innards and iPhones are more fragile. While iOS has a strong security track record in terms of exploits that have made it into the wild, plenty of severe flaws have been found and patched, and may have been used to target individuals. Recently, I wrote about the three-exploit package deployed against a human-rights activist’s iPhone in the United Arab Emirates, which—had it been successful—would have allowed remote audio and video interception on demand by the attackers.

You can simply put a black opaque sticker over the front-facing camera, or get a case that obscures both the front and back cameras.

It’s hard to argue that Apple could do more with iOS, because the locked-down nature of the system prevents the casual installation of third-party software that might commit unwanted acts and more serious attempts to quietly subvert your privacy. Any software that manage to hijack your mic or camera on an iOS device is the kind of thing that won’t go undiscovered in the wild for long, given how many researchers are watching for just this kind of attack.

Apple's delayed AirPods now available to buy online By Caitlin McGarry


Apple is releasing its wire-free Bluetooth AirPods in time for Christmas, skating under the wire juuuuust barely by making them available to order online today with an initial ship date of December 21.

AirPods will also be available in Apple Stores on December 21, Buzzfeed reports.

Apple announced the AirPods back in September alongside the headphone jack-less iPhone 7 and 7 Plus, positioning the $159 earphones as the perfect accessory. But then the pre-announced shipping date—sometime in October—came and went with no AirPods to be seen. Rumors swirled last week that Apple was troubleshooting connectivity issues with the AirPods, which operate independently of each other. The earphones are unusual in that they lack buttons for controlling the volume and song playback, instead relying on double taps and Siri commands.