Life has changed there is no doubt and we wanted to reach out to see how you are doing.
As we go through this interesting time, we are trying to look at this as an opportunity to focus on our family and on friends like you. Let us use this extra time to catch up and talk more. Let us cook food that is not fast, but interesting and satisfying. Let us learn to enjoy a time to try new things. Let us find ways to enjoy time at home!
Computer Security
If my client base is any experience, anyone can be a victim of a Ransomware, Malware or Virus attack.
What can you do about it?
I conduct audits of your entire computer infrastructure and apply best practice solutions to plug the security holes on your computers, Smartphones and networks.
Now offering consultations to give you the best protection possible:
12:56 PMHigh Tech House Calls, Expert Computer Consulting
What’s taking up all your storage space on your iPhone or iPad and
preventing you from
downloading and installing a shiny new app or a new
version of iOS? A somewhat hidden panel in iOS’s Settings app will tell
you everything you need to know.
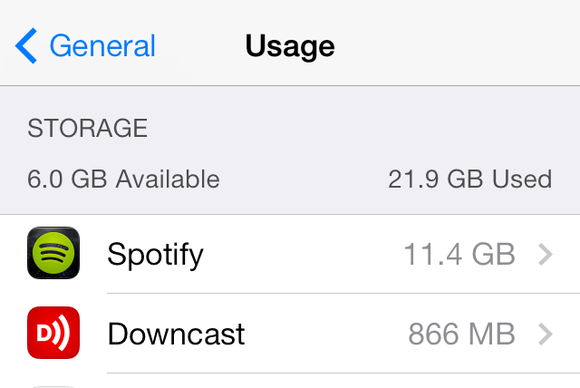
To see what’s taking up all your storage space, open the Settings app, tap General, then tap Usage.
There, you’ll get an overview of how much storage space you have used
and how much you have available, and you’ll get a list of how much space
each app uses for the app and associated data. If you want to see more
specifics, tap the app’s name in the list: You can also delete the app
via this screen.
This screen shows only the 10 heftiest apps; scroll down and tap Show all Apps for a complete list of your apps and the storage space they use.
In this case, Spotify eats up the most space on my phone; 11.4GB is tied
up with songs I downloaded. Give it a try; you might be surprised by
what you discover.
12:47 PMHigh Tech House Calls, Expert Computer Consulting
Q. Kim, I'm confused about Web addresses. Some sites have a "www,"
and sometimes they don't. Sometimes they need the "www" to work and
sometimes they don't. What gives?
A. I don't blame you for being confused, Rick. For those who don't get what Rick is asking, here's an example.
My main website is www.komando.com, but you can also get there by typing komando.com. It works either way.
As confusing as it might sound, there is a reason for this.
First, you should know a few terms. The main part of a Web address, such as the "komando" in " www.komando.com," is commonly called a domain.
The prefix, such as "www," "news" or "videos," is a subdomain. (For
those who know, I'm going to ignore top-level domains right now to keep
the explanation shorter.)
Think of the domain like a hotel and the subdomains like rooms. Each room can have different decorations.
With that in mind, let's take a quick step back through time.
In the early days of the Internet, things were very different.
There was no World Wide Web as we know it. There were no cat pictures or
videos. Everything was plain text.
There were also other ways people regularly communicated. Some
people set up parts of their sites for file transfers, email and news
groups.
To keep these organized, they used subdomains, or, in our analogy,
hotel rooms. So, what we now call a website would often live in the
World Wide Web, or "www", subdomain.
A place for uploading and downloading files would live in the File
Transfer Protocol or "ftp" subdomain. News groups usually used "news" or
"nntp."
As the Web became bigger, the "www" subdomain became the most-used
for websites. Soon, the "www" became what you typed by default.
Basically it went from a hotel room to the hotel lobby. That's why
starting around 2003, browsers began to add it for you automatically if
you forgot.
These days, most sites just redirected their domain to the "www"
subdomain. That's why when you visit "komando.com" it redirects to " www.komando.com".
But not every site does, which is why you can occasionally run into
problems. For a while, search sites still treated "www" and non-"www"
addresses as different sites, even if the content was the same.
Today, advances in search sites have made this a non-issue. Search
sites are now smart enough to know that both addresses have the same
content.
This also explains why typing in http://www.news.komando.com
doesn't work. "News" is a subdomain of the "komando.com" site. You're
asking for a subdomain - "www" - of a subdomain - "news". Going back to
our hotel analogy, it's like looking in the closet expecting to find the
bed.
As a rule, it usually doesn't matter if a site address uses "www"
or not. It's just a leftover from the early days of the Internet.
However, you may run into a few sites where the "www" is necessary.
It's pretty rare, but some sites require it. If you have trouble
loading a site, try putting the "www" back in.
Occasionally, this will fix the issue and route you to the correct site.
However, if the site address is already a subdomain, like "videos.komando.com," then no "www" is needed.
Browsing the Web can open you up to all kinds of threats. But you
don't have to be a victim. I can teach you how to stay protected online:
12:35 PMHigh Tech House Calls, Expert Computer Consulting
Bad news, smartphone owners: Unlimited data plans are, for the most
part, a thing of the past. Even if you’ve managed to hang on to your
unlimited data plan on AT&T or Verizon, it’s likely not truly
unlimited—your carrier probably throttles your data speeds if you exceed
2GB of downloaded data in a given billing period.
Telecoms want you to buy bigger data allowances, and they have the leverage to do so: We’re using more data
than ever these days thanks to apps, social media, Web services, and
our obsessive email-checking. So what’s a hard-working, socially
connected, tech-savvy person such as yourself to do with a limited data
plan? Follow these tips to cut back on your data habit, track and
monitor your usage, and extend your data plan—so you never have to pay
overage charges again.
Monitor usage
Before you can start reducing your data usage, you need to know how much
data you actually use. The only way to do that is to monitor and track
your usage so that you learn exactly what your phone is doing—even when
you’re not using it (thanks, background data).
The latest version of Android offers interactive graphs that show your data usage at a glance.
You have a few ways to track your data usage on an Android or iOS
device. The simplest method is to look up the information on the device
itself, namely your smartphone or tablet. Android users can check their
data consumption by digging into the settings menu: Navigate to Settings > Wireless and network and tap Data usage.
Here, you’ll find an interactive graph that displays how much data
you’ve used over the past month. You can also check previous months’
data usage, and you can view a list of apps that use data and see how
much they consume.
Checking your data usage on your device is convenient, but the function
is limited, and you should rely on it only in a pinch. It’s better to
track data through a carrier-specific app, such as AT&T’s MyAT&T app or Verizon Wireless’s My Verizon Mobile app.
The main benefit of using one of these apps is that you’ll have an
accurate estimate of how much data your carrier believes you’ve used,
and therefore how much your carrier will charge you for.
If you want more data and tracking options than either your device or
your carrier can provide, consider using a third-party app such as Onavo
Extend to track your data in a more detailed manner. Onavo Extend,
which is available on both Android and iOS,
is a free app that offers detailed monthly usage reports and data plan
analysis, information that can help you determine whether you’re using
all of the data that you’re paying for each month. Onavo Extend also
“extends” your data plan by compressing your incoming and outgoing data
so that you use less data overall.
Keep certain apps off of cellular data
Want to prevent only certain apps from using your data plan? It's easy to do on iOS 7.
iOS 7 lets you keep certain apps from using your cellular data
connection, forcing them to use Wi-Fi. This could be especially useful
if you have some apps that are particularly data-hungry.
Pop open the Settings app, then tap Cellular. Here, under Use Cellular Network Data For:,
you can see how much you’ve consumed—but only since the last time you
reset the tracker. If you don’t reset the tracker at the beginning of
each new billing cycle, this statistic is useless.
You'll also notice a toggle switch next to each app’s name. If you want
to keep any of these apps from using your data plan, slide the toggle to
the off position.
Use Wi-Fi whenever possible
If you have regular access to a Wi-Fi network at home or at work, use
that instead of your cellular data connection: When you connect to
Wi-Fi, apps will use that for uploads and downloads, thus sparing you
from going over your data cap. The downside? Using Wi-Fi may drain your
battery a little more quickly.
Trying to find a good Wi-Fi network can be tedious, so use a free Wi-Fi
finding app, such as JiWire’s Wi-Fi Finder. Available for both Android and iOS, Wi-Fi
Finder contains a database of over 550,000 Wi-Fi hotspots in 144
countries. You can use the app’s regularly updated hotspots map in
conjunction with your phone’s GPS function to find the best Wi-Fi in
your area, or you can download JiWire’s database so that you can still
peruse its map of Wi-Fi hotspots even if you’re currently offline.
For every hotspot, Wi-Fi Finder lists details that you can’t get from
your phone’s settings menu, such as the provider (AT&T, Comcast, or
the like), the type of location (hotel, café, and so on), and whether
it’s a free or paid hotspot.
Avoid streaming music or video on the go
Streaming apps like Pandora can eat up your cellular data quickly.
It may seem obvious that streaming audio would eat up your data
allotment, but it can eat it up more quickly than you might think. So
limit the amount of time you spend streaming Pandora or Netflix while on
the bus.
If listening to podcasts while commuting are your thing, consider
downloading the episodes you want to listen to using your home Wi-Fi
connection before you leave in the morning. The same goes with music:
Transfer a playlist from your iTunes library to your iPhone so you don't
have to stream it later.
At the very least, see if the app you’re using to stream audio gives you
the option to adjust the audio quality (bitrate). If you can adjust
it—and if you can tolerate lower-quality audio—that’s another way to
limit the strain you put on your data plan.
Cut back on other data-heavy apps, too
You now know that it’s best to keep Netflix and Pandora mobile marathons
to a minimum, but don't forget about other data-sucking apps. Social
networking apps (which are constantly updating in the background), games
(which push ads and notifications to you), and cloud-storage apps such
as Dropbox or Google Drive (which constantly download files to stay
synced) can drain data without your knowledge.
Onavo Count keeps tabs on how much data your apps are gobbling up.
You need a tattletale app, one that reports on how much data each app on
your phone is using. We recommend downloading a third-party app such as
Onavo Count, which is available for both Android and iOS.
The free Onavo Count shows you how much data your apps are using, but
it doesn’t stop there—you can generate weekly and monthly data usage
reports, as well as an app guide that shows a list of the 20 most
popular apps and how much data they use on average.
Onavo Count also has a “You vs. Everyone” analysis feature, which tells
you how much data each of your apps is using in comparison with other
people’s apps. This function is helpful because it can alert you to
excessive data usage; for example, if your Dropbox app is using way more
data than other people’s Dropbox apps are, you should probably tweak
your sync settings and rein in your mobile Dropbox use to reduce data
consumption.
Lightweight text-only browsers such as, err, TextOnly (right) pare websites down to pure text to minimize data usage.
Another way to cut back on data-heavy apps is to use “lightweight” apps
for everyday tasks, such as Web browsing. For example, Opera Mini (Android and iOS)
is a lightweight browser that compresses websites before sending them
to your device. If you don’t mind text-only browsing, TextOnly (Android) and Text Browser (iOS)
are extremely lightweight browsers—they show only the readable text on a
webpage. You’ll save data, since you won’t have to worry about
downloading large graphics, photos, or ads.
12:07 PMHigh Tech House Calls, Expert Computer Consulting
As summer winds down and autumn kicks in, it’s time for another iOS
update. And, just as predictably, a lot of iPhone, iPad, and iPod touch
owners will want to make the leap from the previous operating system to
the new one. If tradition holds, Apple will release iOS 8 at around 10
a.m. Pacific (1 p.m. Eastern) on Wednesday, and when it does, this guide
will show you the way.
The limited path back
Because it comes as a surprise to a lot of people, it’s important to know the following from the get-go: Once you update your device to iOS 8 there’s very little chance that you’ll be able to revert to a previous version.
Apple stops “signing” (authorizing) older versions of iOS just days
after releasing a new one. Reverting during this brief window is
possible (and we'll explain how at the end of this story). But once that
window closes, there’s no going back.
For many, the jump from iOS 6 to iOS 7 was jarring because of iOS 7’s
new look. With regard to design, iOS 8 is more refinement than
revolution. So if you’re comfortable with the way iOS 7 looks and
operates, you should have little problem with iOS 8’s interface.
That said, as this is a brand-new version, there are likely to be
glitches—some third-party apps may not yet be fully compatible with iOS
8, for example. For this reason you may wish to delay upgrading. Keep an
eye on stories here and an ear open to friends, family, and colleagues
who may have taken the step. When your key apps are updated, and you
hear no complaints, it may then be time to upgrade.
Compatible devices
As excited as you may be to upgrade, make sure that the latest operating
system will run on your device. Apple says the following are compatible
with iOS 8:
iPhone: iPhone 4s, iPhone 5, iPhone 5c, iPhone 5s, iPhone 6, iPhone 6 Plus
iPod touch: iPod touch 5th generation
iPad: iPad 2, iPad 3rd generation, iPad 4th generation, iPad Air, iPad mini, iPad mini with Retina display
iOS 8 is compatible with most iOS device made in the last few years.
Earlier iOS devices are incompatible with iOS 8. Some of the older
devices that are compatible, such as the iPad 2 and iPhone 4s, may not
support all of iOS 8’s features or may perform less than optimally with
it. (New operating systems can demand more of a device’s processor and
thus cause older devices to be less responsive.) With that in mind, if
you have an iPad 2 or iPhone 4s, you may wish to delay upgrading until
you’ve read reports of their performance under iOS 8.
Preparing your device for the upgrade
Before committing to the upgrade there are steps you should take before
doing so. The first is to back up the data on it. You can do this in one
of two ways: either by connecting your iOS device to your computer and
backing it up to iTunes, or by backing it up to iCloud. In this case,
I'd encourage you to choose the first option. If it comes time to
restore your data and apps, you’ll find that doing so from iTunes is a
lot faster than from iCloud. Let’s start with the steps for backing up
to your computer.
Back up via your computer
Launch iTunes on your Mac and, if you haven’t enabled Wi-Fi sync, string
your device’s syncing cable between it and your iOS device. Select your
device in iTunes, choose the Summary tab, and in the Backups area of
the resulting window click on Back Up Now. If there are apps on
your device that aren’t in your iTunes library, a window will appear
asking if you’d like to back them up. The choice is yours, as you can
always re-download any you’re missing from the iTunes store. iTunes will
now set about backing up any apps on the device that aren’t in your
iTunes library as well as other data the device contains.
You'll find that restoring your data takes less time if you back up your iOS device to iTunes.
This would also be a good time to back up any purchased content on the device. To do that, choose File > Devices > Transfer Purchases From [name of device]. Any purchased media on the device will be backed up to iTunes.
Back up to iCloud
You can choose to back up your data to iCloud directly from your iOS device.
Alternatively, you can wirelessly back up your device to iCloud. You can
initiate this in two ways. The first is to access the Summary tab in
iTunes and in the Backups area enable the iCloud option (as seen in the
image above). The other is to choose to back up to iCloud from the
device itself.
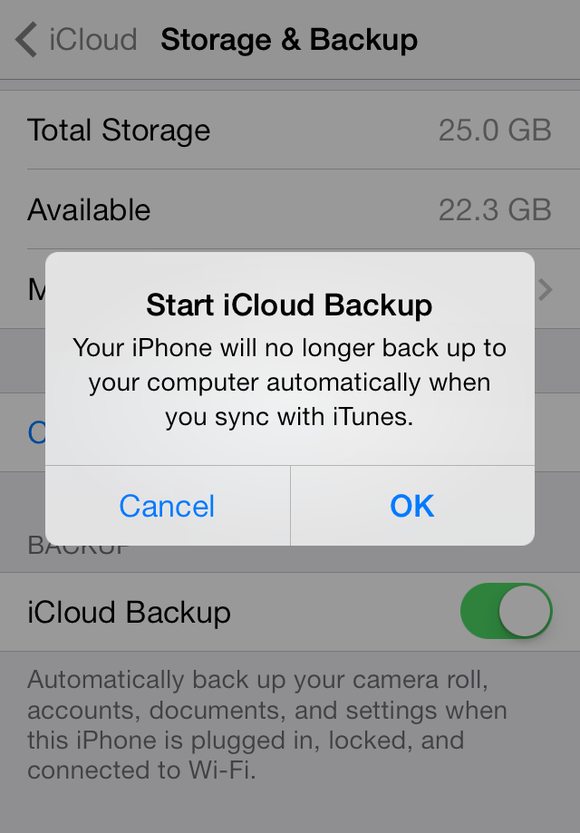
You do this by going to Settings > iCloud > Storage & Backup
and in the resulting screen enabling the iCloud Backup option. An alert
appears informing you that your data will now be backed up to the
cloud. Tap OK to allow that to happen.
Turn off Find My iPhone/iPad/iPod
If you’ve enabled iCloud’s Find My [Device] feature to help you
track it should it be lost or stolen, you’ll have to turn it off before
you can upgrade to iOS 8. This is a security precaution introduced with
iOS 7 to help prevent bad guys from wiping your device after stealing
it.
To do this, go to Settings > iCloud > Find My [Device]. Switch the toggle to Off
and you’ll be prompted for your Apple ID password. (This is not the
security code you may have set up for the device but rather the password
you use with iCloud and with the various online Apple stores.) Enter
that password, tap OK, and the feature will be switched off, allowing you to update your device.
Initiate the upgrade
Just as you can back up your device via iTunes or directly from your
device to iCloud, so too can you update your iPhone, iPad, or iPod touch
through an iTunes connection or via iCloud. The latter is easier as you
can do it over any Wi-Fi network and needn’t be within cable-reach of
your computer. Still, we’ll show you how to do it both ways.
Install over the air
When a new iOS update becomes available, it isn’t long before your
iPhone, iPad, or iPod touch learns about it. Similar to the way the App
Store seeks out new versions of apps you own, your device checks in with
iCloud to see if a new iOS update exists. When it learns of such an
update, a small red badge appears atop the Settings icon on the home
screen.
To install the update, go to Settings > General > Software Update. On the resulting screen you’ll be told that iOS 8 is available. Tap the Install
button to start downloading and installing the update. (If you don’t
see the red badge on the Settings app but know that iOS 8 has been
released, navigate to Software Update anyway. When you get there, your
iPhone, iPad, or iPod touch will query the update server to see if a new
version is available. If so, it will offer you the opportunity to
install it.)
Your device gives you plenty of hints that an iOS update is available.
It’s a good idea to update your device only when it has at least a 50
percent charge or, better yet, is plugged into a power outlet. You don’t
want your device to run out of power when it’s half-way through
installing a new version of its operating system.
Install from your computer
If you happen to be within reach of your computer you’re welcome to
install iOS 8 via iTunes. To begin, launch iTunes. If you’re not using
the Wi-Fi Sync option, string the syncing cable between your computer
and your iOS device. iTunes should tell you that a new version of iOS is
available for your device and offer to install it for you. If you see
such a notice, choose to install the update.
If iTunes doesn’t mention the update, click on the Summary tab and then click the Check for Update
button. This will cause iTunes to query Apple’s servers about the
existence of any new updates. When it’s alerted to one, you’ll be told
that the update is available. To install it, click the Update
button. iTunes will then start downloading the appropriate version of
iOS for your device. (Apple creates different versions of iOS 8 for each
device and model. So even though you’ve download one copy for your
iPhone 5s, you’ll need to download a different version for your iPad
mini.)
If iTunes doesn't tell you that iOS 8 is available, click Check for Update.
Regardless of whether you choose to update iOS over the air or via
iTunes, it should only update the operating system and Apple’s default
apps. Any other apps and data on your device will be preserved in their
current states.
Starting over with iTunes
If you’re the kind of person who uses a major iOS update as an excuse to
start fresh—with a device that behaves as if it just came out of the
box—you have the option to completely wipe the apps and data from your
iPhone, iPad, or iPod touch; install iOS 8; and then operate it as if
new (or restore it from a backup). One avenue for doing this is via
iTunes.
To proceed, in iTunes’ Summary tab, instead of clicking Check for Updates, click the Restore button (Restore iPad… or Restore iPhone…,
for example). If Find My iPhone/iPad/iPod is switched on you’ll be
asked to disable it (as described earlier). If you have purchased media
on the device that hasn’t been backed up to iTunes, you’ll be prompted
to do that. You'll then be asked if you're really sure that you want to
restore the device to its factory settings. If you're certain you have a
backup, go right ahead.
To start with a factory-fresh device, choose to restore it.
Again, iTunes will download the version of iOS 8 appropriate for your
device and then install it. During the installation you’ll see the Apple
logo on the face of the device and a progress bar, giving you a general
idea of how long it will take to install iOS.
iTunes will display a series of messages, telling you it’s waiting for
your device to get ready, verifying that the device can work with that
version of iOS, and then telling you that it’s restoring your device.
Once restored you can choose to set it up as if new, or restore a backup.
When iOS is finally installed, iTunes offers two choices. You can set up
the device as a new one—meaning your device will be set up as if you’ve
just pulled it from the box. Or you can enable the Restore from this backup option and then, from the pop-up menu, choose a backup you’ve created. (Ideally the latest backup you’ve performed.)
Set up as a new device
Choose Set up as new iPhone/iPad/iPod and click Continue
and you’ll be walked through the process of setting up the device just
as you did when you first got it. The first thing you’ll see is your
device welcoming you with a cheery “Hello” (or a greeting in another
language). Do as the screen tells you and slide to the right to get
started.
The Hello screen is the first of many screens you'll encounter when setting up your device.
This begins a process where you’re presented with a variety of setup
options. They include choosing a Wi-Fi network, agreeing to Apple’s
terms and conditions, choosing to use location services, entering your
Apple ID (or creating one if you don’t have such a thing), choosing to
use iCloud, enabling the Find My feature, selecting identities to use
with iMessage and FaceTime, choosing and confirming a passcode, allowing
your device to use iCloud Keychain,
choosing to use Siri, and deciding whether or not you want to send
diagnostic and analytics data to Apple and third-party developers. If
you’re unsure about what a particular option does or means, there’s
generally a bit of text that explains it (or a link to more
information). A Back button is available on every screen so if
you've made a mistake, just retreat through your previous steps and
correct the issue.
If you have an iPhone with Touch ID security you’ll be prompted to scan
one finger during the setup process. You can skip this step if you like.
It takes about five minutes to walk through the process and the only
information you'll need is your Apple ID and password and the password
for your Wi-Fi network, if one is necessary.
Starting over via Wi-Fi
iTunes is just one way to set up the new OS. The other is to switch on
your device, connect to a Wi-Fi network, and then start the setup
process. When you do, you’ll arrive at a Set Up screen where you can
choose to set up the device as a new one, restore it from an iCloud
backup, or restore it from an iTunes backup. If you choose the last
option, you’ll be prompted to connect your device to your computer.
We’ll examine this option first.
Restore from iTunes backup
If you choose to restore from an iTunes backup, connect the device to your computer, select it in iTunes, and from the Restore from this backup pop-up menu choose the latest backup for your device and click Continue.
Your device will display the Apple logo and a progress bar, indicating
that it’s being restored from the backup. When that’s complete the
screen displays an Update Completed message. Tap Continue
and you’ll be walked through a few steps—enabling location services,
choosing accounts to use with iMessage and FaceTime, creating and
confirming a passcode, and choosing to share analytics data with
third-party developers.
Be sure to select the correct backup. You may have many.
When the update completes, iTunes will copy your backed-up apps and data
to the device. Depending on how many apps you have, this could take
many minutes.
Restore from iCloud backup
If you’ve backed up your iOS device to iCloud (rather than to your computer via iTunes), select Restore from iCloud Backup on the Set Up screen. You’ll be prompted for your Apple ID and password. Enter them and tap Next. Your device will sign into iCloud and you’ll be presented with the Terms and Conditions screen where you tap Agree twice.
Choose the desired backup (you may have more than one depending on the
number of iOS devices you’ve backed up), and then wait; the process can
take anywhere from a few minutes to many hours, depending on how many
apps you had installed and how much data you had stored in those apps.
(As mentioned earlier, restoring from an iTunes backup is much faster
than restoring from iCloud, which is why many people back up to iTunes
periodically even if they normally back up to iCloud.)
When the restore is finished, your device restarts, and you see a screen
explaining that you have a few more steps to follow. These steps
include entering your Apple ID’s password again, selecting which
identities you want to use for iMessage and FaceTime, creating a
passcode, and setting up iCloud Keychain.
And back again
As we mentioned, Apple traditionally stops signing old versions of iOS
just a day or two after releasing major updates (such as iOS 8). If you
were to update to iOS 8 say, a week after it ships, you might find that
you can’t go back to iOS 7. So, if you intend to be among the earliest
adopters, it’s not a bad idea to have a copy of the iOS 7.1.2.ipsw file
at hand.
If you have a copy on your hard drive you will find it, by default, by following this path: youruserfolder/Library/iTunes/ and then within a folder called iPad Software Updates, iPhone Software Updates, or iPad Software Updates,
depending on the devices you use. (You access the Library folder in
your user folder by holding down the Option key in the Finder and
choosing Go > Library.)
This is where you'll find any iOS .ipsw files that you have.
The Mac will delete these files under certain circumstances so you may
not have a copy of the latest one. If you don't, launch your favorite
Web browser and search for download ipsw. You’ll find a
number of sites that offer links to the file you need. Just be sure to
choose the correct one based on the device you’re using.
If you revert before Apple stops signing iOS 7, the trip back shouldn’t
be too painful. Just jack your device into your computer, launch iTunes,
select your device, click the Summary tab, and while holding down the
Option key, click on the Restore button. (If you’ve enabled the Find My
feature you’ll need to disable it on the device first.)
Do so and a navigation window will appear. Use it to locate the iOS 7.1.2.ipsw file and click Open.
If things go according to plan, the Mac will set about installing iOS 7
on your device. When it does, it will wipe out all the non-stock apps
and data on it, so be sure to make a backup before you begin.
You'll see a screen similar to this when you throw your device into Recovery mode.
If you’re instead told that you’re already running the latest version of
iOS on your device (and you know that iOS 7 is still signed and
allowed), you may have to put your device into Recovery mode. You do
this by shutting down your device, plugging the syncing cable into your
computer, and then holding down the Home button while you connect the
syncing cable to it. When the Connect to iTunes screen appears, release
the Home button.
iTunes will report that your device is in Recovery mode. You should now
be able to hold down the Option key, click the Restore button, navigate
to the iOS 7.1.2.ipsw file, and install it on your device. Should you
see an alert that this version of iOS is not compatible with your
iPhone, iPad, or iPod touch, it means Apple has stopped signing it and
you must run iOS 8.
And in the end
We’ve covered every installation angle for you and, because we have, it
may sound like you have a lot to do. In truth, it’s not that
complicated. For safety’s sake you should always have a backup. But once
you do, it’s a simple matter to jack your iPhone, iPad, or iPod touch
into a power source; ensure that you’re connected to a Wi-Fi network,
access Software Update; and install iOS 8 over the air. Depending on the
speed of your broadband network your device should be running the
latest version of iOS in well under an hour.
11:51 AMHigh Tech House Calls, Expert Computer Consulting
You’ve got a Mac, an iPhone, maybe an iPad or two in your household, and
you have a problem. Maybe one of them’s got a cracked screen, and you
want to find out if it’s still under warranty (and what that warranty
covers). Maybe one of them won’t start up, and you want to find out what
to do. Maybe you just have a question that requires an Apple expert.
Turns out you can find out all that and more in one place—a place that a
lot of Apple users have never heard of.
You probably know about Apple’s standard Support website. But I’m betting you haven’t been to your own personal Support Profile page.
There, you can view a list of all of your Apple products, check their
warranty coverage, access troubleshooting resources, and contact Apple’s
support team. Here’s how to take advantage of all that.
Everything you ever bought
If you’ve ever bought any hardware from Apple—whether from Apple’s
online store, or in an Apple retail store, but using your Apple ID—the
company has a record of what you bought and when.
After you log in with your Apple ID and password, you’ll get to the
support profile itself. On the left, this page lists a bunch of your
personal information: name, phone number, email addresses and postal
address. (Tip: While you’re there, click the Edit link at the top of the
phone-number list and put a checkmark in the Apple VoicePass column
next to one of your phone numbers. That way, Apple can streamline any
future support calls you make, by identifying you when you call them,
based on the number you’re calling from.)
The support-profile landing page.
On the right there’s a list of every bit of hardware you’ve bought from
Apple. Below that list, you’ll see a list of the support cases you’ve
opened, repairs you’ve initiated, and a link to Apple’s support
communities.
What’s interesting is how far back this list goes; Apple has a long
memory. In my case, it goes back to that gray iMac DV SE that I bought
in 2000, the early AirPort base station, and the very first iPod I
bought.
As I said above, as long as a purchase is associated with your Apple ID,
Apple has a record of it. If you bought Apple hardware from other
retailers, you can register that, too: Click Register & Add
Products, and you’ll be asked for a serial number. When you provide one,
that item will be added to your list. Note that you can also add
nicknames for each of your devices. That can make it easier to find what
you’re looking for if you have more than one of a specific computer
model or iOS device.
If you have multiple Apple IDs, and you’ve bought Apple hardware with a
different Apple ID, you might want to put everything in one list. You’ll
need to log into your support profile with the second Apple ID, remove
the item(s) from the list by clicking Disassociate, then log in again
with the Apple ID you want to use and add it back, using the serial
number. (You might also want to do this for any Apple devices that you
sell or give away.)
Drilling down
Click an item in your hardware list and you’ll see information about it.
This is a great place to start if you have problems with any hardware.
For starters, you can confirm what kind of support you have. (In the
screenshot below, for example, you can see that my Thunderbolt display,
which I bought together with a Mac mini, is covered by AppleCare until
November of this year.)
Each item listed on your Apple support profile gives you information about that item, its warranty coverage, and more.
The Support Resources tab is useful if for troubleshooting. You’ll find a
number of FAQs, technical notes, links to downloads and other
information that may help you solve your problem. This is also a great
place to look for instructions if you want to upgrade your Mac, add RAM,
or change any user-accessible hardware items. Unfortunately, I find
that many of the articles aren’t necessarily applicable to the specific
model of Mac or iPod I have. When I look at the page for my new Mac Pro,
it links to a number of articles about the older cheese-grater Mac Pro.
So you may still need to search for what you want.
If you need to contact Apple, you can click Case Activity, then Create a
New Case. The latter lets you create a support case with all the
information about your device already filled in, making it easier to
manage. If, for example, your iMac won’t start up, it may be difficult
to find its serial number, which you’ll need for repairs. But if that
number’s listed in your support profile—either because you bought it
from Apple, or registered it yourself—you can save yourself that step.
Initiating a new service case from within your support profile.
There’s one more reason this support profile is useful. If you register
all of your Apple products, it will serve as a handy list in case you
need to contact an insurer when one of them is damaged or stolen. The
support profile won’t provide actual invoices, but it will show which
models you owned. While it doesn’t display purchase dates, you can
figure that out for recent items, based on when their warranty coverage
ends.
Note that there’s another little-known profile page
that you should know about. This one has a slightly different front
page, where only your devices are listed. That list gives you one-click
access to Apple’s Express Lane support service—which can be even faster
than going through your support profile. It’s essentially the same as
starting a new case from your support profile, after selecting an item.
If your hardware is working fine, you may never need to access these
pages. But when things go wrong with a Mac or iOS device, or if you just
want to check your warranty coverage, they can make dealing with
Apple’s support team easier for everyone.
11:43 AMHigh Tech House Calls, Expert Computer Consulting
The much-anticipated Apple launch has finally come, and with it the
latest and possibly greatest version of Apple's iconic smartphone.
Welcome to the world, iPhone 6!
But Apple didn't stop there. In addition to the iPhone 6 release, we
also witnessed two more new debuts, Apple Watch and Apple Pay - more on
them in another Tip.
The big question, as it always is with iPhone launches, is whether
the iPhone 6 lives up to the pre-launch hype. Even more importantly, are
you going to want to buy one?
Keep reading for a detailed breakdown of the announcements and what impact they're going to have.
The iPhone grows up
Like any consumer, I eagerly examined the iPhone's appearance the
moment it was introduced. My hope was that I would be totally blown
away. Apple helped me out by slowly and fluidly rotating images of the
new iPhone 6 on a giant screen behind CEO Tim Cook.
It was impressive. It looked bigger, included more curved surfaces,
but in typical Apple fashion it never really lost the basic iPhone
"look." I guess you could say the new phone looks to be more "evolution"
than "metamorphosis." And you know what, I think that was a good move.
It was finally time to get down to the nitty-gritty. Would the phone
keep the aspects that we love most? Would it improve upon the areas that
needed help? And does the new phone have enough new functions to
delight, entertain and, above all else, assist us users so that we "have
to" get one right away?
Well, let's just say that one of the biggest debates among Apple customers, particularly with the rise in popularity of larger-screened Samsung phones,
has been about size. Some continue to applaud iPhone's compact design
(minimally elongated in the 5s), while others say that Apple must make
the viewing screen (and the entire device) much larger, in order to
compete.
Enter the 4.7-inch iPhone 6 and its big brother, the 5.5-inch iPhone 6 Plus.
For starters, the basic iPhone 6 screen is already 0.7 inches larger
(diagonally) than last generation's 5s and 5c (up from 4 inches to 4.7
inches). But, if you want a dramatic increase in size, you can jump up
to a giant-sized 5.5-inch display. Either way, you will notice an
impressive difference in not only screen size but resolution. You see,
the screens aren't just bigger, they are incredibly clearer.
You may also find it as amazing as I do
that Apple was able to accomplish all this with two new phones that are
BOTH noticeably thinner than last year's 5s model.
Back when the 5s was introduced, we were excited about its 1136 x 640
pixel resolution at 326 pixels per inch. In the base iPhone 6, that
number leaps to 1334 x 750 pixel resolution at 326 ppi. In the iPhone 6
Plus, it's an almost-clearer-than-reality 1920 x 1080 pixel resolution
at 401 ppi.
In other words, the displays are just marvelous. Fortunately, Apple is using them well.
iOS now includes a horizontal home page option that is great for
navigation, and you can get two vertical fields for email and other
applications that look and feel very similar to what you would be used
to on your desktop.
More goodies
Aside from the screen size, the iPhone has expanded in other areas as
well. These new models have the new A8 chip, which increases processing
by 50 times and graphics by 84 times over the original iPhone.
If you are a gamer or have one in your family, the new iPhone
actually plays games in higher resolution than "next generation" game
consoles. That is big news to gamers.
Health nuts (yes, like me) are going to love a health app (included)
that uses the M8 co-processor to track just about everything you need to
know in order to maintain excellent condition and overall wellness.
Storage size is up, with options from 16GB to a massive 128GB. That will store enough HD movies for a decently long trip.
At first glance, the camera doesn't look any different - it's still 8 megapixels. However, there are some differences.
The iPhone's M8 co-processor allows for "phase detection" autofocus
to happen twice as fast as ever. And, the camera can detect faces from
much closer and much further away. And, in terms of video , the slow-mo
function is so amazing. Plus, the 6 Plus includes real optical image
stabilization for steadier photos and videos.
If those weren't enough, the iPhone 6 has upgraded 802.11ac Wi-Fi and
the fastest LTE on the market, so it can officially say it's the best
roaming smartphone in the world. Add in 14 hours of continuous talk time
between charges, you have one seriously impressive offering.
Hardware aside, you really did not think Apple would roll at this new
flagship phone without a new operating system to go with it, did you?
Nope. Me neither. And as we expected, the iPhone is launching with iOS
8. It will also be available as a free download for older iPhones and
iPads on September 17.
It always comes down to this
The hold-your-breath moment typically comes down to price. We hear
about the great features and capabilities and then we begin to think,
"Uh oh, how much is this going to run me?"
Ready for the good news?
Well, I cannot tell you that they are just giving these devices away.
However, I am maybe just a little surprised that their prices are
fairly close to what the 5s and 5c were offered at, last year (they are
exactly the same).
With a two-year contract, you can get an iPhone 6 starting at $199.
The starting price for the iPhone 6 Plus costs $100 more for its base
model. Prices either stay the same or increase based upon your choice of
16GB, 64GB or 128GB. Color is not an issue in determining price and
every model is available in Silver, Gold and "Space" Gray.
So, are you putting the iPhone 6 on your Christmas gift list? Which
model and color? Or are you buying something non-Apple? Let me know in
the comments.
Thoughts about Apple's 2014 launch event
With Samsung on the rise, and with Apple throwing out some lukewarm
releases after the loss of Apple icon Steve Jobs, you could say that
this launch was as important as any that Apple has ever faced. The goal
was to reestablish Apple's perception as the world's top technology
innovator. Did that happen?
Right now, it is hard to say. A lot will have to do with the public
and how the products are spoken of once "real people" like us get to try
them. However, I can say this: Apple took the opportunity seriously
and, at first glance, seems it is on its way back up to the top of the
mountain.
Does Apple Watch eventually flop? Does Apple Pay fail to catch on?
Maybe. But with Apple's razor-focus on user experience leading the way,
my best guess is that it did itself more good with this launch than any
other moment in the post-Jobs era.
The iPhone 6 and 6 Plus look like solid market contenders. Maybe they
could have appeared a bit more space-age, but I do think that staying
on-brand was ultimately a pretty good idea.
Apple Pay is very timely, and if it is easy and safe, I cannot
imagine why it would not catch on. I mean, who doesn't like the idea of a
digital wallet that is actually safer than carrying an actual one
around?
And finally, the Apple Watch is really amazing. To me, the obstacle
for that gadget may be convincing customers that they need to spend
another $350 in addition to their iPhone. But, once people get a look,
or better yet, get to play with one - something tells me it will sell. A
wrist walkie-talkie? Yes, please!
9:29 PMHigh Tech House Calls, Expert Computer Consulting
With over 50 million subscribers in 40 countries, Netflix is the
most popular television show and movie streaming service. During peak
evening hours, the service using up to 34% of America's Internet
capacity.
While Netflix may seem simple on the surface, though, the reality is
that Netflix is one of the most complex services on the Internet - from
the massive amount of HD videos it has to stream to its formulas for
deciding what videos to recommend for each subscriber.
That means Netflix sometimes doesn't work as well as you'd want. I'm
going to share some of the lesser-known Netflix secrets that will help
you track down problems and make it work the way you want.
But first, did you know Reed Hastings
started Netflix in 1997 in response to Blockbuster charging him a $40
late fee? Despite a rocky start, Netflix eventually drove Blockbuster
out of business.
Maybe if Blockbuster had been a bit more lenient with its late fees, it would still be around today.
OK, back to the Netflix secrets you need to know.
1. Streaming speed affects video quality
A side effect of Netflix's massive popularity is that it overwhelms
Internet providers' networks - or so the ISPs claim. Some providers have
even gone so far as to throttle, or slow down, their subscribers'
connections to Netflix.
If you're paying for a hyper-fast Internet connection and getting
lousy video quality, this might be the cause. Take a look at Netflix's ISP Speed Index Chart to quickly see how your ISP stacks up.
To know for sure, open Netflix and search for "Example Short 23.976."
This video is an 11-minute series of random clips so it's not very
entertaining. But it does hold the keys to one major secret.
If you look in the corner of the video, it shows your video bit rate
and resolution. The bit rate is how fast the video is streaming and the
resolution is the quality. The faster the bit rate, the better the
quality you can get.
Typically, Netflix streams 1080p resolution at 3 Megabits per second
(3,000 kilobits per second). That's ideally what you want to see.
Make a note of the highest numbers you see during the clip and then
check the bit rate against what Netflix says your provider averages.
That will tell you if you're getting the streaming speed that Netflix
thinks you are.
If you aren't getting the speed you're paying for, call your provider
and let it know. Once it gets your speed where it should be, Netflix
streaming should improve.
If you are getting the speed you're paying for, and it's faster than
the Netflix bit rate, call your provider and let it know there's a
problem with Netflix streaming. You might find out that you're being
throttled.
2. Time of day affects video quality
Poor video quality and streaming speed might have another cause,
though. Remember when I said at peak hours Netflix uses 34% of the U.S.
Internet? That's a lot of information moving around at once. Traffic
jams are bound to happen, which slows things down.
To keep things flowing, Netflix and ISPs might both decide to drop
the video quality - and thus the amount of bandwidth needed - a little.
So, you might still get HD video from 7 to 9 p.m. in your area, but
you probably won't be getting full 1080p quality. If you are testing
Netflix for quality using the methods above, be sure to do it throughout
the day.
Consistent quality is actually the one area where traditional TV has
streaming beat. If you want the best possible at all times, then you
might want to consider flipping to regular old TV during primetime
hours.
Consider buying an indoor HD antenna that will let you watch local news, syndicated shows and sports.
3. Tweak your recommendations
Netflix takes every movie you watch into account when developing
your Taste Profile. This helps it recommend videos from a pool of 76,897
genres. Sound like a lot? Well, Netflix has genres like Quirky Sci-Fi
Comedies and Dark Independent Police Dramas.
The way to change your recommendations is by rating what you watch.
When you're first starting Netflix, you'll see a lot of surveys called
Taste Preferences that ask you to rate movies, shows and genres you've
watched recently.
Handy tip: If you have
several people in the house using one Netflix account, be sure to set
each person up with their own Netflix profile to avoid conflicts. On the
Netflix website, click Manage Profiles in the top right corner to get
started.
Taste Preferences are important to fill out so Netflix can build your
Profile. After a while, you won't see as many of these, however.
If you want to revisit your preferences, go to the Netflix site and under Your Account load the Taste Preferences survey.
A few minutes tweaking your ratings can mean less time scrolling past movies you'd never watch.
Enjoy!
9:06 PMHigh Tech House Calls, Expert Computer Consulting
Use the web to surf through school
The web can be your best ally when it
comes to slogging through another school year. Whether you're looking to
make sense of an obscure topic or want to avoid breaking the bank on
that political science textbook, the Internet has a solution.
We've
compiled ten of the best resources for research, report writing, cheap
textbooks, and even finding a date with a fellow student from your
university—because college isn't all about schoolwork.
8:14 PMHigh Tech House Calls, Expert Computer Consulting
When you're walking out the door for a vacation, or even just a normal workday, it's easy
Most people don't think about setting up a monitoring system until they're already out of the house.
An Internet-enabled security camera will do the trick, but most people don't bother buying and installing one, even though I recommend it. Take a look at some of the great security cameras available in my store.
If cost or complexity is keeping you back, I have a less-expensive solution. You probably have a webcam for your desktop or laptop computer, which means you already have almost everything you need for serious spy-grade home surveillance (when you and Fido simply can't be there to secure the home front "old school" style).
Instant webcam to surveillance conversion 'ingredients'
OK, so you've decided that webcam home surveillance is not a bad idea. (Who could blame you?) So then, what are you going to need to make this happen?
Good question! For starters, I want to assure you that there are some very good and FREE software and apps that can make this a breeze. Here are two options that will satisfy needs for both Windows and Mac users:
Sighthound (Windows, Mac) - This allows you to record when motion is detected. What's more, it can tell the difference between people and objects. Sighthound will even allow you to detect movement in critical areas like doors and windows as an extra precaution.
iCamSource (Windows, Mac) - This free download works with almost any webcam. What's really nice about it is it lets you connect and take a look from any gadget with iCamSource software installed. So, if you leave your laptop behind for surveillance duty, you can just jump on your mobile device for a peek, just as often as you like. Note: The iOS and Android apps cost $5 each. Another note: They're worth it.
Before we move on, for Windows folk, there is one more option that I like. iSpy is a free, open-source camera viewing program with almost limitless possibilities. And it's always offering new features and improvements, like being able to activate any number of connected cameras by motion, sound or schedule.
It even comes with amazing value-adds like loitering recognition, license-plate recognition, motion tracking, time-lapse recording and more. However, it is a bit more complicated to set up than other options I've listed. As with everything else in life, there are always trade-offs.
But what if your computer doesn't have a webcam? Well, you can buy one. Don't forget it works great for video chat with friends and family when it isn't pulling surveillance duty.
What you need to know before purchasing a webcam
There are so many webcam options out there, you need to decide what you want it to do. Once you get an idea, there are tons of great buys out there for any budget. So, here's a boiled-down list of the things you'll want to consider:
Image quality - This includes resolution, but it also means frame rate and - especially with this surveillance idea - auto-focus as well. Look for a video resolution of at least 1280 x 720 (720p HD). A lower-resolution webcam may also be fine if you don't need crystal-clear imagery, but avoid anything less than 640 x 480.
to be thinking about what's ahead, not what you're leaving behind. Sure, you locked the doors, but what if you want to check up on your home while you're gone?
Night viewing - Beware. Inexpensive webcams often have low-light recording problems. This may be a surveillance deal-breaker. Slightly-higher quality (OK, more expensive) webcams have better low-light sensors - something you should think about.
Motion sensing - This is a webcam-gone-home-surveillance no-brainer. More sophisticated webcams are have more settings so you can actually dial in on the "type" of motion you want to look for. Some will even allow you to increase sensitivity with respect to a critical area in the view field. Of course, the software I mentioned above can add this to a webcam that doesn't have it.
Pan, tilt and zoom - Found on more expensive webcams, these features will allow you actually look around a room from a distance rather than just see what's in front of the camera. This isn't needed for smaller rooms, but if you're keeping an eye on a large family room, it might be worth it.
Of course, a full-featured webcam is approaching the price and features of an Internet-enabled security camera. So, if you're looking at the high-end webcams, take a look at security camera options as well.
When one webcam just won't cover it
Aside from the obvious option of using more than one webcam, you may come to the realization that your home or business really should have a dedicated surveillance camera or system in place. Are there too many points of entry to cover with one camera? Do you have too many valuables stored, which warrants the expense of extra protection? Could you benefit from the visible presence of an outdoor camera to deter would-be menaces?
If any or all of the above scenarios touch a nerve, then perhaps a more sophisticated system is just what the doctor ordered. And yes, of course I can help. In fact, I have some really great buys right here.
8:00 PMHigh Tech House Calls, Expert Computer Consulting
Back up your stuff
As you’d do before installing any new operating system, be sure that
your data is backed up. You can do this either via iCloud or through
iTunes on your computer. Let’s take a look at both options.
Back
up to iCloud
You can initiate this in two ways.
The first is to connect your iPad to your computer, launch iTunes, select the
iPad in iTunes, click the Summary tab, and in the Backups area enable the
iCloud option.
The other is to choose to backup to
iCloud from the iPad itself. You do this by going to SettingsiCloud Storage Backup and in the resulting screen enabling the iCloud
Backup option. An alert appears informing you that your data will now be backed
up to the cloud. Tap OK to allow that to happen.
You'll find the option for backing
up via iCloud within the iCloud/Storage & Backups setting.
Back
up via your computer
To do things the old fashioned way,
launch iTunes on your Mac and string your device’s syncing cable between it and
your iOS device. Select your iPad in iTunes, choose the Summary tab, and in the
Backups area of the resulting window click on Back Up Now. If there are
apps on your device that aren’t in your iTunes library a window will appear
asking if you’d like to back them up. The choice is yours as you can always
wirelessly re-download any apps you’re missing from the iTunes Store, but
restoring them to your iPad will happen more quickly if they’re being copied
from your computer rather than being downloaded over a slowish broadband
connection.
You can also back up your iOS device
via iTunes on your Mac.
iTunes will now set about backing up
any apps on the device that aren’t in your iTunes library as well as other data
the device contains.
In either case, once you’ve
installed iOS 8 you’ll restore from the backup you just made.
Leave
a way back
This is something we’ll look at in
greater detail when iOS 8 ships as well, but forewarned is forearmed. Be sure
to have a copy of the latest version of iOS 7 compatible with your device.
There are invariably cases where people wish they hadn’t upgraded—perhaps
because an app they rely on hasn’t yet been updated for iOS 8 or, as it turns
out, they hate change (or their older device runs more slowly with the new OS).
If you act quickly, you can put things back the way they were.
What I mean by quickly is
this: Apple “signs” versions of iOS. This tells the device that the version you
wish to use is okay to use with that device. While that version is signed, you
can install it on your iOS device—even if it’s a version of the operating
system that’s earlier than the one you just installed.
However—and this is very
important—Apple traditionally stops signing old versions of iOS just a day or
two after releasing major updates (such as iOS 8). If you were to update to iOS
8 say, a week after it ships, you might find that you can’t go back to iOS 7.
So, if you intend to be among the earliest adopters, it’s not a bad idea to
have a copy of the iOS 7.1.2 .ipsw file at hand.
If you have a copy on your hard
drive you will find it, by default, by following this path: youruserfolder/Library/iTunes/iPad
Software Updates. (You access the Library folder in your user folder by holding
down the Option key in the Finder and choosing Go > Library.)
The Mac will delete this files under
certain circumstances so you may not have a copy of the latest one. If not,
launch your favorite web browser and search for "download
ipsw". You’ll find a number of
sites that offer links to the file you need. Just be sure to choose the correct
one based on the device you’re using.
When we discuss upgrading to iOS 8
in that future article I’ll also provide steps for rolling your device back to
iOS 7 (at least for as long as you’re allowed).
For your convenience Venmo and Zelle are also accepted for payment.
Fed up with Windows based computers?
Think an Apple Computer might be what the doctor ordered?
We can help you with that decision for free! Give us a call so we can discuss your computing needs!
Gift Certificates
What will you use your certificate for?
Making the move to an Apple laptop? My business has been running on an Apple laptop for 6 years.
You bought an iPhone. Now what? We have been working on iPhone problems since they came out and we can help.
Summer will be here before you know it. You want to surf on the internet on your wireless network from your pool. We are wireless network experts in both design and deployment.
Or you can use this gift card for any help needed (including training) for the computers in your home or small business.
The perfect present for any occasion:
Available in one hour increments.
No expiration date.
Can be used for service calls or training.
Giving a technology gift that requires setup or training? Why not add a gift certificate?