Google+ July 2015 ~ High Tech House Calls
Expert Computer Consulting for Homes and Small Businesses

Let there be hope...

Life has changed there is no doubt and we wanted to reach out to see how you are doing.

As we go through this interesting time, we are trying to look at this as an opportunity to focus on our family and on friends like you. Let us use this extra time to catch up and talk more. Let us cook food that is not fast, but interesting and satisfying. Let us learn to enjoy a time to try new things. Let us find ways to enjoy time at home!

Computer Security

If my client base is any experience, anyone can be a victim of a Ransomware, Malware or Virus attack.

What can you do about it?

I conduct audits of your entire computer infrastructure and apply best practice solutions to plug the security holes on your computers, Smartphones and networks.

Now offering consultations to give you the best protection possible:


404.229.0839
carlthorne@hthcatlanta.com

Jack of All Trades, Master of Many

Jack of All Trades, and Master of Many

We provide technical support for:


Homes and small businesses

Windows and the Mac OS platform

iPhones and Android Smartphones

Wireless and wired networks

New device setup

Old device upgrade or repair

One-on-one training

Remote assistance


How To Stop Malware

Friday, July 31, 2015

Eyeing a Galaxy S6? Samsung May Be About to Drop the Price by Andy Boxall, Digital Trends


If you’ve been looking at the Galaxy S6 or the Galaxy S6 with envious eyes, it may be worth your while not giving into temptation just yet, because Samsung says it intends to drop the price on its two flagship Android phones in the near future.

The news comes from Samsung itself, and was part of a statement released alongside its latest earnings report, in which it shows an improvement over projections, but admits they didn’t come from sales of its smartphones. “Despite the launch of the Galaxy S6,” it reads, “improvements to earnings was quite marginal due to low smartphone shipments and an increase in marketing expenses.”

This doesn’t mean it’s not selling any, but it would like to sell more. The key sentence for bargain hunters is found when Samsung says it wants to maintain the “sales momentum for its high-end products,” by adjusting the price of the Galaxy S6 and the Galaxy S6 Edge. It doesn’t state how much this adjustment will be, or really whether it’ll be an increase of a decrease, but we can’t imagine it’ll be putting the price up even more.

Samsung’s Galaxy S6 phones are among the most expensive currently on sale, and in the wake of Motorola and OnePlus’s announcement of equally powerful phones that cost $200 less than an S6, an “adjustment” in price seems appropriate.

It’s timely for another reason. On August 13, Samsung is expected to launch the Galaxy Note 5 and the Galaxy S6 Edge Plus, neither of which will be cheap. The statement alludes to the arrival of the new phones, stating it’ll “flexibly adjust the price of the Galaxy S6 and S6 Edge, and launch a new model with a larger screen.”

The cost cuts may translate into better deals with networks on the S6, and a drop in the unconnected, SIM-free model’s price too.

Customizing the Windows 10 Start Menu by David Pogue
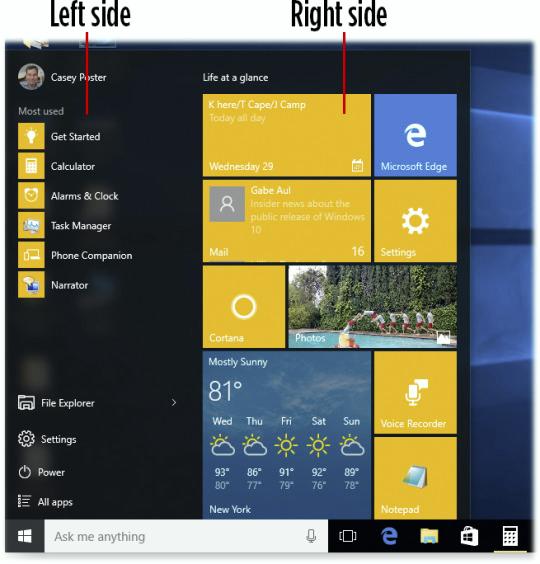
You may love the new “tiles” half of the Start menu in Windows 10, or you may hate it. But it actually doesn’t matter how you feel about it; you can expand it, shrink it, customize it, or get rid of it altogether.

Here’s the complete list of things you can do to the right side of the Start menu — and the left side.
Customizing the Windows 10 Start Menu

Right Side

Expand it: Drag the top or right edge, using the mouse or trackpad. It snaps bigger or smaller. (It doesn’t work with a finger on a touchscreen.)

Make it fill the entire screen: Right-click anywhere on the desktop. From the shortcut menu, choose Personalize. On the Settings screen, click Start, then turn on “Use Start full screen.”

In this mode, the left column of the Start menu is hidden. The live tiles area fills your entire desktop (which is handy for touchscreens).

Move a tile: With the Start menu open, drag a tile to a new spot.

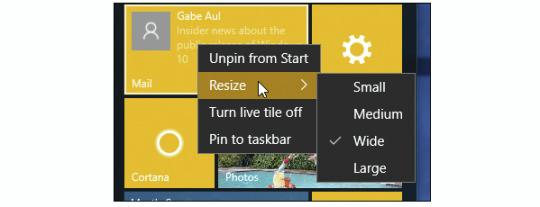
Resize a tile: Right-click the tile. From the shortcut menu, choose Resize. You always have a choice of Small and Medium; some apps offer Wide or Large options, too.
image
Add new tiles: Right-click any folder, disk, or app. From the shortcut menu, choose “Pin to Start.”
(Or open the “All apps” list, and right-click an app’s name there.)

Its tile now appears at the bottom of the right side of your Start menu.

Make a tile stop blinking: If you’d rather silence the animation of a “live tile,” right-click it. From the shortcut menu, choose “Turn live tile off.”

Remove a tile: Open the Start menu. Right-click the tile you want to eliminate. From the shortcut menu, choose “Unpin from Start.” (You’re not actually discarding that item — you’re just getting its tile off the Start menu.)

Eliminate all tiles: Right-click each tile; choose “Unpin from Start.” Repeat until you’ve eliminated all the tiles. Now only the left-hand column remains, just as it was in Windows 7.

Change the color: Right-click anywhere on the desktop. From the shortcut menu, choose Personalize. In Settings, click Colors. You can change both the tile colors (“Accent color”) and the background of the Start menu and taskbar (“Show color on Start, taskbar, and action center”).

Left Side

Add new items: You can’t.

Remove items: You can remove listings in the “Most used” section — handy if you’re embarrassed about something that shows up there. To do that, right-click its name. From the shortcut menu, choose “Remove from this list.”

Windows 10's Wi-Fi Sense is not a security risk. Here's why By Ed Bott for The Ed Bott Report

Yesterday, tech sites went full Chicken Little over a Windows 10 feature that allows you to share your wireless connection without having to give away your Wi-Fi password. If only those alarmists had actually used the feature first...

Every new Windows release brings its own sudden explosions of FUD: fear, uncertainty, and doubt.
It used to be that competitors were the one responsible for sowing FUD. These days, it's the tech press.

For this week's launch of Windows 10, the primary FUD factor is one I didn't expect. Coinciding with yesterday's launch, there was an absolute avalanche of paranoid posts warning of the horrible security risks of the Wi-Fi Sense feature.

Even the normally reliable Brian Krebs fell for the FUD: "Unless you opt out," he warned, "Windows 10 will by default share your Wi-Fi network password with any contacts you may have listed in Outlook and Skype -- and, with an opt-in, your Facebook friends."
According to Krebs, this feature will "allow anyone in your Skype or Outlook or Hotmail contacts lists to waltz onto your Wi-Fi network -- should they ever wander within range of it or visit your home (or hop onto it secretly from hundreds of yards away with a good 'ole cantenna!)."

And of course the echo chamber made sure to reinforce the message that this feature is terrible and dangerous and you should disable it right away. NPR, for example, quoted Krebs as calling this feature "a disaster waiting to happen." He even went so far as recommending that people rename their Wi-Fi access points.

Except, no. That's not how Wi-Fi Sense works.

Yes, the option to allow sharing is enabled by default. Here's what it looks like in Windows 10's Settings.
wifi-sense-01.png
But did you notice the part where it says "For networks I select..."? That's the key detail that Krebs and everyone who rewrote his post under their own by-line missed.

Yes, you actually have to take an extra step to make a Wi-Fi network available for sharing by your contacts. If you scroll down from the screen I just showed, you get a list of Known Networks. Here's the list of available networks in my office, I've tapped one of those networks to show the options available for it.
wifi-sense-02.png
If you know you're in my Skype contacts list feel free to park in front of my house with your Windows 10 PC. But you'll have to bring your own Wi-Fi, because Wi-Fi Sense won't let you connect to my network. That option is off by default for every network, as you can see by the Not Shared status message under each one.

And you have to very consciously enable sharing for a network. It's not something you'll do by accident.
wifi-sense-03.png
And of course even if it were on, Wi-Fi Sense only shares Internet access. It doesn't allow any access to local resources, so you can't rifle through my personal files. (As my colleague Simon Bisson pointed out, it's based on the well-tested, enterprise grade Network Access Protection feature that has been part of business versions of Windows for years.)

I've been using Windows 10 since last October. And yet none of my networks are available for my friends and contacts to share over Wi-Fi Sense. Why? Because I never enabled sharing for any of those networks.

I could imagine doing so if I was having a party or expecting houseguests and I knew that some of them would be using Windows 10 on a tablet or a phone. It's much more convenient (and secure) for all concerned if I don't have to give them my password and they can just connect automatically.
I could also imagine disabling this feature after the party's over.

If you upgrade to Windows 10, you have the same options. Despite what you read yesterday, Wi-Fi Sense is not a security hole, and no one is going to connect to your network without your permission.
Spread the word. Don't spread FUD.

Windows 10 is here: Everything you need to know (updated!) By Justin Ferris


We've been talking about it for over a year, but Windows 10, Microsoft's latest and greatest version of its venerable operating system, has finally arrived.

We know you have questions like "What's new in Windows 10?", "Should I upgrade?", "Is the upgrade really free?", "How do I get it?", and more. Here are the answers.

Just click on the links below to find out what you need to know:
Windows 10: Features, release date and more
Is Windows 10 right for you and your old PC?
Windows 10 worries: 7 things that won't work after you upgrade
How to get your Windows 10 upgrade
What version of Windows 10 is right for you?
Stop Windows 10 from automatically sharing your Wi-Fi with others
5 Windows 10 secrets you need to know now
How to roll Windows 10 back to Windows 8.1 or 7

That's just the beginning, though. We're going to be releasing more helpful information about Windows 10 in the coming days, weeks and months. From customizing the new Start menu and the best apps to install, to settings you need to change for better security and how to defer problematic updates, you can find it all at Komando.com and in our helpful daily newsletters.

Microsoft says 14 million computers now running Windows 10 Associated Press Associated Press BRANDON BAILEY

PALO ALTO, California (AP) — Microsoft says its' new Windows 10 operating system is now running on more than 14 million computers, two days after the software was released as a free download.

That's a far cry from the company's goal of getting Windows 10 onto a billion devices within three years. Microsoft says it's releasing the software in waves to make sure downloads go smoothly.

In a blog post late Thursday, Microsoft said it has not yet delivered Windows 10 to everyone who requested a free upgrade for computers running older Windows versions. Microsoft says the 14 million includes some copies installed on new computers sold in stores.

Reaction has been mostly favorable, with reviewers calling the new Windows an improvement over the last version, known as Windows 8.

8 Reasons Not to Upgrade to Windows 10 Jason Cipriani

8 Reasons Not to Upgrade to Windows 10 

After months of hype and media attention, Windows 10 is almost here. That means it’s  decision time: Do you upgrade as soon as you can? Or do you wait?


Hard as it may be to resist the immediate promise of a better computing experience, upgrading to a new operating system as soon as it’s available isn’t always the best idea. Why? Glad you asked. Here are eight reasons you might want to consider not upgrading to Windows 10.

If it ain’t broke…

Sure, Windows 10 will be a free upgrade for current Windows users. But price isn’t the only thing you should consider when deciding to upgrade or not. The real question is, What are you going to get? Sure, there’s some fancy new touch interaction and a personal assistant you can talk to — cool story, Microsoft. But “cool“ doesn’t always equal “compelling.”

If you’re happy with your current Windows 7 or 8 setup, why change it? Remember, Microsoft has promised to keep supporting Windows 7 until 2020, Windows 8 until 2023. And you’ve got a year to take advantage of the free upgrade offer. Why the rush?

Windows 10 is forever

Unless you have some serious tech-savvy, downgrading from Windows 10 to a previous version is going to be a serious undertaking. And there’s always the chance that you’ll lose apps and/or data during that downgrade process.

Point being, once you hit that upgrade button, it’s going to be really tough to go back, should you have second thoughts. Why not wait until you’re absolutely certain you’re ready for the new OS?

You can get the new features in other ways
image
Image: Microsoft
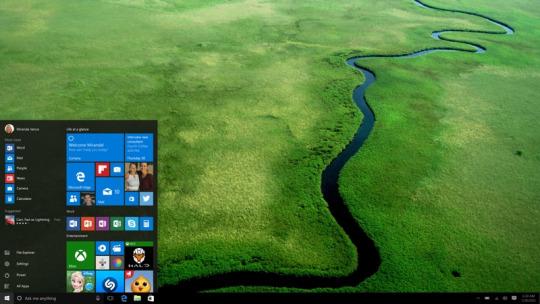
Microsoft can scream all it wants about shiny new features in Windows 10. But with a little patience and a few Web searches, you can get many of those “new” features now by tweaking your older version of Windows.

For example, Windows 10 brings back the Start menu. But our very own David Pogue showed you how to get that menu in Windows 8 (or 8.1) last year. The shiny new Edge browser looks cool and all, but it doesn’t do a whole lot that Chrome or Firefox — with the appropriate settings and extensions — can’t.

The first version is almost always buggy

Despite Microsoft’s best efforts at collecting feedback from early adopters through its extensive Windows 10 technical preview process, bugs and other issues are still going to surface in the launch-day version of the new OS.
Let others be the guinea pigs, and wait until the bugs are ironed out. You’ll thank yourself in the long run.

“You’ll update your OS, and you’ll like it”
image
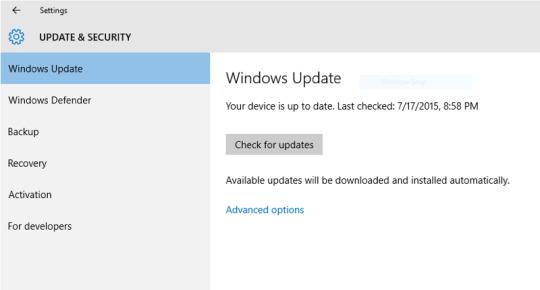
Microsoft is taking a proactive approach by requiring all Windows 10 Home users to accept forced updates and reinstalls of the core apps.

This lack of control leaves you at the mercy of Microsoft, regardless of how you feel about new apps or redesigned interfaces. Should Microsoft push an update that breaks your system … well, too bad.

RIP Windows Media Center

Windows 10 completely does away with Windows Media Center. According to Microsoft, once you upgrade to Windows 10, WMC will all but disappear, leaving you to figure out some other means of accessing your entertainment content.

So don’t upgrade to Windows 10 if you rely on and use Windows Media Center on a daily basis.

Your favorite apps might break

image
Regardless of how long third-party developers have had access to Windows 10 to test their code against, it won’t be enough for all of them. If you rely on a given app to do your job, check with its developer about its Windows 10 compatibility before you click on that install button.

You have an older computer

Microsoft has laid out some minimum hardware requirements for PCs to run Windows 10. But let’s be honest: Just because your PC meets those requirements, that doesn’t necessarily mean you’ll be happy with the results.

If you find yourself with an older computer that’s on the bubble between compatible and not, and that PC runs your current OS just fine, you can wait until you upgrade your computer before you update Windows.

Jason Cipriani is a freelance technology journalist based in Colorado. His work has appeared on CNET, Fortune, and PC World, among other outlets. You can follow him at @MrCippy on Twitter.

Saturday, July 25, 2015

No Place for a Child or Pet by Costco


Sunday, July 19, 2015

Windows XP somehow just got LESS secure By Justin Ferris


It's been 16 months since Microsoft stopped rolling out security updates for the 14-year-old Windows XP and left it to the mercy of hackers and other online threats. We knew that was going to happen well in advance, which is why we at Komando.com spent an entire year warning you to upgrade to a more secure system.

Most of you listened, but I know there are still a few holdouts; Google claims 17% of its users still have XP. You might know a relative or two yourself who refuses to upgrade. Now you can add this news to the already long list of reasons not to use XP anymore.

Even though Microsoft stopped releasing security fixes for Windows XP, it was still updating its Microsoft Security Essentials anti-virus program and Windows' built-in malicious software removal tool with new virus signatures. That at least gave XP some level of protection, even though Microsoft admitted it wouldn't be enough to stop a serious hack.

This week, however, Microsoft stopped pushing out those updates. That means XP won't detect or stop any new virus created from now on, and there are hundreds of new viruses created every day.
On the plus side, Google is still updating its products for XP until the end of 2015, but it's one of the last companies to do so. That's one reason it's costing the U.S. Navy $9 million a year to keep XP on its computers.

If you're still using Windows XP as anything other than a standalone computer completely disconnected from the Internet and any networks, it's time to upgrade. Windows 10 is coming out at the end of the month, and it's much faster and more secure.

If you don't want to buy a new computer, then replace XP with a free operating system that's faster and more secure, such as Linux Mint or Elementary OS. Or get a tablet instead.
At this point, just about any option is better than sticking with Windows XP.

HTHC Note: Microsoft Essentials is not a very good anti virus program. I suggest downloading AVG Free Edtion and using it instead. Any computer running Win XP is very old and is at the end of its life cycle. Make sure you have a good backup of all your critical files. Plan on replacing your computer as soon as possible.

5 hidden YouTube secrets you should try By Kim Komando

Want to know how popular YouTube is? Think how many conversations you've had lately included the phrase, "I saw this great video on YouTube ..." News, instructions, cat videos, instant celebrities, music, humor, emotional stories and more are all within a split-second search.

Of course, if you just go to YouTube and click "Play," you're missing out on some great features. Let's take a look at some tricks that could change how you use the service.

1. YouTube on your TV
Turning your TV into a computer monitor isn't hard, but it can make some common programs and websites a little harder to use. You have to deal with small type, icons that are harder to see from a distance and you won't always know exactly where that small mouse cursor is.

YouTube has a simple solution. Head over to https://www.youtube.com/tv to load an interface designed just for TVs. You can easily navigate videos using the keyboard arrow keys, "S" to search and "G" to open the left-column guide.

2. Turn off annotations
You know when you're watching a video and little clickable messages pop up over the video blocking what you want to see? Most YouTube creators use these sparingly, but some go overboard and it can ruin the video.

To turn these off, click the gear icon at the lower right of the video player, and next to "Annotations" click "Off." However, that's only going to be for that one video.

To turn off annotations across the site by default, click your profile icon in the upper right corner of YouTube. Then click the gear icon to visit your YouTube settings. In the left column, select "Playback" and under "Annotations and interactivity" uncheck "Show annotations ..." Then click the "Save" button. Easy.

3. Change your video speed
Have you ever been watching a YouTube video and something amazing happens really fast? It would be nice if you could slow the video down to see what really happened.

There are entire YouTube channels devoted to slow-motion videos, like this one that shows what happens when a CD shatters. However, you don't need a high-speed camera to slow things down.
On any video, click the gear icon in the lower-right corner of the video player and click the drop-down box next to "Speed." You can drop the video speed to half or a quarter of the normal playing speed.

Or, if you want, you can speed the video up by a quarter, half or double. Speeding up a video is a good way to condense a long instructional video, or just a fun new way to listen to favorite song.

4. Get smoother streaming
YouTube is fairly smart when it comes to picking video quality settings. It adjusts the quality based on your Internet connection speed so you don't get too much buffering (i.e. waiting around for the video to load).

Unfortunately, if you have an unstable Internet connection that speeds up and slows down, it can throw YouTube for a loop. When your connection speeds up, YouTube will try to push you to a higher video quality setting, and then you're stuck buffering when the connection slows down again.
Fortunately, if that starts happening, you can take control. Click the gear icon in the lower-right corner of the video player and look at the number next to "Quality."

Try dropping it down one setting and see if that smoothes things out. So if it's 1080p, make it 720p. If you're still having trouble, drop it down another level until the buffering stops.

You can also use this to force YouTube to a higher quality setting than it would normally go for your connection. You'll be waiting longer for the video to start playing, but it should be smooth once it gets going.

Of course, continual buffering might actually indicate a problem with your Internet connection or Wi-Fi. Here are three tricks that can improve your streaming speed.

5. Share a video at the right time
You found a hilarious video you want to share with a friend. Unfortunately, it doesn't get good until three minutes in. The first part is boring and you don't want your friend to stop watching.

Cue up the video to the start of the section you want your friend to see. Then right-click the video and select "Get video URL at current time." Copy the link that appears and paste it into an email or on Facebook. When someone clicks on the link, the video will start at the exact spot you wanted.

Handy hint: Copying the link using the CTRL+C command doesn't always work. If you test the link and it doesn't start the video at the right time, do this instead: Right-click the video and select "Get video URL at current time." Then right-click on the link and select "Copy." Then paste it and it should work.

Bonus: Autoplay
Just recently, YouTube added an autoplay feature that advances you to a new video when your current video is done. It bases the next video off of related videos and what you've watched in the past.

But what if you want to stay on the same video? Just click the gear icon in the lower-right corner of the video player, and next to "Autoplay" click "Off." You can also turn it on and off from the "Up next" area of the right-hand column next to the video.

Saturday, July 11, 2015

How have you used Netflix this long without knowing these 10 tips and tricks? by Zach Epstein


Netflix is a game-changer. You know it, I know it, and the pay TV industry certainly knows it. The cord cutting trend is accelerating and study after study attribute the increased number of households without a cable or satellite TV subscription at least in part to Netflix.

While Netflix has changed the game for entertainment, we’re about to change the game for your Netflix experience with 10 tips and tricks you’ll wonder how you even lived without.

Remove things you’ve watched from your history

Screen Shot 2015-07-09 at 7.50.01 AM
This is the holy grail for many users, and yet they had no idea the option is there.

Have you ever watched something and you’d rather not have other people in your house know you watched it. Don’t worry, we’re not here to judge. We’re here to tell you that you don’t have to be ashamed anymore — you can simply remove the movie or TV show from your history.

On Netflix.com, hover over your name in the top-right corner and click “Your account.” Now scroll down to “Viewing activity.” Head over to the title you’re not exactly proud of and click the “X” all the way to the right. If it’s a show and removing one episode isn’t enough, you can then click the “Remove series” link that appears.

Test new features before they launch

Screen Shot 2015-07-09 at 7.56.16 AM
Want to check out new features Netflix is testing before everyone else? Hover over your name in the top-right corner and click “Your account.” Now click “Test participation” under Settings. Click the toggle to on and, on occasion, you’ll get access to new pre-launch features that Netflix is testing.

God Mode

Netflix just rolled out a big redesign that helps fix those annoying carousels but if you really want to see Netflix’s titles presented in the best possible way on Netflix.com, you need “God Mode.” Our earlier post on Netflix God Mode will tell you everything you need to know.

Tell Netflix what you like

Don’t rely solely on your watch history for Netflix recommendations. After all, everyone has those guilty pleasures we’d rather not repeat. Instead, help Netflix recommend more fitting content by telling it exactly what you like.
Screen Shot 2015-07-09 at 7.27.44 AM
On Netflix.com, hover over your name in the top right corner and then click “Your account.” Now scroll down to “Taste preferences.” There, you can indicate how much you like different themes, and you can also pick which genres you like and which ones you dislike.

Force high-quality streaming

By default, Netflix is set to optimize your stream based on the quality of your internet connection. If you only want to stream high-quality videos, hover over your name in the top right corner and then click “Your account.” Now scroll down to “Playback settings.” Click “High” and you’re good to go.

Flicksurfer

If Netflix’s recommendations aren’t enough and you want help finding new content to watch, check out Flicksurfer. The site lists all content on Netflix and lets you drill down by genre, and then you can sort by Rotten Tomatoes rating, IMDb rating, Netflix user rating, or a combination of all three.

Use your phone to watch, not a set-top box app

t-mobile-galaxy-s6-edge-netflix
The Netflix experience on your smartphone is so much better than the experiences offered by set-top box apps or smart TV apps. Use AirPlay to stream content from your iPhone or Chromecast to stream from your Android phone. Then you can find content in that great mobile UI, and search using a keyboard instead of moving a cursor around a keyboard on your TV.

See everything you’ve rated, and adjust ratings

Are your Netflix recommendations not as solid as you’d like? People’s tastes change over time, so it might be a good idea to go back through the content you’ve rated and make some adjustments.

Hover over your name in the top right corner and then click “Your account.” Now scroll down to “Ratings.” Here, you’ll see everything you’ve rated and you can either make adjustments or remove titles completely.

Instantwatcher

Do you find it difficult to keep track of everything new that’s added to Netflix? Do you just want to see the most popular content? Or how about the most popular movies and TV series only among recently added content? Instantwatcher is the answer.

Keyboard shortcuts

Heaven forbid you have to move more than a few inches while you’re streaming the latest episode of Daredevil. Use these keyboard shortcuts to control playback:
Space – Toggle Play/Pause
Enter – Toggle Play/Pause
PgUp – Play
PgDn – Pause
F – Full-screen
Esc – Exit full-screen
Shift+Left arrow – Rewind
Shift+Right arrow – Fast Forward
Up arrow – Volume Up
Down arrow – Volume Down
M – Mute toggle

Friday, July 10, 2015

How to Move Your Spotify Playlists to Apple Music by Jacob Siegal


Now that Apple Music has officially launched, many Spotify users are trying to figure out the best way to export their playlists from one service to the other. Unfortunately, there’s no easy solution for this dilemma, but don’t worry — you won’t have to manually recreate every single playlist if you don’t want to.

So far I’ve found two popular methods for importing a Spotify playlist to Apple Music. They aren’t foolproof, but if you have dozens of playlists that need to be moved, they could potentially save you hours.

First up is Applefy, an application that was originally intended for developers, but has since been reworked for anyone to use. Once you’ve downloaded the app from GitHub, follow these instructions from the creator:
  • Open the application and log in with your Spotify details.
  • Select the playlist you want to transfer from the dropdown list.
  • Press the ‘Save Playlist’ button.
  • Navigate to your home folder and there will be a folder called Applefy.
  • Inside this folder will be a folder with your playlist name containing MP3s.
  • Open iTunes, go to the Playlists tab and make a new playlist.
  • Drag the MP3 files into the playlist.
  • Select all and right click. Choose ‘Add to iCloud Music Library’. wait for the spinner in the top right to finish
  • Once the songs have been registered, right click again and ‘Remove download’, you can now stream or download the full song using your Apple Music subscription.
The second method works in a similar fashion, but it’ll cost you a few dollars if you want to take advantage of all of its features. Here are the steps you need to take toexport your Spotify playlists and convert them with the STAMP app:
  • Before you begin, export your Spotify playlists as .csv filed using Exportify
  • Next, go to the STAMP website and download the app for ~$5.00
  • Open iTunes and head to either the For You or the New tab
  • Open STAMP and select the .csv file you want to import
  • Click parse and wait for the application to finish importing
From here, you won’t actually have the playlists on your Apple Music account, but all the songs will be in your library. The best way to recreate these playlists seems to be the following technique (thanks, GottaBeMobile):
“[Import] all the playlists you want to Apple Music and then click on My Music. Right click on the columns and add Date Added. Sort by Date Added which goes down to the minute so that you have the songs you added in order. Then highlight the songs you need to add to the new playlist and add them. Repeat for the rest of your Spotify playlists.”
It’s a shame that there’s no simple process for moving playlists between services, but these methods will still save you a ton of time.