Google+ February 2017 ~ High Tech House Calls
Expert Computer Consulting for Homes and Small Businesses

Let there be hope...

Life has changed there is no doubt and we wanted to reach out to see how you are doing.

As we go through this interesting time, we are trying to look at this as an opportunity to focus on our family and on friends like you. Let us use this extra time to catch up and talk more. Let us cook food that is not fast, but interesting and satisfying. Let us learn to enjoy a time to try new things. Let us find ways to enjoy time at home!

Computer Security

If my client base is any experience, anyone can be a victim of a Ransomware, Malware or Virus attack.

What can you do about it?

I conduct audits of your entire computer infrastructure and apply best practice solutions to plug the security holes on your computers, Smartphones and networks.

Now offering consultations to give you the best protection possible:


404.229.0839
carlthorne@hthcatlanta.com

Jack of All Trades, Master of Many

Jack of All Trades, and Master of Many

We provide technical support for:


Homes and small businesses

Windows and the Mac OS platform

iPhones and Android Smartphones

Wireless and wired networks

New device setup

Old device upgrade or repair

One-on-one training

Remote assistance


How To Stop Malware

Sunday, February 26, 2017

7 Google Maps tricks only the pros know By Mark Jones, Komando.com


Are you an avid Google Maps user?

It wouldn't be surprising if you are. Google estimates that there are nearly 1 billion active monthly users worldwide.
The service has become an integral part in many people's lives. Not only does it show you how to get to that trendy new restaurant everyone is talking about, it can also help you plan weekend trips, entire vacations and so much more.

That's why you need to know these seven handy Google Maps tricks that will help you use it like a pro.

1. Storing your home and work addresses

It's a good idea to save your work and home addresses in Google Maps. This makes it easier to navigate to either location by saying, for example, "OK Google, navigate to work." You will also see relevant traffic information in your Google feed.

Steps to save your home and work addresses:
  • Open Google Maps.
  • Tap the Menu icon located in the upper left.
  • Select Your Places.
  • You will see Home and Work under the Labeled section.
  • Enter the address for each location and they will be saved.


Note: If you are reading this article using the Komando.com App, click here to see an example of Your Places.

2. Save favorite locations

One great feature of Google Maps is being able to save favorite locations. This will help speed up the process when you are looking for a specific place. You can also share your favorite locations with others, and I'll tell you how to do that later in this tip.

Here are the steps to save a location:

  • Open Google Maps.
  • Find the location you want to save.
  • Drop a pin - This is accomplished by doing what's known as a "long press" on the map. That just means pressing a specific spot on the map long enough for a red pin to appear.
  • Swipe up - Once you have "pinned" a location, a menu will appear at the bottom of the screen. Swipe up on that menu.
  • Select Save.
  • Select the list that you want to save this location to or create a new one.


Note: If you are reading this article using the Komando.com App, click here to view an example of a dropped pin.

You can manage saved locations from the Your Places option found under the main menu located in the upper-left corner of the app.

3. Search for locations nearby

If you are out driving and don't know where the nearest ATM or gas station is, Google Maps can help. Follow these steps:
  • Open Google Maps.
  • Tap on the blank search bar.
  • Scroll through the menu and tap More.
  • Select a location - You will see a list of options like gas stations, ATMs, grocery stores and post offices. Once you select what you're looking for, a list of specific locations will appear that you will choose from.
  • Tap Directions next to the location you want to visit - After choosing which location you want to visit, a Direction button will appear next to it.


Note: If you are reading this article using the Komando.com App, click here to view the nearby menu.

4. Quick Navigation

This feature comes in handy when you are in a hurry. You just need to enter both your start and end destination.
  • Tap the blue button - You will see this in the lower-right corner.
  • Tap Your Location - Enter your current location. This can be done automatically if you have location services turned on in the app.
  • Tap Destination - Enter the address of your destination.
  • Select transportation mode - Typically, you will select driving or walking. This will show you the distance from point A to point B along with an estimated travel time.


5. Select your route

Google Maps by default will show you the fastest route available. If you want to select a different route for any reason, like you are in an area that collects tolls, that's an option. You can avoid ferries, highways and tolls completely.
  • Open Google Maps.
  • Select your starting location and destination.
  • Tap the 3 vertical dots - This is found in the upper-right corner, it opens a menu.
  • Tap Route Options - Slide the toggle to the right next to the option you want to avoid. You can select a route that avoids one or all of the following: highways, tolls and ferries.


Note: If you are reading this article using the Komando.com App, click here to view the Route options menu.

6. Sharing lists of saved locations

There is now a feature on Google Maps that will help you keep track of any location or route that you'd like. You can also create a list of places and share it with friends and family.

Not only can you share your list of places, but you can also subscribe to lists created by other people so you know their favorite locations too. Here is how to get started:
  • Open Google Maps.
  • Find a location on Google Maps that you want on your list.
  • Tap the name of that location.
  • Tap the Save icon under the location's name - Doing this saves the location to one of your pre-set lists. You can name the lists anything you want, such as favorite restaurants or places I want to try.
Once you have a few locations saved, they can be found under Your Places in the menu on the upper-left side of the screen. Just tap the icon of the location and it will show up on Google Maps.

Sharing your lists is easy as well. Simply tap the share button to get a link and you can send the list via text, email, social media or any popular messaging app. The recipient only needs to tap "Follow" on the link you sent to pull up the list whenever they need it.

Lists that you follow are with you wherever you take Google Maps and can be viewed on mobile, desktop computer and even offline. Download offline maps of the area you are traveling to in advance and you will be able to see all the places on the list.

Here is a quick video that shows you how to use the new feature:


Note: If you are reading this article on the Komando.com App, click here to watch Google's demonstration video.

7. Pre-select pit-stops for longer trips

If you are heading out on a long road trip, you are probably going to make a few pit-stops. Google Maps now has the option of adding these to your trip ahead of time. Follow these steps:
  • Open Google Maps.
  • Tap the blue navigation button.
  • Select your starting point and one of your destinations.
  • Tap the three vertical dots in the upper-right corner.
  • Select Add Stop - You can add up to nine stops along the route.
If you like to plan everything ahead of time, this is a great feature to use.

Android power tips you'll wish you'd known all along By Francis Navarro, Komando.com

Do you want to take your Android expertise to the next level? If you read our everyday essential tricks for your Android, you might feel like you have everything you need to know to go about your daily Android life.

But think again. From blocking calls to naming a song that's playing, maybe a few more advanced tricks will have you saying "I wish I knew this all along."
These five tips will definitely power up your Android experience.

1. Set up your phone to automatically unlock


Do you find it too cumbersome to keep unlocking your phone in trusted places like your home? Well, here's a tip you can try.
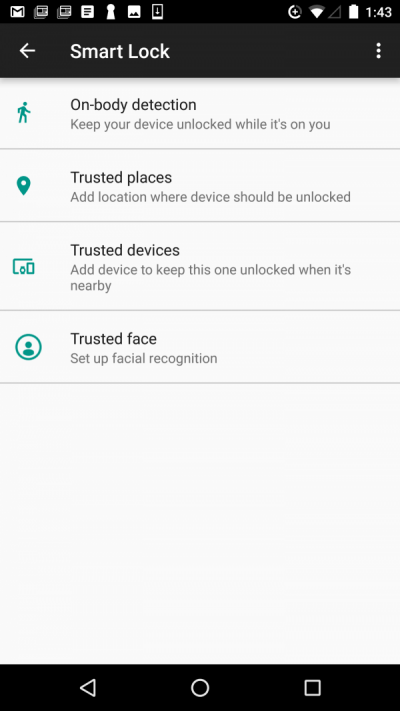
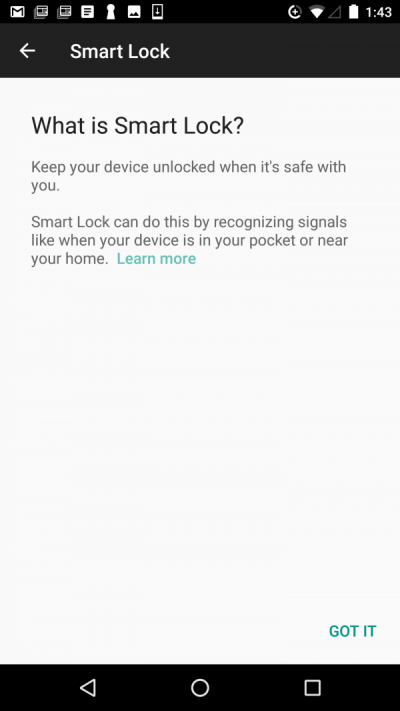
Introduced in Android 5.0 Lollipop, Smart Lock is a feature that lets you automatically unlock your Android phone without entering your passcode, pattern lock, or password under certain conditions.

The options for Smart Lock are as follows:
  • On-body detection - your phone stays unlocked as long as you hold and carry your phone.
  • Trusted devices - pair your phone with another device such as a Bluetooth smartwatch to keep it unlocked when it's nearby.
  • Trusted places - add a location where the phone is unlocked, for example, your home.
  • Trusted face - if your Android phone supports it, unlock your phone with facial recognition.


2. Plug in a mouse or keyboard


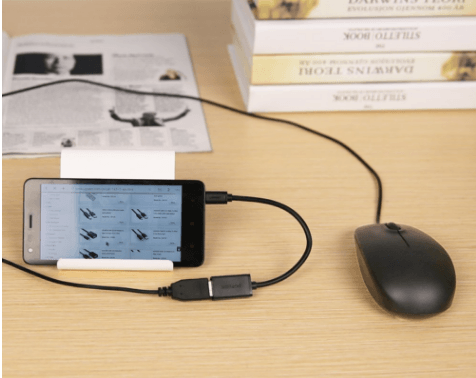
Did you know that you can connect an external wired mouse, keyboard or game controller to your Android gadget?


All you need is a USB On The Go (OTG) cable like this item they sell on Amazon.
An OTG cable is an adapter that converts a regular micro-USB port into the standard sized one so you can connect a variety of peripherals.

Connecting an external peripheral to your Android gadget has its advantages since a mouse will display a cursor and a keyboard, apart from accurate typing, will let you do keyboard shortcuts.
Not all Android gadgets support this setup, though, so make sure you check beforehand.

3. Zoom in on anything on your screen


With all the high pixel density displays that Android phones are rocking nowadays, sometimes text can be hard to read. To remedy this, you can use Android's built-in magnification feature.

Turn this on by going to Settings >> Accessibility >> Magnification gestures then toggle it to "On."

To quickly magnify a portion of the screen, just quickly tap it three times. Pinch with two or more fingers to adjust the zoom level. You can also hold down your finger on the third tap and move around the screen.

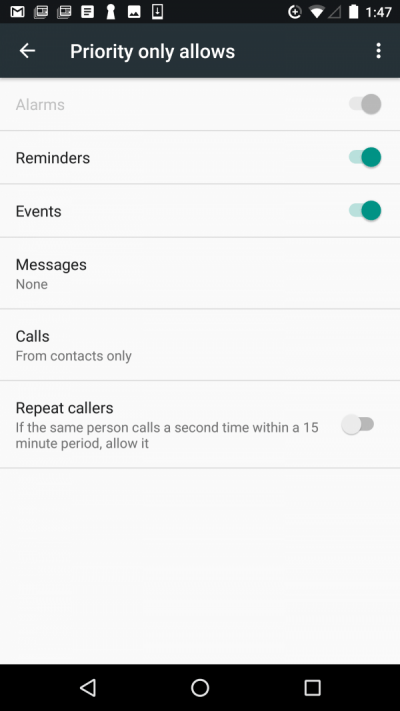
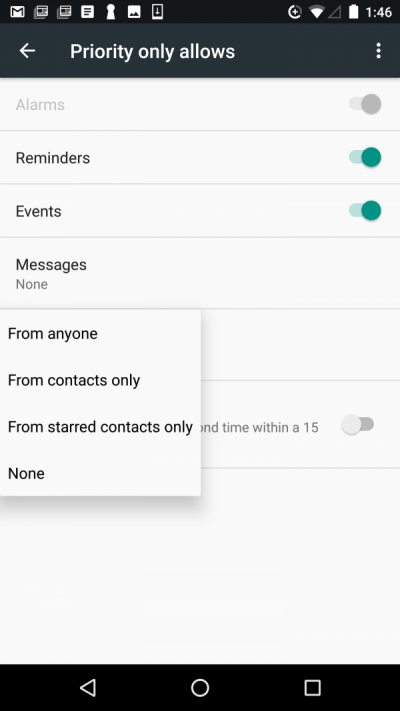
4. Set up priority interruptions to only accept calls from "starred" contacts


On occasions when you don't want to be disturbed, you can filter text and call notifications to only show contacts you deem as important.

To set your "Do Not Disturb" priority settings, head on to Settings >> Sound >> Do Not Disturb. Here you can choose your message and notifications for calls and messages. 

Note: To set your "starred contacts," open Contacts, search for the contact you want to favorite then tap the star in the upper left.

You can also turn on "Repeat callers" in this section. If this feature is turned on, you will always get a notification if a caller tries to call you within a 15-minute period regardless of your priority settings.

If these options are not enough, you can also set up your own notification custom rules under "Automatic rules."


5. Access quick settings


Here's a quick trick that may come in handy.

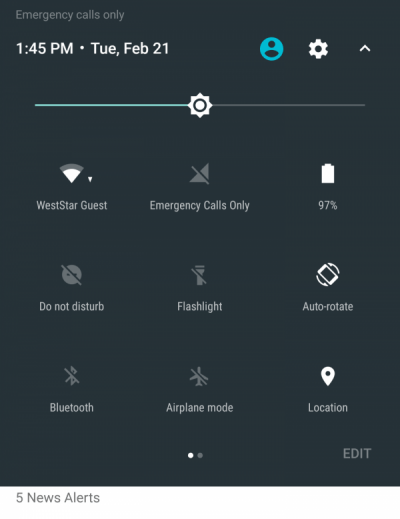
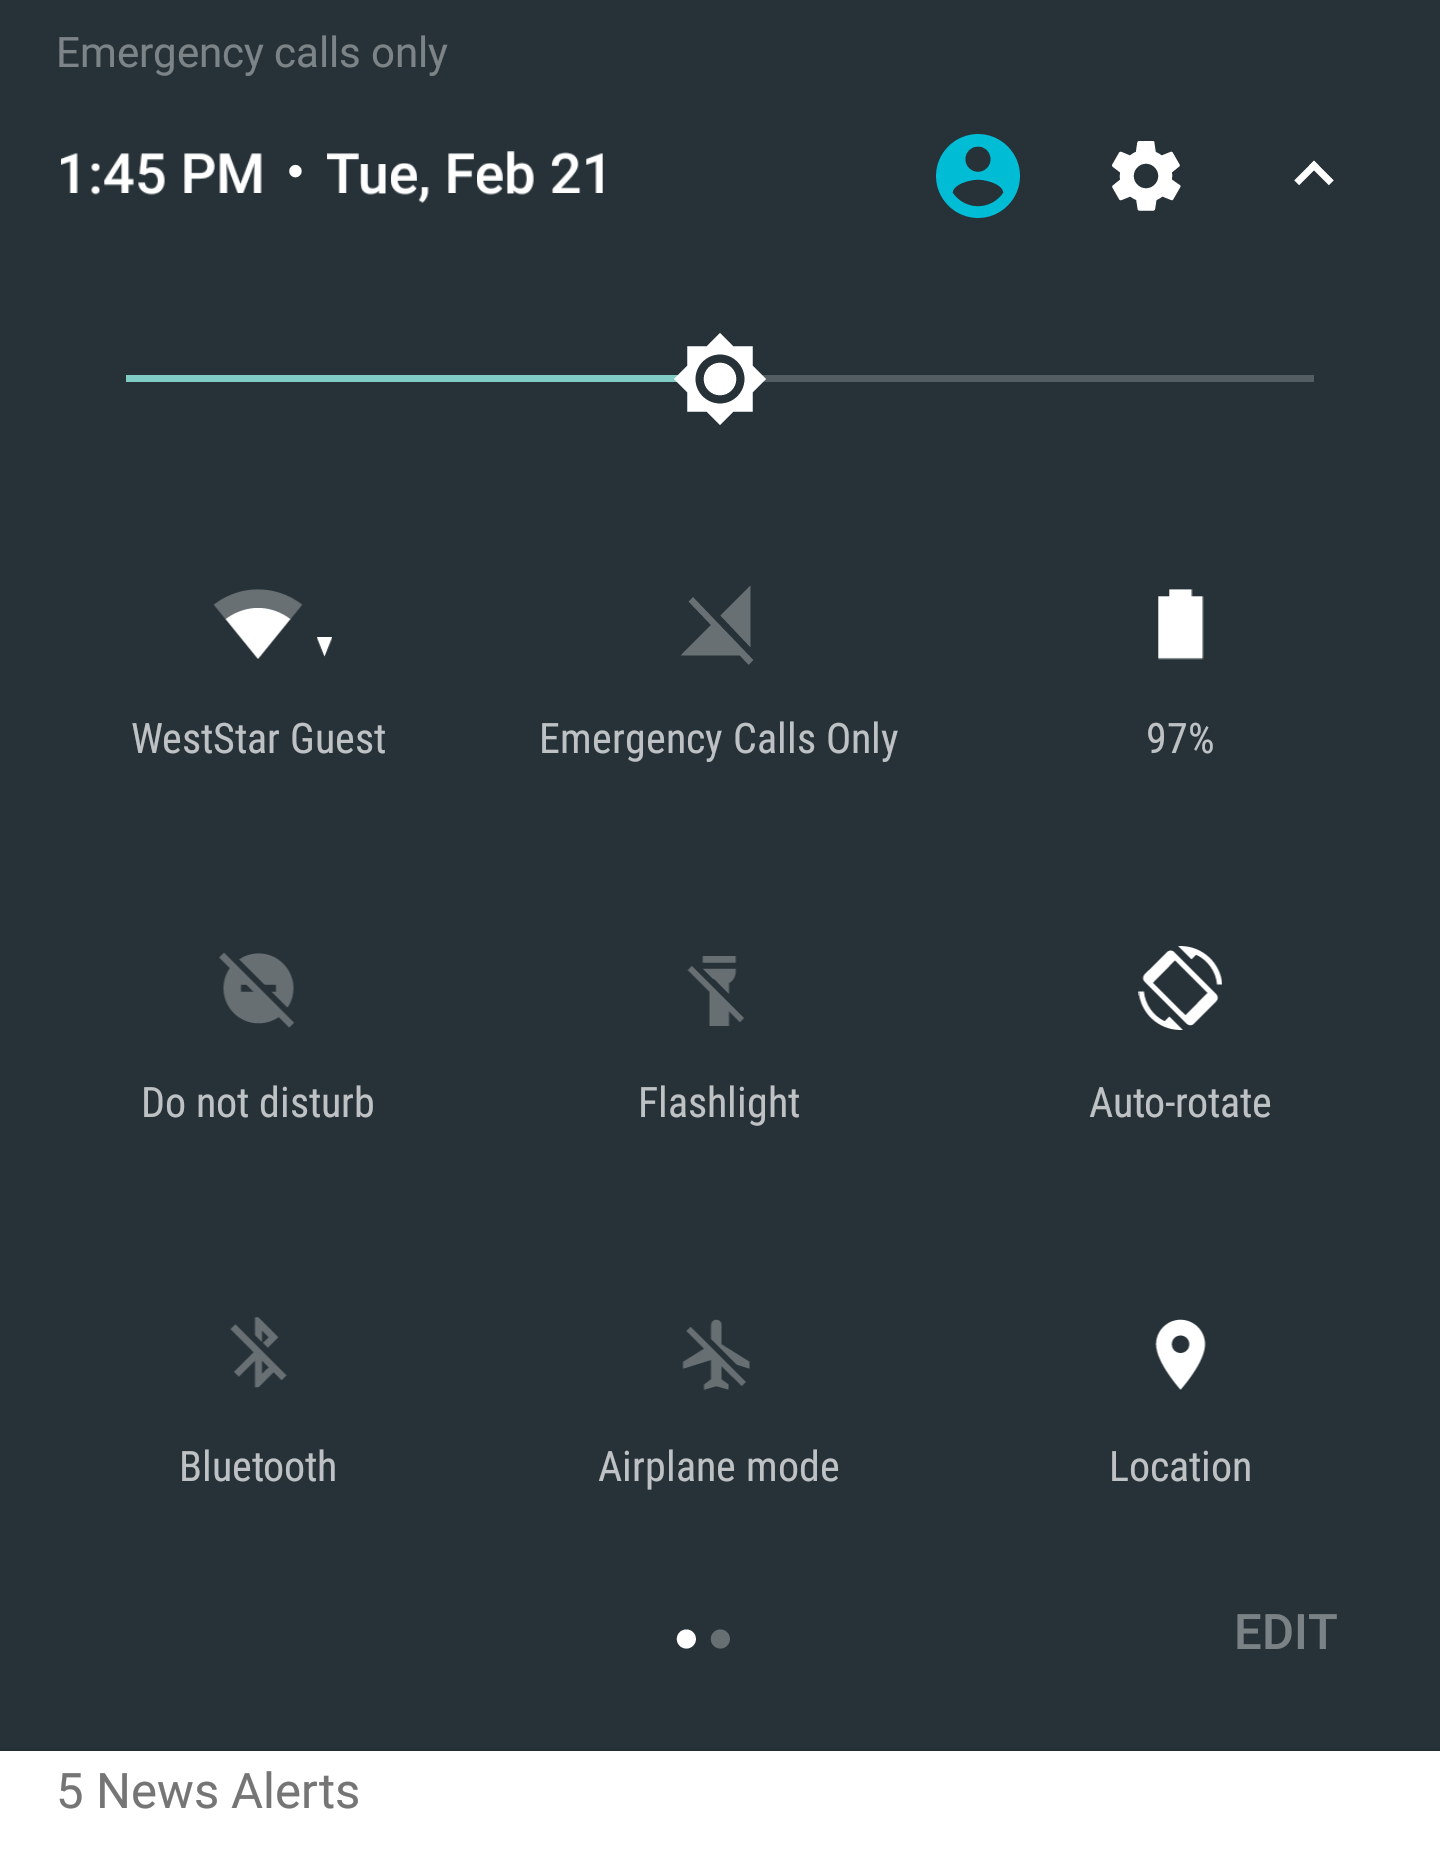
You are probably used to swiping down from the status bar to view your notifications by now. But did you know that you can access your Android device's Quick Settings by swiping down with two fingers instead?

Try it. It's a convenient way to tweak Wi-Fi, Bluetooth, Airplane mode and Rotation settings.

Bonus:  Ask Google to find out what song is currently playing.


Ever had the compulsion to know the title of an unknown song that's playing? Instead of using a third party app like Shazam or Soundhound, you can just ask Google.

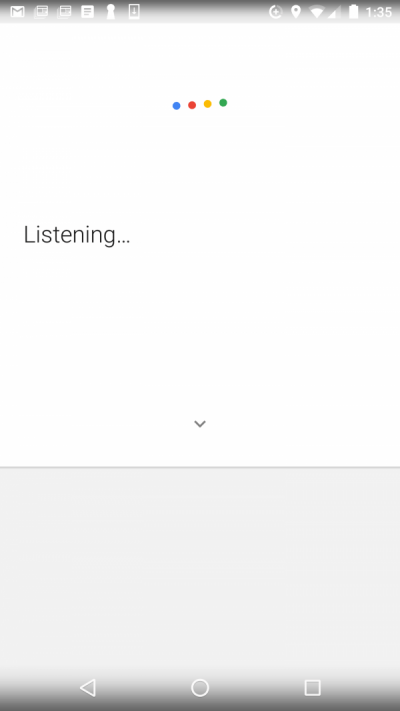
Do this by opening the Google app, tap the mic on the search bar then audibly ask "What's this song?" Your phone will then listen and it will try and show you the song title, artist and album info.

Everyday essential tricks for your Android By Kelli Uhrich, Komando.com


Psst! Need the Apple version of this tip? Click here for essential tricks for your iPhone >>

So you feel like you know all you need to know about your smartphone. You can adeptly make calls, send text messages, check emails, change settings, download apps and everything in between.
Sure, having the right know-how to get things done on your smartphone makes you feel like a bonafide expert. But of course, there might still be hidden tricks here and there that can make your everyday use even better. (While you're at it, click here for one little trick that can help you save battery power.)

To elevate your Android mastery, here are a few essential tricks you should be using daily:

1. Take a screenshot

There used to be multiple ways of taking a screenshot in Android, depending on your smartphone brand and Android version. Fortunately, starting with Ice Cream Sandwich (Android 4.0), Google made the screenshot buttons standardized across devices.

To take a screenshot, simply hold the power and volume down buttons at the same time. You'll know you did it correctly when you see a preview of your image and hear a notification sound with it. The image is automatically saved to your default photos app, ready for viewing, editing and sharing.

2. Turn off autocorrect

Autocorrect is a fine tool for spotting mistakes as you type but sometimes it just gets in the way. Although it can be funny at times, there's nothing as embarrassing than sending a text message that was autocorrected to mean something else entirely.

To turn off autocorrect for the built-in Google keyboard, go to Settings >> Language and input >> Spell Checker then toggle it off.

Tip within a tip: If you're only using your Android device as a phone or tablet, you're missing out. Click here and learn how to use your Android as a desktop PC.

3. Turn off notifications

Notifications can be handy for keeping you up-to-date but they can sometimes be distracting. They are also known to drain your phone's battery life faster.

Again, it depends on your Android version but the quickest and most common way to do this is to long press on a notification (notifications can be viewed by swiping down from the top status bar).

You can then select either "Show notifications silently," "Block all notifications" or "Don't silence or block" to control the notification settings of that particular app.

4. Disable automatic app updates

App developers do updates and sometimes permissions and features change. Also, bugs can creep through that can break apps. If you want to check what reviews say before updating apps, you can disable automatic app updates.

To do this, head on to the Play Store app, tap on the three horizontal lines on the upper-left of the app and tap "Settings." Tap on "Auto-update apps" then tick off "Do not auto-update apps."

5. Organize Home screen apps with folders

If your Home screen gets too cluttered with app shortcuts, you can organize them into convenient folders.

To do this, just long press on the app shortcut icon then drag it on top of another app shortcut icon. Android will automatically create a folder indicated by a circle. To open the enclosed apps, just tap on the folder. This will give you an option to rename it. To add more app shortcuts to the folder, just drag them into the desired folder.

Saturday, February 25, 2017

Online security 101: Tips for protecting your privacy from hackers and spies by ZDNET

7 Google Maps tricks only the pros know By Mark Jones, Komando.com


Are you an avid Google Maps user?

It wouldn't be surprising if you are. Google estimates that there are nearly 1 billion active monthly users worldwide.
The service has become an integral part in many people's lives. Not only does it show you how to get to that trendy new restaurant everyone is talking about, it can also help you plan weekend trips, entire vacations and so much more.

That's why you need to know these seven handy Google Maps tricks that will help you use it like a pro.

1. Storing your home and work addresses

It's a good idea to save your work and home addresses in Google Maps. This makes it easier to navigate to either location by saying, for example, "OK Google, navigate to work." You will also see relevant traffic information in your Google feed.
Steps to save your home and work addresses:
  • Open Google Maps.
  • Tap the Menu icon located in the upper left.
  • Select Your Places.
  • You will see Home and Work under the Labeled section.
  • Enter the address for each location and they will be saved.
Note: If you are reading this article using the Komando.com App, click here to see an example of Your Places.

2. Save favorite locations

One great feature of Google Maps is being able to save favorite locations. This will help speed up the process when you are looking for a specific place. You can also share your favorite locations with others, and I'll tell you how to do that later in this tip.

Here are the steps to save a location:
  • Open Google Maps.
  • Find the location you want to save.
  • Drop a pin - This is accomplished by doing what's known as a "long press" on the map. That just means pressing a specific spot on the map long enough for a red pin to appear.
  • Swipe up - Once you have "pinned" a location, a menu will appear at the bottom of the screen. Swipe up on that menu.
  • Select Save.
  • Select the list that you want to save this location to or create a new one.
Note: If you are reading this article using the Komando.com App, click here to view an example of a dropped pin.

You can manage saved locations from the Your Places option found under the main menu located in the upper-left corner of the app.

3. Search for locations nearby

If you are out driving and don't know where the nearest ATM or gas station is, Google Maps can help. Follow these steps:
  • Open Google Maps.
  • Tap on the blank search bar.
  • Scroll through the menu and tap More.
  • Select a location - You will see a list of options like gas stations, ATMs, grocery stores and post offices. Once you select what you're looking for, a list of specific locations will appear that you will choose from.
  • Tap Directions next to the location you want to visit - After choosing which location you want to visit, a Direction button will appear next to it.
Note: If you are reading this article using the Komando.com App, click here to view the nearby menu.

4. Quick Navigation

This feature comes in handy when you are in a hurry. You just need to enter both your start and end destination.
  • Tap the blue button - You will see this in the lower-right corner.
  • Tap Your Location - Enter your current location. This can be done automatically if you have location services turned on in the app.
  • Tap Destination - Enter the address of your destination.
  • Select transportation mode - Typically, you will select driving or walking. This will show you the distance from point A to point B along with an estimated travel time.

5. Select your route

Google Maps by default will show you the fastest route available. If you want to select a different route for any reason, like you are in an area that collects tolls, that's an option. You can avoid ferries, highways and tolls completely.
  • Open Google Maps.
  • Select your starting location and destination.
  • Tap the 3 vertical dots - This is found in the upper-right corner, it opens a menu.
  • Tap Route Options - Slide the toggle to the right next to the option you want to avoid. You can select a route that avoids one or all of the following: highways, tolls and ferries.
Note: If you are reading this article using the Komando.com App, click here to view the Route options menu.

6. Sharing lists of saved locations

There is now a feature on Google Maps that will help you keep track of any location or route that you'd like. You can also create a list of places and share it with friends and family.

Not only can you share your list of places, but you can also subscribe to lists created by other people so you know their favorite locations too. Here is how to get started:
  • Open Google Maps.
  • Find a location on Google Maps that you want on your list.
  • Tap the name of that location.
  • Tap the Save icon under the location's name - Doing this saves the location to one of your pre-set lists. You can name the lists anything you want, such as favorite restaurants or places I want to try.
Once you have a few locations saved, they can be found under Your Places in the menu on the upper-left side of the screen. Just tap the icon of the location and it will show up on Google Maps.

Sharing your lists is easy as well. Simply tap the share button to get a link and you can send the list via text, email, social media or any popular messaging app. The recipient only needs to tap "Follow" on the link you sent to pull up the list whenever they need it.

Lists that you follow are with you wherever you take Google Maps and can be viewed on mobile, desktop computer and even offline. Download offline maps of the area you are traveling to in advance and you will be able to see all the places on the list.

Here is a quick video that shows you how to use the new feature:
Note: If you are reading this article on the Komando.com App, click here to watch Google's demonstration video.

7. Pre-select pit-stops for longer trips

If you are heading out on a long road trip, you are probably going to make a few pit-stops. Google Maps now has the option of adding these to your trip ahead of time. Follow these steps:
  • Open Google Maps.
  • Tap the blue navigation button.
  • Select your starting point and one of your destinations.
  • Tap the three vertical dots in the upper-right corner.
  • Select Add Stop - You can add up to nine stops along the route.
If you like to plan everything ahead of time, this is a great feature to use.

Tuesday, February 21, 2017

Best Buy has cut the MacBook Air's price tag to $800 By Ian Paul


Apple hasn’t updated the MacBook Air since 2015, and many Apple watchers don’t expect to see a refresh of the device. In fact, the 11-inch MacBook Air left the consumer market last October.

Nevertheless, Apple still offers the 13-inch Air as the cheapest MacBook option at $999—and today at Best Buy, you can grab one for $200 cheaper than its sticker price.

This particular Air comes with a 13.3-inch display with 1440x900 resolution, a 1.6 GHz dual-core Intel “Broadwell” Core i5 processor, 8GB RAM, 128GB onboard storage, SDXC card reader, and a Thunderbolt 2 port. There’s also a MagSafe adapter, two USB 3 ports, and a headphone jack. Best Buy is also throwing in a redemption code for six months of free Kaspersky Internet Security service.
 That last giveaway requires a Best Buy account.

Of course, while this deal is solid (it’s the second-lowest price we’ve seen recently), don’t forget this laptop’s age. Its processor is now two generations behind, and Thunderbolt 2 is also a generation behind current standards—though it’s still a ridiculously fast I/O port. This computer also doesn’t have Apple’s Force Touch trackpad.

However, if buying a new MacBook is a foregone conclusion, then this is the one of the cheapest options around right now.
MacBook Air 13 Apple
Today’s deal: 13-inch MacBook Air with 128GB storage for $800 ] 

Friday, February 17, 2017

How to Make Songs Available Offiline with Apple Music on iPhone by iPhoneLife

Thursday, February 16, 2017

New Google Maps feature means you'll never forget a great location again By Mark Jones, Komando.com


Don't you just love having friends and family visit from out of town? It's a great time to play tour guide and show them all of the exciting places your city has to offer.

You might also want to take them to your favorite restaurant to share an epic meal. I'm sure you remember how to get there, but what about that amazing Italian restaurant you tried last summer and forgot its name and where it's located? No worries, Google Maps now has you covered.
That's right, there is now a feature on Google Maps that will help you keep track of any location or route that you'd like. You can also create a list of places and share it with friends and family.

How to use the new features on Google Maps

Not only can you share your list of places, you can also subscribe to lists created by other people so you know their favorite locations too. Here is how to get started:
  • Open Google Maps.
  • Find a location on Google Maps that you want on your list.
  • Tap the name of that location.
  • Tap the Save icon under the location's name - Doing this saves the location to one of your pre-set lists. You can name the lists anything you want, such as favorite restaurants or places I want to try.
Once you have a few locations saved, they can be found under Your Places in the menu on the upper-left side of the screen. Just tap the icon of the location and it will show up on Google Maps.
Sharing your lists is easy as well. Simply tap the share button to get a link and you can send the list via text, email, social media or any popular messaging app. The recipient only needs to tap "Follow" on the link you sent to pull up the list whenever they need it.

Lists that you follow are with you wherever you take Google Maps and can be viewed on mobile, desktop computer and even offline. Download offline maps of the area you are traveling to in advance and you will be able to see all the places on the list.

Here is a quick video that shows you how to use the new feature:
Note: If you are reading this article on the Komando.com App, click here to watch Google's demonstration video.
This new Google Maps feature is available on both iOS and Android. The update has started rolling out and you should see it soon, if not already.

Wednesday, February 15, 2017

Easiest way to backup your smartphone By Mark Jones, Komando.com


Our smartphones might be the most important gateway to our digital lives. We store so much important information on these handheld gadgets that the thought of losing them is frightening!

If you're like me, once you enter someone's phone number into your contacts list, it's out of your mind forever. It seems like it would be an impossible task to recover everyone's digits. How scary is that?
Obviously, smartphones aren't just contact directories. We also store precious pictures and videos on them as well as important files.

You never know when you're going to lose your phone, or even worse, have it stolen. That's why it's so critical to back up all of the essential data kept on these amazing gadgets.

With that in mind, we're going to tell you how to back up both Android and Apple phones.

Backing up an Android phone

File transfer app

There are different ways to back up your data from an Android phone. One way is to use a free file transfer app. We recommend using AirMore.
airmore
AirMore is a cross-platform tool that allows you to connect your mobile gadget to a PC wirelessly. It frees you from cables and client. The only thing you need to do is open the PC's web browser.
Here are some features you'll find on AirMore:
  • File transfer - Easily transfer data, music, photos and videos between your Android gadget and PC.
  • Manage contacts - You can manage all of your contacts on AirMore Web conveniently, including editing, deleting, transferring and making phone calls.
  • Secure transfer - AirMore makes the transfer between mobile gadgets and the PC more private and secure, as your approval is required for successful connection.
  • File management - You can delete, download and upload the files in your Android phone. Manage apps, documents, music, photos and videos easily.
Click here to see additional AirMore features and get the link to download the app.

Android backup service

You can also use Android Backup Service to back up data connected to one or more of your Google Accounts. If you have to replace your gadget or erase its data, you can restore your information from any Google Account that you backed up.

With Android Backup Service you can back up Google Calendar settings, Wi-Fi networks and passwords, home screen wallpapers, Gmail settings, apps installed through Google Play, display settings and more.

Before you begin, you'll need to add a backup account. Here is how to do that:
  • Open your gadget's Settings app
  • Under "Personal," tap Backup & reset
  • Tap Backup account >> Add account
  • Confirm your gadget's PIN, pattern or password
  • Sign into the account that you want to add
Now you're ready to backup your data. Here are those steps:
  • Open your gadget's Settings app
  • Under "Personal," tap Backup and reset
  • Tap Backup my data and switch it on
Once you use Android Backup Service to backup your phone, the information is available to be restored. All you need to do to get the backed up data onto your new phone is add the Google Account to it. When the Google Account is added to the phone, the backed up data is restored.

Backing up an iPhone

Airdrop

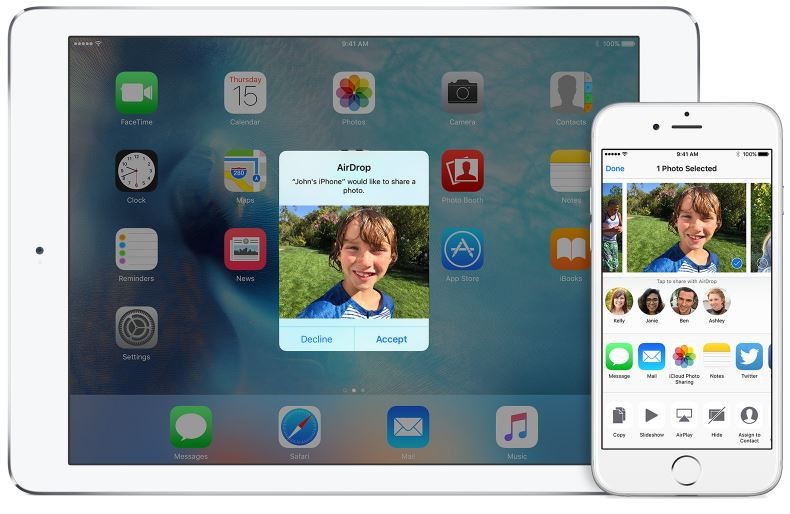
As we mentioned earlier, AirMore is a file transfer app for Android. Apple actually came up with this concept first and implemented it with AirDrop. This is one way to back up important data from your iPhone.
airdrop
Apple AirDrop is a built-in app that lets you seamlessly move files back and forth between nearby desktop Macs and iOS gadgets like iPad, iPhone or iPod touch. This is a quick and convenient way to transfer files from an iOS gadget to a Mac using a Bluetooth connection.

To enable AirDrop on an iPhone, iPad, or iPod touch, swipe up on the Home screen to access the Control Panel. From here, you can set AirDrop to receive from Contacts Only, Everyone, or turn it Off.

To use AirDrop from a Mac, it is available from the Finder, the Share menu, and in Open and Save windows. When you select AirDrop, your Mac looks for nearby devices that can also use AirDrop. This includes Mac computers with OS X Lion or later installed, and iPhone, iPad, and iPod touch devices with iOS 7 or later.

Back up your data in iCloud

An easy way to back up important data from an iPhone is to use iCloud. Here are the steps for using iCloud:
  • Connect to a Wi-Fi network
  • Go to Settings >> iCloud >> Back up
  • Turn on iCloud Backup
  • Tap Back Up Now - After the back up is done, go to
  • Settings >> iCloud >> Storage >> Manage Storage - Do this to make sure the backup was successful
Here are the steps to transfer data from iCloud to your phone:
  • Turn on your new iPhone - A Hello screen should appear.
  • Press the Home button - Follow steps until you see the Wi-Fi screen.
  • Tap a Wi-Fi network to join - Follow steps until you see the Apps & Data screen.
  • Tap Restore from iCloud >> Backup >> Next.
  • Sign into iCloud with your Apple ID and password.
  • When asked, choose a backup. Make sure it's the correct one by checking the date and size of each.
  • If you purchased iTunes or App Store content using multiple Apple IDs, you'll be asked to sign in to each. If you forgot a password, you can skip this step by tapping "Don't have an Apple ID or forgot it."
  • Stay connected and wait for the restore process to finish, then complete the rest of the onscreen setup steps. If possible, keep your gadget connected to Wi-Fi and plugged into power after setup. This allows content like your photos, music, and apps stored in iCloud to automatically download back to your gadget.

Back up your data to iTunes

To back up to iTunes on your computer, first, plug your phone into your computer. Then follow these steps:
  • Open iTunes.
  • Go to Files >> Devices >> Transfer Purchases - This will save any purchases you made directly on your phone.
  • Then go to File >> Devices >> Backup.
  • Select "This computer."
  • Click "Back Up Now."
Here are the steps to transfer data from iTunes to your phone:
  • Turn on your new iPhone - A Hello screen should appear.
  • Press the Home button when you see the Hello screen and follow steps until you see the Apps & Data screen.
  • Tap Restore from iTunes Backup >> Next.
  • Connect your new phone to the computer that you used to back up your previous phone.
  • Open iTunes on your computer and select your device.
  • Select Restore Backup. Then choose a backup. Make sure it's the correct one by looking at the date and size of each.
  • If you need to restore from an encrypted backup, enter your password when asked.
  • Wait for the restore process to finish, then complete the rest of the setup steps on your iOS gadget. If possible, keep your device connected to Wi-Fi and plugged into power after setup. This allows content like your photos, music, and apps stored in iCloud to automatically download back to your gadget.

Android tricks for fantastic photos By Francis Navarro, Komando.com


How many photos have you taken with just your smartphone? Just think about the countless photos you've taken of your friends, pets, objects and family members. What about those you've taken while traveling to exotic locations and your favorite nearby destinations?

When capturing these cherished memories, of course, you want to get the best shot possible, either for sharing online or saving on your own digital scrapbook. You don't have to be a professional photographer to get the most out of your smartphone's camera. Sometimes, a little bit of tweaking and know-how is all it takes.
Here are some quick and easy tricks for taking better photos with your Android.

Clean your lens

My first tip may sound simple but it could make the difference between a keeper or an image destined to be deleted. Before taking a shot, make sure your phone lens is clean!

Fingerprint smudges, specks of dust and lint can blur your phone's camera lens and ruin an otherwise perfect picture.

Make sure you wipe it down with a piece of cloth before taking a photo. To avoid scratches, the best way to clean a camera lens is with a microfiber cloth. If you're planning on doing extensive photo shoots with your Android smartphone, make sure you have at least one of these cleaning cloths handy.

Choose the best resolution

Next, to maximize your Android smartphone camera's capabilities, try setting the resolution to the highest possible. This ensures that your image will be as sharp as it can be. Maximizing your resolution also means you have more flexibility when it comes to editing the photo, like cropping or zooming, for example.
It's not the same for each Android phone, but to check your camera's resolution, open your camera app and look for its respective "Settings" section, it's usually under "Photo resolution" or "Photo Size."
Note that the higher the resolution, the bigger the photo's file size so plan accordingly. If you're running out of storage space and you don't mind grainy shots, take your resolution down a notch.

Frame your subject properly

Before you take that picture, there are a few composition techniques you can employ to improve your images dramatically.
One is the "Rule of Thirds." This technique breaks down the image into nine quadrants and according to this theory, the best location to put your subjects is along where these quadrants intersect. This creates a balanced, well-organized and more visually appealing photo.
To aid you in adhering to this "Rule of Thirds," you can turn on your camera's gridlines by digging into its settings and turning on "Show grid in viewfinder."

Set your focus point and exposure

With most of our everyday smartphone shots, we usually rely on the available lighting - natural daylight, indoor lighting inside the office, or a dim lampshade in our bedroom, for example. Inadequate lighting and improper focus can cause blurriness, over or under exposure and uneven shots.

One quick way to fix focus and exposure issues is to tap on your viewfinder/screen to select your area or subject of interest. Your camera settings will then automatically adjust its focus and exposure based on that area.

Another feature that can help you resolve exposure issues is High Dynamic Range (HDR). HDR will take photos of different exposures in rapid succession then merges them to create an evenly exposed image.

To enable HDR on your Android phone, look for the HDR option under settings and toggle it on. Some Android phones will have the HDR option instantly accessible next to the Flash setting.

Bonus tip: Although your smartphone's flash can help you in extreme situations, avoid using it since it washes out your image most of the time.

Stabilize your shot

Another trick to achieve better results with your Android smartphone's camera is to stabilize your shot to avoid blur. The best method is to use a tripod but if that's not available, use two hands to operate your phone as much as possible. Also, try leaning on a wall to stabilize your shot even further.

You can also try extending your arms when taking the shot to add more stability. Remember, the less movement you do, the sharper your image will be.

Take multiple shots to choose from

To nail that perfect shot, take as many insurance shots as possible. Try taking shots of your subject in rapid succession and select the best one of the bunch after the fact.

If possible, do burst shots (by holding the shutter button) and sort the pictures out later.

How to see all the companies tracking you on Facebook - and block them By Komando Staff, Komando.com


Facebook is tracking you seven ways from Sunday, but that should be no surprise if you've been reading Komando.com for any length of time. In the past, we've talked about stopping Facebook from sharing your information with advertisers, storing your search history, or figuring out your interests to serve you targeted ads.

Today, however, we're going to look at other companies that can see your information on Facebook. You agreed to let them do it without even realizing it, and you might have dozens watching your posts, your profile and more. Let's talk about how to get rid of them and how to keep this from happening again.

How did this happen in the first place?

If you've ever received a request to play that Facebook game your friends are obsessed with, and you decided, "Why not?" and signed up, you let a company track you. When you visit a site and it says "Log in with Facebook," and you do, then you're letting that company track you.

That's right, we're talking about Facebook apps. These third-party apps integrate with your Facebook profile and can ask Facebook for permission to pull various personal data from your work history to timeline posts. Sure you can edit what information they can access, but very few people do.

Even worse, apps your friends install can potentially see some of your information as well. So, we're going to need to fix both of these to stop the tracking.

Review and edit installed apps

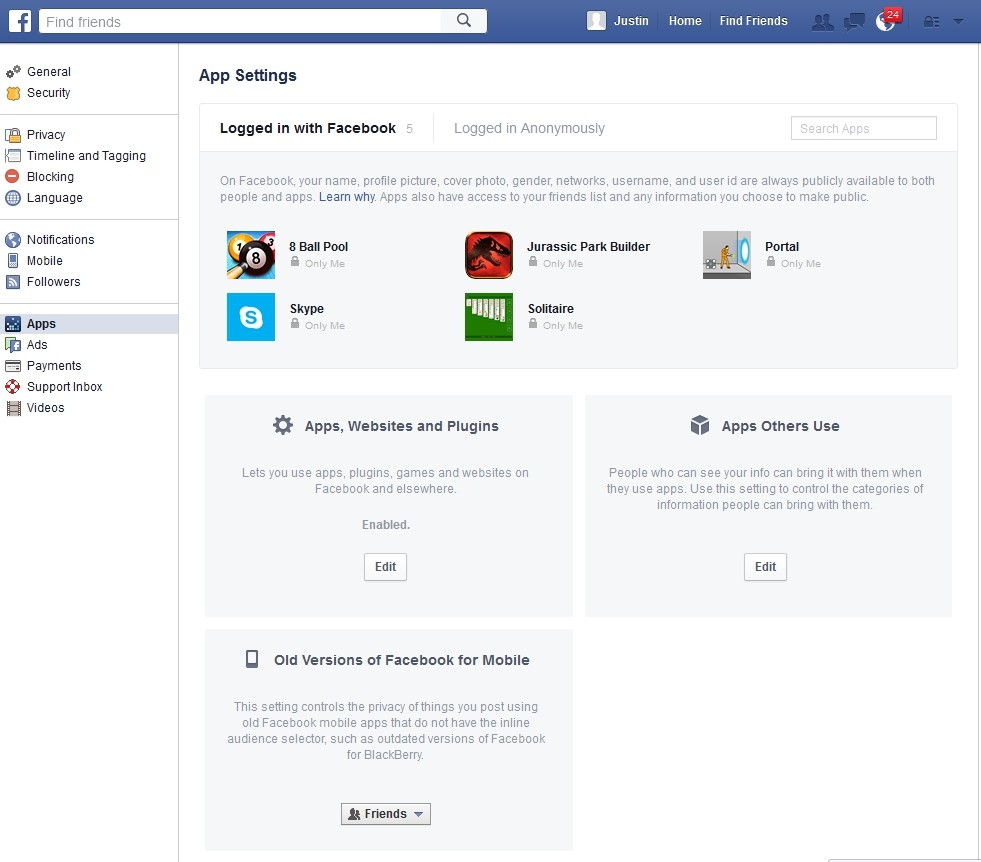
To see what apps you've installed over the years, click the down arrow in the upper-right corner and select "Settings." Then click on the "Apps" header in the left column.
fbapps1
You'll see two areas, one for "Logged in with Facebook" and one for "Logged in Anonymously." You'll want to follow the below steps for each section, although anonymous logins don't share nearly as much info with app developers.

Let's look at the "Logged in with Facebook" section. In the example above, it has some game apps installed and it was used to log in to a Skype account. Each of those apps now has ongoing permission to pull information from the account.

As an example, let's take a look at what information Skype can access. Just click the pencil icon next to any of the apps to see and edit the settings.

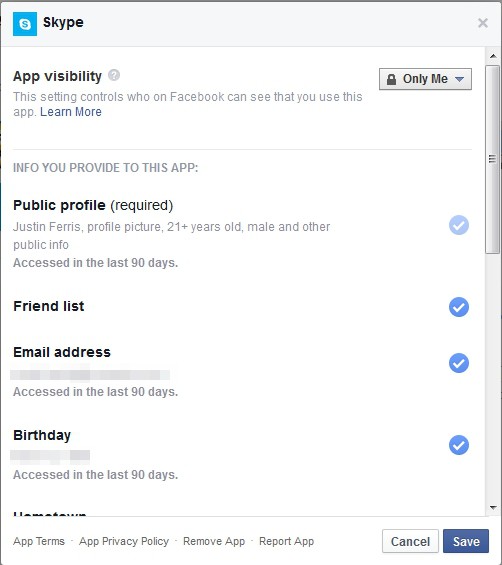
The first setting lets you set who can see you using the app. It defaults to "Only Me," so it isn't a big deal. Below it, however, is another story.
fbapps2
fbapps3
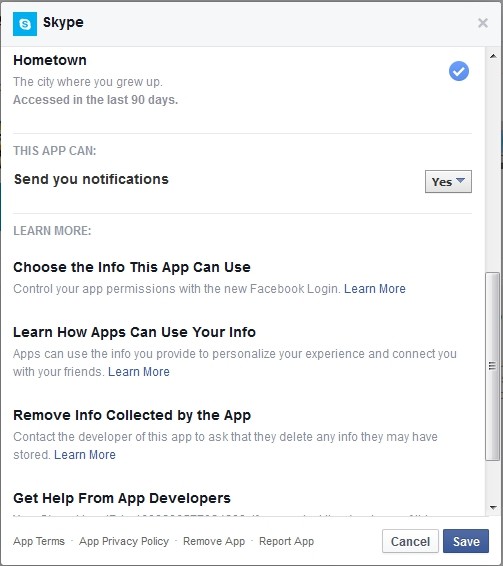
You can see that Skype pulls your public profile information along with your list of friends, email address, birthday and hometown.

That's really not too bad, but remember that the information is being stored on a third-party server. Not every app developer is going to have Microsoft-level security, and hackers are good at turning tiny pieces of stolen information into big gains.

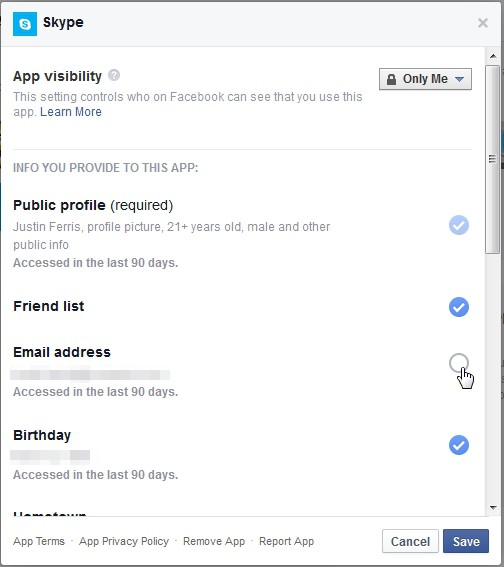
If you want to keep using the app, you can deselect certain items, such as your email address (as seen below). Be aware that won't remove the information from the app developer's servers, however.
fbapps4
Your public profile also can't be deselected. Edit your public profile to remove information Facebook shouldn't have.

If you don't want the app anymore, you can click the "Remove app" link at the bottom of the page. Just remember that this won't automatically remove your information from the app developer's servers. For that, you'll need to contact the app developer directly. Facebook has a link for more information on this under the "Remove info collected by the app" section.

Turn off apps completely

If you've deleted all the apps, and you're not keen on accidentally installing more in the future, you can turn off the app platform completely. Just note you won't be able to install apps or log in to third-party sites using Facebook until you turn this back on.

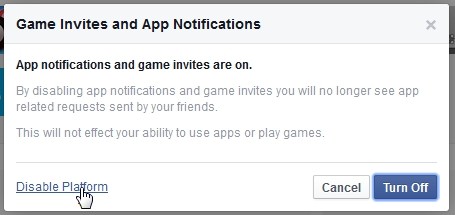
To turn off the app platform, go back to the App Settings page. Under "Apps, Websites and Plugins" click the "Edit" button.
fbapps5
At first, this just looks like a way to disable app notifications and invites from other people, which is a big help on its own. However, you'll want to click the "Disable Platform" link in the bottom left corner.
fbapps6
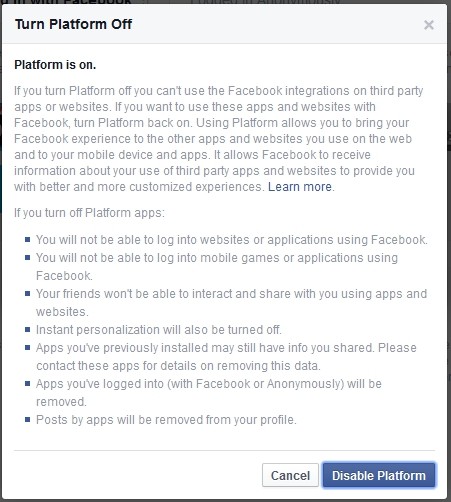
Facebook gives you the standard warning about what disabling the platform does. If you're OK with it, click the "Disable Platform" button. Again, this won't remove information that app developers might have collected about you already.

Stop friends' apps from seeing your info

That's not the end of it, however. Apps can still get your information through your friends. Basically, your friends install apps and those apps often have permission to grab info about you.
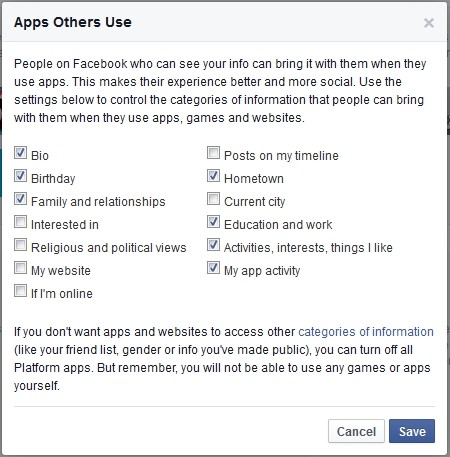
To put a stop to this, go back to the App Settings page. Then under "Apps Others Use" click the "Edit" button.
fbapps7
You'll see everything that your friends' apps can potentially see about you. Go through and uncheck every option listed on the page, and then click "Save." Now companies can't track new information about you.

Home Upgrades: Ideas on New Laptops and Better Wi-Fi by Marc Saltzman

Tuesday, February 14, 2017

How Verizon's new 'unlimited' plan compares to the competition by Rob Pegoraro

Some five and a half years after killing its unlimited-data plan, Verizon (VZ) is resurrecting the offering, putting the carrier back on an even footing with competitors like AT&T, Sprint and T-Mobile.

The move, announced Sunday, completes a remarkable turnaround for the industry. Back in mid-2012, only Sprint (S) offered a plan with unlimited full-speed data, which, given its horrible network then, wasn’t too appealing anyway. But in August 2012, T-Mobile (TMUS) added an unlimited plan to its stable of offerings. In January, AT&T (T) brought back unlimited data for its subscription-TV customers. And now Big Red has joined the trend.

Here’s how Verizon’s unlimited plan compares to the competition’s.

Prices and prioritization

Verizon’s Unlimited offering can actually be considered “unmetered,” as it does have some limitations. But that’s also the case with the unlimited-data deals from each of the three other nationwide carriers.

And the severity of the restrictions on each so-called unlimited plan often has little do with how much more or less it costs next to competitors’ plans — a lineup in which Sprint is cheapest, followed by T-Mobile, then Verizon and finally AT&T.

Here’s how the plans shake out:
  • AT&T (reserved for DirecTV and U-verse TV subscribers): $100 per month for one line, $40 per month each for the second and third lines. The fourth line is free.
  • Sprint: Sign up now through March 31, 2017 and you’ll pay $50 per month for one line, $40 for the second and nothing for the third and fourth lines through March 31, 2018. After that you’ll pay $60 a month for one line, $40 for a second and $30 each for the third and fourth. If you sign up after March 31, 2017, you’ll pay the standard $60 a month for the first line, $40 for the second  line and $30 each for the third and fourth lines.
  • T-Mobile: $70 per month for one line, $60 for the second line and $20 each for the third and fourth lines.
  • Verizon: $80 per month for one line, $60 for the second, $22 for a third and $18 for a fourth.
The most obvious limit is the point at which your data speeds slow if your carrier’s network becomes congested. This doesn’t mean getting kicked back to 2G speeds — the fallback, unmetered data service AT&T, Sprint and Verizon provide on their limited plans — but could mean slower webpages and poor streaming quality. It’s hard to say how much this could impact you, though, as user reports about the severity of this “deprioritization” have varied widely.

AT&T and Verizon will start to deprioritize your date after you use 22 GB in a month, while Sprint sets its limit at 23 GB. T-Mobile says ranking among the top 3% of its users, which the carrier says equates to burning more than 28 GB a month, will see your data fall to a lower priority level.

Other caveats: hotspots, high-def video

What about using your phone as a Wi-Fi hotspot, otherwise known as tethering? AT&T’s unlimited plan bans that, while Sprint limits it to 5GB a month. Verizon, meanwhile, includes 10 GB of tethering. As of Monday morning, T-Mobile offered unlimited tethering but at painfully slow 3G speeds; that afternoon, it reversed course and said it would include 10 GB of full-speed tethering starting Feb. 17.

Video also faces limits on most of these plans. While Verizon offers unlimited high-definition video streaming, Sprint and AT&T constrain streaming to 480p resolution, or DVD quality. AT&T lets you opt out of this “Stream Saver” feature to watch movies at a higher resolution. Sprint (which also limits music streaming to 500 kilobits per second and gaming to 2 megabits per second) charges $20 extra per line for an “Unlimited Premium” plan that enables high-definition video and quadruples music and gaming speed limits. 

T-Mobile’s Monday switcheroo also ended the carrier’s policy of limiting streaming video to 480p resolution. You’ll be able to get higher resolution streams starting Feb. 17. If you’re already on the carrier’s T-Mobile One unlimited plan, you’ll also be able to switch to this upgraded version Feb. 17.
T-Mobile CEO John Legere.
View photos
After Verizon announced its new ‘unlimited’ plan, T-Mobile announced updates to its own unlimited plan.
T-Mobile and Verizon also specify that you must enable automatic payments on your account to get the advertised pricing for their plans, while Sprint requires that you use paperless billing. If you’re fond of mailing back a check each month, look elsewhere.

Your alternatives

Whether these mostly-unlimited options work for you depends not on how much data you use, but on how you use it.

How to disable your webcam By Mark Jones, Komando.com

The fact that we are living in a digital world means now, more than ever, that we really need to take privacy and security seriously.

Almost everything that we use these days can be connected to the internet. Our televisions, lights, washing machines and even refrigerators can be Internet-of-Things (IoT) devices.
These everyday smart appliances connect to the internet to give you more information and control than we could ever have imagined. It's a really handy technology.

Unfortunately, hackers are able to turn IoT devices into botnets to help them with a DDoS attack. DDoS stands for "distributed denial of service," which is a techy way of saying "crashing a system or the whole internet." It works when a targeted website or server is flooded by an overwhelming amount of requests from millions of connected machines in order to bring it down.
Another gadget that cybercriminals can use against you is your webcam. Not only can they be infected with malware allowing them to be controlled as a botnet, but a creeper can also use your own webcam to spy on you.

That's why it's so important that you know how to disable your webcam.

How to keep your webcam private

Webcams are great for video chatting with distant friends or watching your house while you're on vacation. Unfortunately, they're great for hackers too.

Hackers can slip data and finance-stealing viruses onto your computer. Why not a virus that can take control of your webcam?

Even scarier, some webcams don't require any hacking! They broadcast an unsecured signal that anyone can find.

This is actually happening. Listen to our podcast to find out how hackers are watching your every move.


The easiest way to stop people from watching you on your webcam is to cover it with a piece of tape, or sticky-note. Facebook CEO Mark Zuckerberg was even spotted using this technique last year.
However, if you don't want to pin all of your hopes of privacy on a piece of tape, there are more thorough ways of disabling webcams. Here are the steps you need to take:

Disabling an integrated webcam in Windows

Whether you are using a laptop or a touch-screen all-in-one desktop PC, it more than likely came with an integrated, or built-in, webcam. Disabling the webcam is pretty simple, just follow these steps:
  • Press Win + R - (The Win button is located on your keyboard and looks like a Window.) Pressing these two buttons at the same time is a shortcut to opening a Run window.
  • Type devmgmt.msc and hit enter or click OK. This opens up a Device Manager pane.
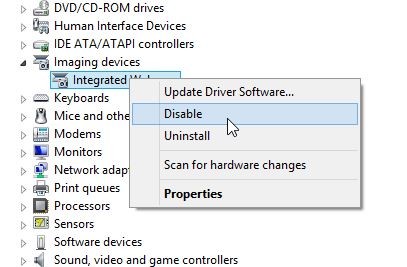
  • Click Imaging devices.
  • Right click on Integrated Webcam - You will see this underneath Imaging devices.
  • Select Disable  
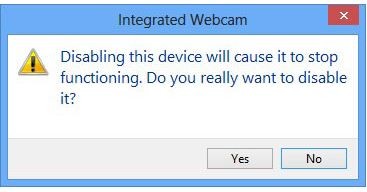
  • Click Yes - A popup menu will open after selecting Disable. This will officially disable the webcam.
Later, if you want to enable the webcam, just go through these same steps and select Enable on the step that you previously selected Disable.

Disabling a webcam connected with USB in Windows

The easiest way to disable a webcam connected with a USB is to unplug it. If you want to disable it the more thorough way, follow these steps:
  • Press Win + R.
  • Type devmgmt.msc and hit enter or click OK. This opens up a Device Manager pane.
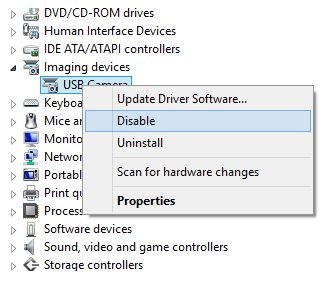
  • Click Imaging devices.
  • Right click USB camera (it could say USB webcam).
  • Select Disable.

Disabling a webcam on macOS

Deactivating a webcam on a Mac is a bit more tricky than in Windows. You need to delete a specific file for this.

Warning! If you plan on using the integrated webcam at any point in the future, you need to make a back-up of this file before deleting it. Create a new folder and paste the copied file in it.
Here are the steps to delete the file: Go to Macintosh HD >> System >> Library >> Quicktime. Under Quicktime, you will delete the file called QuickTimeUSBVDCDigitizer.component.