Life has changed there is no doubt and we wanted to reach out to see how you are doing.
As we go through this interesting time, we are trying to look at this as an opportunity to focus on our family and on friends like you. Let us use this extra time to catch up and talk more. Let us cook food that is not fast, but interesting and satisfying. Let us learn to enjoy a time to try new things. Let us find ways to enjoy time at home!
Computer Security
If my client base is any experience, anyone can be a victim of a Ransomware, Malware or Virus attack.
What can you do about it?
I conduct audits of your entire computer infrastructure and apply best practice solutions to plug the security holes on your computers, Smartphones and networks.
Now offering consultations to give you the best protection possible:
3:46 PMHigh Tech House Calls, Expert Computer Consulting
We don't know about you, but it seems like Microsoft is getting a bit pushy when it comes to encouraging users to switch to Windows 10. Last month we shared a blooper that aired on live TV, where a weather reporter was prompted to make the software upgrade. (Click here to read the full story.)
Of
course, that incident was just a poorly-timed accident. But, all jokes
aside, the tone of Microsoft's push to Windows 10 is beginning to become
aggressive.
Just
two weeks ago we let you know about the $119 fee Microsoft will charge
to anyone who wants to upgrade after July 29. The upgrade is free before
then, but you have to do it by the deadline.
Lately, we've been
hearing complaints from people who are getting the Windows 10 upgrade
overnight, even if they don't want it. This is all part of Microsoft's
nine-month push to get users to update their software. The company
announced its plans for this push back in October.
"Windows 10
will be offered as a 'Recommended' update for Windows 7 and 8.1
customers whose Windows Update settings are configured to accept
'Recommended' updates," a Microsoft spokesman explained.
Just last
week, Microsoft announced that the Windows 10 upgrade had been added as
a "Recommended Update," instead of an "Optional Update," which is one
of the reasons why people are now finding Windows 10 installed on their
computers. This change means that Windows 10 will automatically be
installed, unless those with older versions of Windows say otherwise.
There is a way you can stop this from happening. Click here for step-by-step instructions.
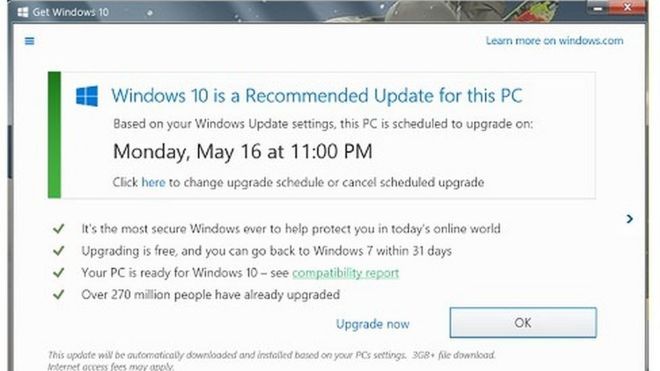
But
there's another reason that Windows 10 is suddenly appearing on
computers, even when people thought they had deleted the prompt to
upgrade. When you look at the message more closely, you'll see the error
they're making. Here's a hint: It has to do with that red X.
When
the alert pops up in a window, the problem is that many people think
closing that window is actually stopping the upgrade to Windows 10. It's
not.
If you look carefully, you'll see the words, "Click here to
change upgrade schedule or cancel scheduled upgrade." It's not hidden,
but it certainly doesn't jump off the screen like the date that's posted
right above it.
Clicking
on the red X in the top right-hand corner of the screen does nothing
more than close out the window. This means that your scheduled upgrade
will continue as planned, unless you go back into your settings and stop
it.
2:04 PMHigh Tech House Calls, Expert Computer Consulting
Multitasking on iPad was introduced with iOS 9. Productivity on the
iPad is all about learning small hacks like keyboard shortcuts,
gestures, and multitasking. There are three main multitasking functions
on iPad: Split Screen, Slide Over, and Picture-in-Picture.
Unfortunately, not all models of iPad can perform multitasking and some
can only perform Slide Over and Picture-in-Picture. We’ll go over which
iPads have multitasking functions and how to use them.
You May Also Like: How to Use iPad-Only Gestures
Slide Over on iPad allows you to use a third of the screen to open
another app, but you can only use one app at a time. Split Screen (or
Split View) allows you to split the screen in half with one app on
either side, and you can use both simultaneously. With
Picture-in-Picture on iPad you can watch a video in the corner of your
screen while working within an app. For example, if you find a video in
Safari you want to watch, you can activate Picture-in-Picture then check
your emails while the video plays.
I’m going to list each multitask function along with the models of
iPad each works with below. But to summarize, the iPad Air 2 or later
& iPad mini 4 can use all multitask functions. While iPad Air and
iPad mini 2 or later can use Slide Over and Picture-in-Picture. The
original iPad and iPad mini are not capable of multitasking. Slide Over:
iPad Pro, iPad Air, iPad Air 2, and iPad mini 2 or later. Picture-in-Picture:
iPad Pro, iPad Air, iPad Air 2, and iPad mini 2 or later. Split Screen:
iPad Pro, iPad Air 2 or iPad mini 4.
Split Screen is an extension of Slide Over. To open Split Screen,
Swipe left from the right of the screen as though opening Slide Over.
Then continue your swipe, dragging the edge of the Slide Over screen to the middle, creating Split Screen.
Slide down from the top of the right screen to change which app is open.
To close one of the apps, slide the center divide over until the app you want to close is edged out.
The benefit of Split View is that you can use both open apps simultaneously
for true multitasking. However, Split Screen isn’t available for all
apps. Some of the apps it works with include Mail, Notes, Safari,
Photos, and Calendar.
Picture-in-Picture allows you to watch a video or chat on FaceTime while working in other apps. . To use Picture-in-Picture,
Locate a video in Safari and look for a new icon that looks like two overlapping squares.
Tap this icon to scale the video down and place it in the corner of the app.
You can drag the video to another corner and make it larger or smaller by pinching two fingers.
The video will have three buttons: Pause, Return, and Exit. To return
to the page where the video was playing, tap the same icon you tapped
to begin Picture-in-Picture. To simply close the video and continue what
you’re doing, tap the X.
Every now and again I’ll come across a video that doesn’t offer
Picture-in-Picture. It works well for videos found in Safari and is
excellent for FaceTime, but as of yet, it doesn’t work within the YouTube app. But Youtube videos embedded in Safari do offer Picture-in-Picture.
2:01 PMHigh Tech House Calls, Expert Computer Consulting
The iPhone 6 and 6s Plus with its
5.5-inch display gives you a lot more viewing space. Apple takes
advantage of that extra display space by giving the devices a
split-screen feature in apps such as Messages, Mail, and Calendar. You
can utilize the extra iPhone 6 & 6s Plus features when you’re in
landscape mode. In Mail, for example, you'll see the list of messages on
the left and the text of a selected message in the space on the right.
We’ll cover how to use split view on the iPhone 6 & 6s Plus as well
as how to turn split screen off if you'd like to use the extra display
space to make the text larger instead.
You May Also Like: Reachability Lets You Use Your iPhone 6 or 6 Plus One Handed To utilize your extra screen space,
you can use split screen view by turning your iPhone on its side, which
automatically activates landscape mode. This allows your iPhone’s
display to feature more content on a single screen and more closely
mimics the way these apps look on iPad or Mac.
Common apps that use
split view include Mail, Calendar, Messages, Stocks, Reminders, Voice
Memos, Contacts, Clock, and you’ll notice a change on Home Screen as
well. Let’s take a look at different ways you can use split view with an
iPhone 6 or 6s held in landscape mode. Rather turn split screen off? Click here to jump to those directions.
Mail
Split view in Mail allows you to
read emails while looking at your Inbox. If you love Mail on your iPad
or Mac, you'll appreciate split screen on iPhone 6 Plus and 6s Plus.
Calendar
Split screen in the Calendar app shows you your daily schedule and event details simaltaneously.
Messages
Similar to Mail, Messages shows you your list of messages and the current one you're replying to in landscape mode.
Stock
Need to check multiple stocks? Split view makes it easy. As you can see, split view displays
more information on the same screen. This feature is only available on
Plus phones, which are currently the iPhone 6 Plus and iPhone 6s Plus.
Conversely, if you’d rather turn
this split view feature off, follow the steps below. Keep in mind that
you will also lose other features like the landscape-oriented home
screen and the extra buttons on your keyboards, but it will turn split
screen off in all of the apps listed above.
How to turn off split screen:
Open the Settings app.
Tap Display & Brightness.
Select View.
Tap Zoomed at the top.
Select Set.
Confirm Use Zoomed. The message will inform you that changing the display will restart your iPhone.
Once your iPhone has restarted you
should no longer see the split screen in your apps. Instead you will see
one big window when you hold your iPhone 6 Plus or iPhone 6s Plus
horizontally.
1:50 PMHigh Tech House Calls, Expert Computer Consulting
There’s
a lot that’s confusing in the world of consumer tech — and there’s no
handy handbook to explain it. Welcome to “Now I Get It: Tech,” a new
series from David Pogue that explains some of the most baffling
mysteries in the tech world.
I don’t use Snapchat. And no wonder: Most people who use it are under 25, and 70 percent of them are female. I’m neither.
At the same time, I’ve been dying to understand Snapchat. I mean, it’s a major cultural force: 200 million people are using it. They send 20,000 photos a second and watch 8 to 10 billion videos a day. The company has yet to turn a profit, but it turned down Facebook’s offer of $3 billion; today, it’s valued at $20 billion.
So
I decided to dive in, to talk to people, to pound on this app until I
finally understood it. Here, for the benefit of people who don’t understand Snapchat, is what I discovered.
First, you need to know that Snapchat is really three apps crammed in one.
Function 1: Self-destructing messages
Snapchat’s
primary (and most famous) feature is that it lets you send self-erasing
photos to people. To be more precise, it lets you snap a picture or
record a 10-second video, dress it up with funny overlays, type and
format a caption, draw on it with your finger if you like, and then send
it to specified friends. Once they’ve seen your snap, it disappears
forever. Not even the company can get it back.
You
can also post snaps publicly to all of your followers on a timeline
(here called your Story), à la Facebook or Instagram; the difference is
that whatever you post on Snapchat vanishes after 24 hours.
For nonteenagers, the whole concept is a little bizarre. Why would you take photos and videos knowing that
they’ll disappear after one viewing? Isn’t the whole purpose of photos
and videos to capture cherished memories to be viewed years from now?
Here’s my theory: Deep down, Snapchat’s appeal has to do with teenage insecurity.
Usually,
what you post online is there forever. It can come back to haunt you.
Everything on Facebook, Twitter, Instagram, the Web, text messages,
email — it will always be there for people to judge you. Your parents might see it. A college admissions officer. A prospective employer.
But
Snapchat takes the pressure off. If your snap is goofy or badly framed
or embarrassing or incriminating — you don’t care! Post it anyway. No
employer or principal or parent will ever find it and disapprove.
Furthermore, there are no comments, no Like buttons, no counts of how many friends you have. No judgment.
All
of this gives Snapchat an honesty, an authenticity, an immediacy that
the other social media apps lack — and that millennials love.
The screenshot loophole
It
is true, by the way, that if someone sends you a snap, you can take a
screenshot of it before it disappears, thereby preserving it forever
and, presumably, defeating the whole purpose of Snapchat. (To take a
screenshot on the iPhone, you press the sleep and Home buttons at the
same time; on most Android phones, you press the volume-down and Home
buttons.)
The
app does notify you when an image has been screenshotted before it
disappears. But even that function can be defeated using little hacks
that are easy to find online.
So I couldn’t help wondering: Why would anyone risk sending naughty or risky stuff, knowing that it could be captured forever?
One good answer
came from a respondent on Quora: “If you don’t trust someone to not
take advantage of you, don’t send them that snap; it’s really that
easy.”
Another
came from a high schooler I interviewed: “Nobody really thinks that the
point of Snapchat is to send messages that will delete … unless it’s
something secret or embarrassing, I guess. Anyway, I don’t think people
care if you screenshot something.”
Either way, the screenshot loophole doesn’t seem to bother anyone.
One
more exception: Once a day, you can watch one snap one more time in
case you missed it. Incredibly, you can also pay to view snaps again
(three replays for a dollar). Mostly, nobody bothers. (“I did not even
know that was a feature. Neither did my cousins — noted avid Snapchat
users,” said my high school source.)
Function 2: Standard chat program
Many teenagers use Snapchat constantly. They send many, many snaps. They live in the app.
The
Snapchat folks have fanned that flame by adding text, voice, and video
chat capabilities to the app. You can have a conversation by typing, by
talking, or by video calling, and you can slap in cute cartoony
“stickers.”
These communications, too, disappear, once both parties have read them.
Function 3: A news app
The
third face of Snapchat’s personality is its recent incarnation as a
news app. Online publications can post their own stuff for you to read:
ESPN, Comedy Central, BuzzFeed, People, National Geographic, CNN, and others are already on board.
What does any of this publishing stuff have to do with chatting with friends or sending self-destructing photos?
Beats the heck out of me, but I’d guess it has something to do with Snapchat trying to make money.
(Most of my teenage sources say they don’t even look at these articles.)
Snapchat the Unknowable
Snapchat wins no awards for ease of use. In fact, it’s incredibly hard
to figure out, filled with unlabeled icons and confusingly arrayed
screens. Many functions don’t have buttons at all; you get to them by
swiping across the screen in various directions [as shown by the arrows
here], which is something you kind of have to stumble on.
(Maybe
this, too, is part of the appeal to teenagers. Every generation of
teens has its secret, proprietary culture — slang, music, rituals —
deliberately designed to shut out or mystify their parents. Maybe
mastering Snapchat’s bizarre layout makes its fans feel like insiders in
an exclusive club.)
Over time, Snapchat has become burdened by an almost absurd assortment of features. My impression is that it’s popular despite this feature-itis, not because of it.
How to use Snapchat
All that said, here’s a quick guide to get you started:
Functions
2 and 3 (chatting and reading articles) are relatively easy. To read
the articles posted by media organizations, tap the lower-right button
(labeled Discover in the right-hand screenshot above) to see the names of magazines and websites, and tap your way in to start reading.
For
chat, you swipe to the right from the camera screen to see your list of
contacts, and then tap one to start typing or calling.
That leaves us with the Big One, the primary Snapchat feature, the really fun one: Sending self-deleting photos and videos.
When
you first open the app, its camera screen appears. It works just like
your phone’s regular camera app. Tap the upper-right camera button to
use the phone’s front-facing camera to take a selfie (which is usually
the point). Touch the big round shutter button to take the photo. (Or
hold it down for up to 10 seconds to record a video.)
All
Snapchat photos and videos are vertical, by the way; nobody turns the
phone 90 degrees to take or view them in landscape mode.
Once you’ve snapped a shot, the real fun begins: Dressing it up.
Apply a filter: Swipe
horizontally across your photo to apply a filter — to add a blue or
green tint to the whole thing, for example. If you keep swiping, you’ll
see some really interesting ones: One adds the name of your city with a
cool graphic treatment, another stamps the current time or temperature,
yet another stamps your current speed in miles per hour (best if you’re
not doing the driving).
Stamp some stickers: At
the top of the screen, the tilted square icon shown here [below, left]
opens a page of emoji icons. Tap to stamp one on your photo. At that
point, you can drag the “sticker” around to move it, or pinch/spread
with two fingers to enlarge it or shrink it.
Type some text: When you tap the T button at the top right of your photo screen, the keyboard opens [below, left]. Type a caption and then Done. Now you can drag with your finger to slide the caption up or down the photo.
Or maybe you’d prefer giant lettering. To do that, tap the T
to make the text huge [below, middle]. Tap a third time to center the
text. Once it’s huge, tap the text itself to open a page with a color
slider, so you can change the color [right].
Draw on the photo: Tap the pencil icon to draw or write on the shot with your finger. Once again, a slider appears so you can specify the color.
Put on a virtual mask:
You’d never in a million years stumble onto this feature without being
told about it, but it’s hilarious and fun: Snapchat can turn you into a
gorilla or a Viking or a bobblehead, either as a still or a video, by
superimposing an animated mask or costume on your live image.
To see these software “masks” (or Lenses,
as Snapchat calls them), the trick is to hold your finger down on your
own face in the live camera view before taking the photo. After a
moment, a grid out of a sci-fi movie appears on your face, and icons for
virtual masks fill the bottom of the screen.
Tap one to try it out.
(They change all the time, for variety.) Some come with instructions,
like Open your mouth, which triggers a funny animation.
When
you’ve got a look you like, snap it as a photo or video just as you
normally would, by touching or holding your finger down on the round
button on the screen. (Snapchat charges $1 apiece to install new Lenses
of this type.)
(I
would have written that these virtual masks are so witty, new, and
interesting that it’s worth installing Snapchat just to try them out —
except that MSQRD
is a free app that does exactly the same thing, with even better
animations and smarts, and without all the extra clutter of Snapchat. If
you have a child and an upcoming car ride, you must download MSQRD.)
Finally, you’re ready to post your masterpiece. For this, you use the icons at the bottom of the screen:
Seconds:
The lower-left icon specifies how many seconds your recipients will
have to view your masterpiece before it disappears. (They’ll see a
countdown.)
Save: Your friends aren’t supposed to keep a copy of your photo, but it’s OK for you to keep one. Tap Save to preserve it in your phone’s Photos collection.
Post to your Story: Again, Story is
Snapchat’s name for your timeline or newsfeed. It’s a way for you to
make your snaps viewable to your entire social circle (which you specify
in Settings) — for 24 hours.
Choose recipients. When everything’s ready to go, tap here to view your friends list, so you can specify who gets your masterpiece.
Now you get it?
As you now know, the first Snapchat mystery — How do you use it? — is easily solved, once you have a cheat sheet.
As for the second mystery — Why do you use it? —
it helps to be a teenager. But Snapchat also rocketed up the ranks
because of its convenience, silliness and fun, immediacy — and above
all, because whatever you do with it, you won’t someday regret it.
1:43 PMHigh Tech House Calls, Expert Computer Consulting
Have you ever looked at your iPhone or iPad user guide? I mean, read through all 100-plus pages of it?
Chances
are, like most people, you were so excited when you got your new Apple
gear that you forgot all about the user guide. That's too bad because
buried deep inside its pages are some really clever tricks.
Good
news. The following seven iPhone tips and tricks are not only cool, but
useful. Even if you're an Apple devotee, chances are good that you
don't know about one or two of these.
So, are you
ready to read about iPhone tricks that'll impress your family and
friends, and make your life a little easier? Let's go.
(Note:
Keep reading for a simple way to share these secrets on social media,
to impress them with these tricks, before everyone knows about them.)
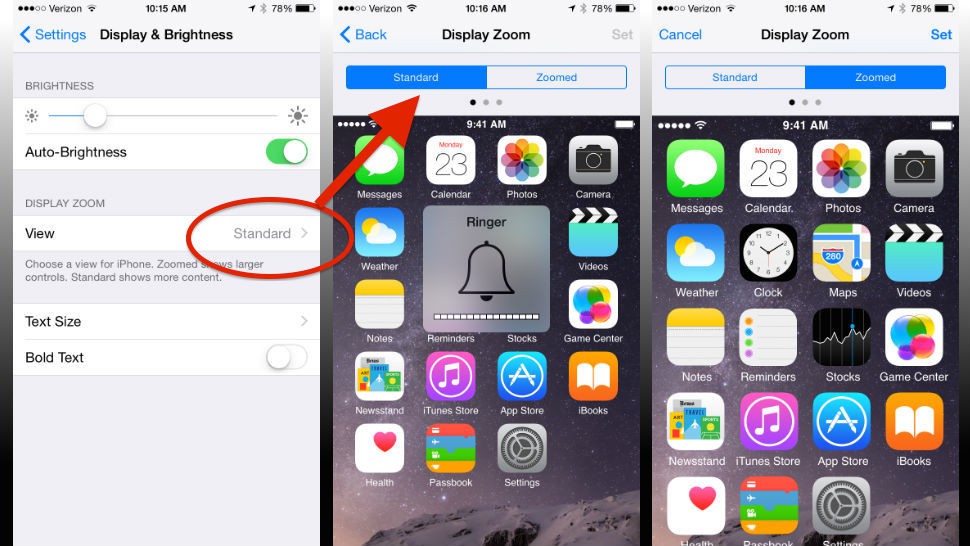
1. Display zoom
Do
you ever have trouble reading your iPhone without your reading glasses?
Or perhaps you have a hands-free holder in your car that places your
screen just far enough away that it's hard to read maps or directional
prompts? Here's a quick way to instantly make everything on your screen a
bit bigger.
The feature is called Display Zoom. Go to Settings >> Display & Brightness >> View >> Display Zoom.
2. See every photo and video you've sent
Do
you ever look back over the photos and videos you've texted someone? We
all have. After all, no one takes more meaningful pictures about your
life than you. Or, maybe you'd love to look through the collection of
photos that someone has texted you.
You may not realize there's a
really simple way to take a look back at all the photos and videos
you've sent someone. It's like a scrolling timeline that'll make you
laugh and bring a tear to your eyes.
Here's how: From Messages,
open the message thread with that person >> press Details in the
upper-right corner of the screen. From there you can view all the photo
attachments sent to that person.
3. Speed up your iPhone with a better restart
The
next time your iPhone starts slowing down, give it some pep with a
restart. But, before you lose all the apps you've got open, do this
instead.
Simply hold down your power button until you see the
message, "Slide to Power Off." Then hold down your home button for about
five seconds.
Your iPhone will open up a refreshed homepage.
It'll look unchanged, but when you tap on any of your apps, they'll
reload. The best part is, you should notice your iPhone running faster,
too.
4. Charge fast in a pinch
Say
you only have a few minutes to grab as much battery recharge as you
can, maybe before boarding a flight or going into a meeting. Putting
your phone in Airplane Mode will allow it to charge just a bit faster.
Airplane
Mode turns off all the radios, including cellular, Wi-Fi and Bluetooth
on your Apple gadget. Not only does that save the juice that it would
have been using to power those transmitters, your gadget won't suddenly
begin downloading a big email attachment.
Here's
how: To access Airplane Mode >> swipe up from the bottom of your
Home Screen to open the Control Center >> tap the airplane icon on
the far left. You can also go into Settings and slide Airplane Mode to
on. It'll turn green and a plane symbol will show up in the top left
corner of the screen.
Do you have more than just a
couple of minutes? To charge the fastest in a hurry, turn off your
phone so it draws no power at all.
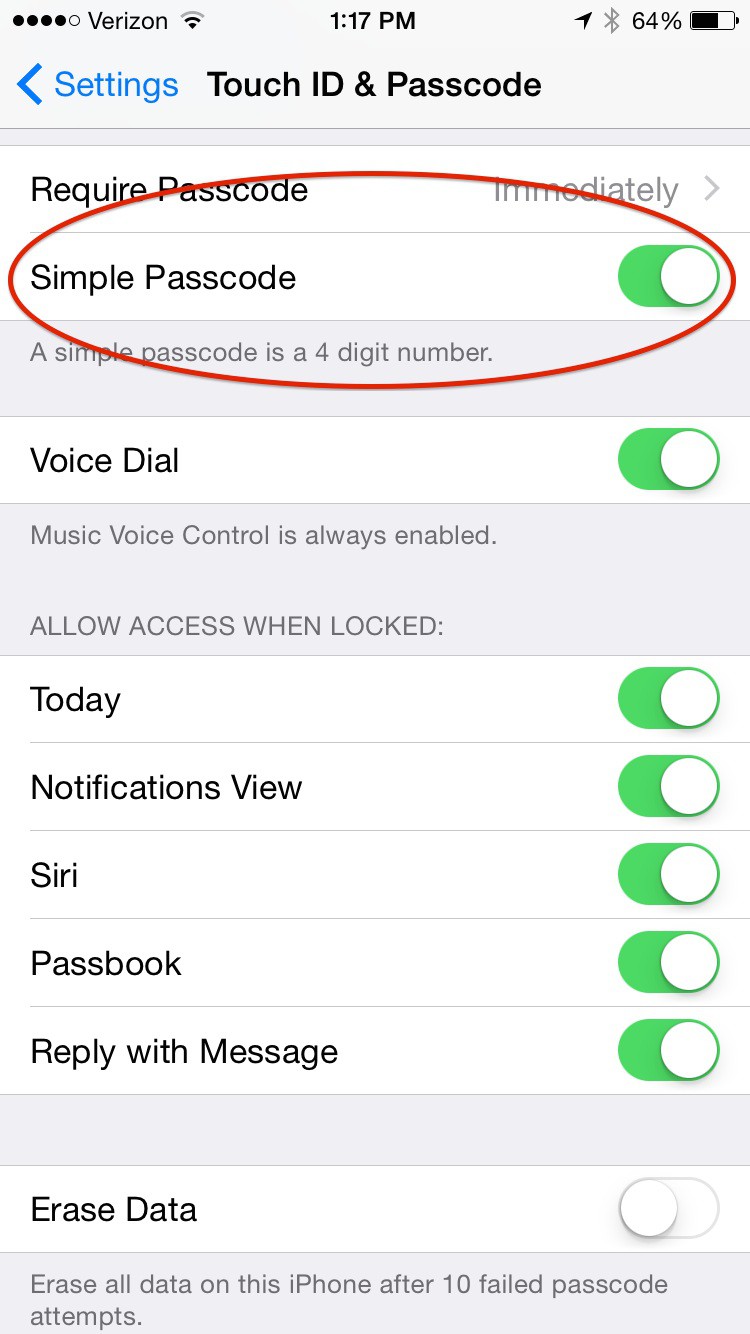
5. Use safer passcodes with letters
Be
default, iPhones only allow a four-digit number as your screen-lock
passcode. Apple calls this Simple Passcode for a reason. Do the math on
that and you'll realize that allows just 10,000 passcode combinations.
Now consider that someone watching you might see the simple combination
you use to enter your passcode. Or, someone who knows you well might
guess your four-digit passcode based on your birthday, street address or
another PIN you use a lot.
There's a more secure, easy way to create an iPhone passcode.
Go
to Settings >> Touch ID & Passcode >> Simple Passcode.
Now you can feel safe that all of your selfies are locked behind a
passcode for your eyes only. Speaking of photos ...
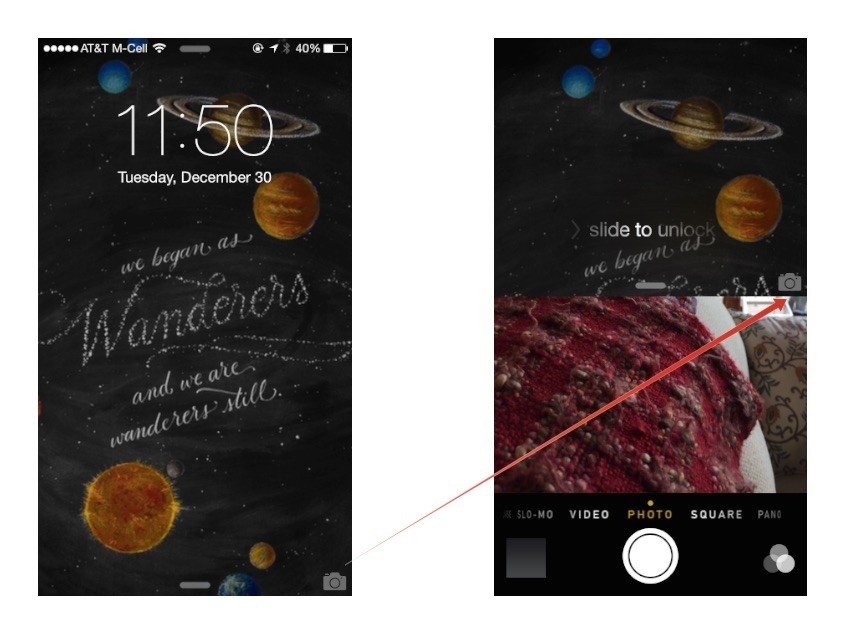
6. Take a photo without unlocking your screen
Is
there anything worse than missing a great photo? You know how it goes.
Your dog or cat or your kid does something so incredibly adorable that
you just have to share it with the world.
But, a lot of times you
miss the shot. By the time you grab your iPhone, unlock the lock screen,
tap your photo app and take the shot, that cute moment where your kid
is looking up at you with a big smile on her face has passed.
Don't
miss another spontaneous shot. Instead, from your lock screen, swipe up
from the little camera icon on the lower right-hand corner of your
screen. Your camera is open and ready to go.
7. Invert your screen colors
Say
you are browsing in a dark place, like a restaurant, but you don't want
to disturb other people. You can't dim your screen but you won't be
able to see.
Plus, turning down the screen
brightness reduces the contrast between the text you are trying to read
and your screen's background. This little-known trick will help you:
turn your screen from white to black and the letters from black to
white. (See photo.)
The people sitting near you will appreciate how much less light your gadget is creating, and so will your eyes. Note: Be sure to turn it back. Photographs will also be reversed like a film negative.
Go to Settings >> General >> Accessibility >> turn on Invert Colors.
We've
got an easy way to share these surprising iPhone secrets with your
family and friends. Just click on one of the links below to share this
article on your favorite social media networks.
1:31 PMHigh Tech House Calls, Expert Computer Consulting
Do you use Windows? If so, you're definitely not alone.
Microsoft says its newest version, Windows 10,
has been downloaded 300 million times in less than a year. There are
good reasons for that. Windows 10 is fast, safe and it'll soon have
browser extensions that diehard Windows users have been asking for for
years.
Another
great thing about Windows 10 is that the Windows 10 upgrade from
Windows 7 and Windows 8.1 is absolutely, 100% free. You pay nothing,
nada, zippo.
That is, you pay nothing if you act really fast. If
you don't upgrade your Windows to Windows 10 by July 29, you'll have to
pay $119 to get it. And, if you're a PC user, you should get it.
For
one thing, Microsoft is moving away from older versions of Windows.
Plus, Windows 10 has features that make it easy to use, like the Start
button that disappeared on Windows 8.
Note: Microsoft's Windows 10 Anniversary Update
will be released in two phases this summer and fall. This will be
Microsoft's first major overhaul of Windows 10 since launching the OS
last year. Among other upgrades, the Anniversary Update will have
improved features for mobile surfing. Keep reading Happening Now for Windows 10 updates.
Smartphones have made our lives so much easier in many ways, but
the on-screen keyboard can drive you up the wall, especially if you need
to write anything longer than a Tweet.
Most smartphone keyboards
have tiny letters and little room for error for adult-sized fingers. And
if you're texting with one hand, throw in even more typos and
frustrations. Even the most careful writers can end up with embarrassing
spelling mistakes. And you don't want to rely on autocorrect to fix
them - usually it just makes things worse.
Luckily,
the next big thing in keyboard technology is here. Microsoft, not
Apple, as part of the Microsoft Garage Project, has released the Word
Flow app, a new keyboard positioned at an angle to make it much easier
to type on a mobile gadget, even with just your thumb! It's called Arc
mode.
To get the Word Flow app enabled on your iOS device, first
you'll need to download the app. Next, you'll go to your Settings >
General > Keyboards > Add New Keyboard > Word Flow.
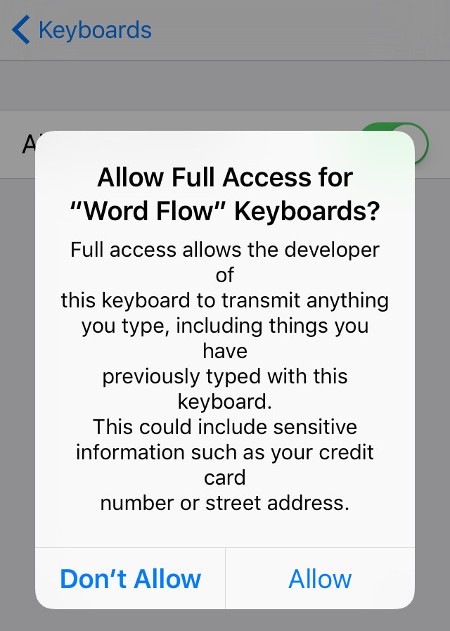
Next,
you'll need to allow the keyboard full access for all of its functions
to work - such as Arc mode - but let me show you why that might not be
the best idea:
It
reads: "Full access allows the developer of this keyboard to transmit
anything you type, including the things you have previously typed with
this keyboard. This could include sensitive information such as your
credit card number or street address."
However, what you might not know is that all third-party keyboards have the same policy.
So
once you've downloaded the app and decided to give permission - or not -
you'll have to choose the theme and then you're on your way to
smoother, one-handed typing. You can swipe instead of type and avoid
embarrassing mistakes all at once!
1:20 PMHigh Tech House Calls, Expert Computer Consulting
The days of physical photo albums are behind us, and amazing cameras
can be found in the palm of our hands in the form of a smartphone.
Transferring your pictures from your iPhone to a computer is a great way
to figure out which photos are important enough to keep, and
downloading them to your Mac or Pc is smart way to keep them safe.
However, getting photos off an iPhone isn’t always the easiest process,
and I’ve heard from lots of our readers about the frustration this
causes them. So here’s five different methods for importing your photos.
The classic way we think of syncing photos to a computer is with a
USB cable, but unless you’re planning to download a lot of photos at
once, there are much easier ways. But the classics are always beloved,
so we’ll start with getting those pictures of yours onto a computer,
then we’ll check out some alternative options you might want to adopt.
This is the tried and true method that hasn’t change much regardless
of whether you use a Mac or a PC. Of course, for this method you’ll need
the USB charging cord that came with your iPhone. The only difference
between offloading photos onto a Mac versus a PC is the program you’ll
use to import them. Let’s break it down.
Mac OS X — Yosemite or later
Using your USB cord with lightning connector, plug your iPhone into your computer.
The Photos app will automatically launch once plugged in. If it
doesn’t, open your Applications folder and select Photos. There’s an
alternative method that uses Image Capture instead, which you can check out here if you prefer.
Click Import at the top. The program will instantly figure out how
many new photos there are to upload. To quickly import all the new
photos, click Import New. If you’d rather download select photos, you
can choose the ones you want to import and click Import Selected.
If you want the transferred photos to delete from your iPhone once
they are on your computer, check the box next to Delete items after
import. This is smart practice if you’re low on iPhone storage.
If you want to view the pictures you’ve uploaded, select Albums at the top.
PC — Windows 8 or later
Newer versions of Windows, such as 8 or 10, shouldn’t have any
problems transferring iPhone photos to a PC computer. The process is
nearly identical to a Mac, except you’re using Microsoft's version of
the Photos app. However, if you are using a PC with an older version of
Windows, check out this tip for using AutoPlay to import your photos.
Using your USB cord with lightning connector, plug your iPhone into your computer.
The Photos app will automatically launch once plugged in. If it
doesn’t, launch the program using the Windows Start menu or search bar.
There will be an Import icon in the top right corner represented by a downward-facing arrow within a box.
Individually select the photos you’d like to transfer from your iPhone and click Continue.
The next pop-up window will tell you where the photos will be saved
and give you the option to delete the uploaded photos off your iPhone.
Check the box to do so, if desired. If you want to save the photos in a
different location than specified, click the grey text: Change where
they’re imported.
Afterward, to view the photos you just uploaded, click Albums on the
left-hand navigation bar. Then select Last Import at the top. From here,
you can share and edit your newly downloaded photos!
You can use iCloud to
automatically transfer new photos to all of your iCloud devices when
connected to Wi-Fi using either iCloud Photo Library or Photo Stream;
although, we recommend using them in conjunction. You get 5 GB of free
iCloud storage, so if you’re going to use iCloud Photo Library, be aware
that it does count towards that storage limit. You can pay a dollar a
month to upgrade to 50 GB. You can also use Photo Streaming on its own,
if preferred. Should you choose to use one over the other, simply check
only iCloud Photo Library or Photo Streaming when prompted below instead
of both.
For both methods, when you take
pictures outside of a Wi-Fi zone, those photos will automatically
transfer once you are in a Wi-Fi zone. To do this,
First you need to enable iCloud Photo Library and Photo Streaming on
your iPhone. Open the Settings app, and tap iCloud. Tap on Photos from
the iCloud menu. Toggle on iCloud Photo Library and My Photo Stream.
If you’re using a PC, download iCloud for Windows to
continue. If you’re using a Mac, log-in to iCloud on your computer.
Open System Preferences on your Mac and open iCloud. Next to Photos,
click Options. Make sure the iCloud Photo Library and My Photo Stream
boxes are checked, and click Done.
To view the photos in your Photo Stream, open the Photos app on your
computer. Tap Albums at the top and select My Photo Stream. You’ll find
your iCloud Photo Library photos in the Photos app on any of your
devices as well; you can also access your photo library online here.
Photo Stream won’t transfer
videos you take but iCloud Photo Library will. And remember that you
need to connect to Wi-Fi before the most recent photos you’ve taken will
appear. But when you have this setup, it’s a great way to transfer
photos to your computer automatically.
If you have a small batch of photos you want to transfer to your
computer, sharing them to Mail is a quick way to get them on your
computer. I use this option a lot when I’m writing tips. To do this,
Open the Photos app on your iPhone.
Tap Select and choose the pictures you want to download.
Tap the Share icon.
Select Mail.
A New Message for email will pop up. Send the photos to your own
email account and tap Send. It will give you the option to resize them,
but I usually select actual size.
Open the email you send yourself on your computer. Download the images in whatever folder you’d like.
There’s no limit on the amount of images you can send through Mail if
your iPhone is running iOS 9 or later. For older operating systems, the
maximum amount you can send is five. This isn’t the best option to
select if you have a large amount of photos to import, but for a select
group, it’s one of the fastest (non-automatic) ways to transfer pictures
that I’ve found.
Dropbox is an awesome platform that allows you to easily access
photos, documents, and more across any device with the Dropbox app or in
a browser. You can also set up Dropbox to automatically copy photos to
Dropbox, which means those photos are quickly accessed from your
computer anytime. We’ll cover your manual and automatic options with
Dropbox.
Manual
Download the Dropbox iOS app from the App Store on your iPhone. If you don’t already have an account, create one and log-in.
In Files, choose the folder you want your picture to go in. Tap the
three dots in the top right corner. Select Upload File. Choose Photos.
Select all the photos you want to transfer to Dropbox and tap Upload.
On your computer, either download an app for Dropbox, or go the the
Dropbox website in your preferred browser and log-in. From there,
navigate to the folder you placed your newly synced photos in. You can
then download them from Dropbox to your computer if desired.
Automatic
Download the Dropbox iOS app from the App Store on your iPhone. If you don’t already have an account, create one and log-in.
Navigate to Settings in the Dropbox app.
Select Camera Upload.
Toggle on Camera Upload.
Now, new photos will automatically upload to the Camera Uploads
folder in your Dropbox, which you can access via your computer on the
Dropbox website.
When you turn on Camera Upload, you’ll see the option to
automatically Upload Videos too. There will also be an option to turn on
Use Cellular Data. I don’t recommend turning that on unless you have an
unlimited data plan. Dropbox offers limited space for free, so that’s
something to aware of if you plan to adopt this method. However, you get
2.5 GB of free space through the iOS app, which can hold a lot of
awesome photos.
Unlike Dropbox, Google Photos gives you unlimited space for all of
your pictures, so long as each photo is under 16 megapixels. Similar to
Dropbox, you can set it up so that your pictures sync manually or
automatically. We’ll cover both options below.
Manual
Open the App Store on your iPhone and download Google Photos.
Open the Google Photos app and log-in.
If it’s your first time using the app, it will ask to access your photos, tap OK.
Navigate to Photos.
Tap the three vertical dots in the upper corner.
Create a New Album or Select Photos.
Once you’ve selected the photos you want to upload, tap Done if
creating a New Album and the photos will upload. You’ll then be prompted
to name the album.
If Selecting Photos, check the photos you want to upload. Then tap
the three dots in the upper corner, and select Back up. The photos will
upload.
On your computer, open Google Photos. The pictures you uploaded will be there!
Automatic
Download the Google Photos app on your iPhone.
Open the app and log-in.
If it’s your first time using the app, it will ask to access your photos, tap OK.
Tap the three horizontal bars in the upper corner.
Tap Settings.
Select Back up & sync
Toggle on Back up & sync.
All of your photos will begin backing up and syncing to Google Photos.
Once all your photos are synced, you can access Google Photos on your computer and see them sorted by date.
If you want to make sure all the photos you take are available across
your devices, this is a great way to go. When you launch the app, all
your recent photos will backup as long as you’re connected to Wi-Fi. In
Settings of Google Photos, you can use cellular data to back up photos
too, but unless you have unlimited data, I don’t recommend it.
For your convenience Venmo and Zelle are also accepted for payment.
Fed up with Windows based computers?
Think an Apple Computer might be what the doctor ordered?
We can help you with that decision for free! Give us a call so we can discuss your computing needs!
Gift Certificates
What will you use your certificate for?
Making the move to an Apple laptop? My business has been running on an Apple laptop for 6 years.
You bought an iPhone. Now what? We have been working on iPhone problems since they came out and we can help.
Summer will be here before you know it. You want to surf on the internet on your wireless network from your pool. We are wireless network experts in both design and deployment.
Or you can use this gift card for any help needed (including training) for the computers in your home or small business.
The perfect present for any occasion:
Available in one hour increments.
No expiration date.
Can be used for service calls or training.
Giving a technology gift that requires setup or training? Why not add a gift certificate?