Life has changed there is no doubt and we wanted to reach out to see how you are doing.
As we go through this interesting time, we are trying to look at this as an opportunity to focus on our family and on friends like you. Let us use this extra time to catch up and talk more. Let us cook food that is not fast, but interesting and satisfying. Let us learn to enjoy a time to try new things. Let us find ways to enjoy time at home!
Computer Security
If my client base is any experience, anyone can be a victim of a Ransomware, Malware or Virus attack.
What can you do about it?
I conduct audits of your entire computer infrastructure and apply best practice solutions to plug the security holes on your computers, Smartphones and networks.
Now offering consultations to give you the best protection possible:
5:20 PMHigh Tech House Calls, Expert Computer Consulting
The Photos apps for OS X and iOS make it super simple to share photos and videos, even without an Internet connection.
Nothing feels more futuristic and Star Trek than using AirDrop
to instantly beam pictures and videos to others while you’re out and
about. There’s no file size limit, no setup, no software to install, and
no password to memorize. And since AirDrop uses Bluetooth, you don’t
even need an Internet connection or a Wi-Fi network to make it work,
though you can use a Wi-Fi network if you want. That means you can use
AirDrop to fling files to and fro in places that you normally
can’t—airplanes, cruise ships, and camping trips, to mention a few. In
this column, you’ll learn how to use AirDrop inside Apple’s Photos app,
plus get some ideas for using AirDrop in other apps.
AirDrop system requirements
To AirDrop pictures and videos between iOS devices, you need an iPhone 5
(or newer), an iPad (fourth generation or newer), an iPad mini, or an
iPod touch (fifth generation or newer), running at least iOS 7. To
AirDrop files between an iOS device and a Mac (or vice versa), your Mac
has to be made in 2012 (or later) and it must be running OS X 10.10
Yosemite or later.
To AirDrop files between two Macs, they both need OS X 10.10 Yosemite or
later. Technically speaking, if you want to transfer files between two
Macs using an AirDrop window in the Finder, instead of the Photos app,
you don’t need the latest and greatest hardware or OS—both Macs simply
need OS X 10.7 Lion or later.
Setting up your devices for AirDrop
To get the AirDrop party started between iOS devices running iOS 8 (or
later), launch the Control Center by swiping upward from the bottom edge
of the display. (In iOS 7, use the Settings app instead.)
Tap the AirDrop icon to the left of the AirPlay icon (if you don’t see
it, your iOS or the device itself is too old). In the resulting menu,
pick who you want to share files with: Contacts Only or Everyone. Tap
Contacts Only and just the people in your Contacts app can see your
device via AirDrop. Tap Everyone and anyone using AirDrop within about
30 feet of you can see your device. If you’re trying to share images
with someone who isn’t in your Contacts app, it’s quicker to set AirDrop
to Everyone than it is to add them to your Contacts app.
Tap the AirDrop icon circled here (left) and the next menu lets you pick
who to share files with (center). Tap Contacts Only or Everyone and the
AirDrop icon turns white. Wi-Fi and Bluetooth are also automatically
enabled if they weren’t already.
To use AirDrop between an iOS device and a Mac, or between two Macs,
make sure Bluetooth and Wi-Fi are turned on. Your Mac doesn’t need to be
connected to a Wi-Fi network—Wi-Fi simply needs to be turned on.
Using Photos for iOS
To AirDrop pictures and videos between iOS devices, fire up Photos for
iOS. Find the images in your Camera Roll or in an album, and then tap
the Select button at the upper-right. Tap the thumbnails you want to
send, and Photos marks them with a checkmark. To deselect an item, tap
the thumbnail again.
If you want to send all (or most) of the images in a single moment, you
can select them all at once and save some time. First tap the Photos
button at the bottom of your screen to enter Photos view, which splits
your images into “moments” based on time and location. Then tap the
Select button at the upper-right corner of the screen, which makes a
smaller Select button to the right of each moment’s name and location.
Tap that to select every image at once, and then tap any you’d like to
deselect, or tap Deselect to deselect the whole moment.
In Photos view, tap Select in the upper-right corner (left). Then tap
Select next to a moment (right). Now you’re ready to tap Share (right).
Once you’ve selected some thumbnails, tap the Share icon at the
lower-left corner. You’ll see several options for sharing, with the
icons of nearby AirDrop users at the top. Simply tap the person you want
to send the file(s) to. On the recipient’s iOS device, a message
appears asking them to decline or accept the transfer—tapping Accept
adds the files to their Photos library. If, however, you send the file
to another device registered with the same iCloud account, Apple assumes
you own both devices and the files are transferred without the need for
approval.
AirDrop-enabled devices show up as icons at the top of share screen
(left). If your recipient is on an iOS device, they can choose to Accept
or Decline the files (right).
If the recipient is on a Mac, they need to open an AirDrop window in the
Finder (choose Go > AirDrop, press Shift-Command-R, or just look for
AirDrop in your Finder window’s sidebar), or else you won’t see their
AirDrop icon. In the AirDrop window on the receiving Mac, a message
appears that lets them decline, save, or save and open the files. The
resulting files land in the Mac’s Downloads folder.
Using Photos for Mac
The process for using AirDrop in Photos for Mac is just as easy. Simply
select some thumbnails by Shift- or Command-clicking them and then click
the Share icon in Photos’ toolbar (or the Share icon that appears when
you point your cursor to a moment in Photos view). In the resulting
menu, click AirDrop.
A message appears in the middle of the Photos window that contains tiny
thumbnails of the image(s) you selected along with the icons of nearby
AirDrop-enabled devices. If you don’t see the icon of your intended
recipient, try opening an AirDrop window yourself to jumpstart the
process.
After selecting some images, click the Share icon circled here (top) and you see the AirDrop icons of those nearby (bottom).
While there are other options for using Photos to share pictures and videos—say, shared albums and Family Sharing, AirDrop is a quick and instant way to get it done without Internet access.
Other uses for AirDrop
AirDrop is available anywhere you see a Share icon—in iOS apps, some OS X
apps, and in your Mac’s Finder. You can use it to share websites in
Safari, attachments in Mail (Control-click the attachment and choose
Share from the shortcut menu that appears), or any file in your Mac’s
Finder (open an AirDrop window and then drop the file onto your
recipient’s icon). You can also AirDrop a location from the Maps app, a
contact from the Contacts app, an open document in Preview or other
Apple apps, and so on. Until next time, may the creative force be with
you all!
5:08 PMHigh Tech House Calls, Expert Computer Consulting
In Windows 10, there’s a whole new Search feature. It works great — once you know the secret.
First,
click in the Search box, type in what you’re looking for, and see the
top 10 most likely results arranged by category — like Apps, Settings,
Documents, Store, or Web. (Just don’t hit Enter, or Windows will
automatically launch a Bing search.)
OK, that’s great. But what if you don’t find the thing you’re looking for?
Click the category heading, which will lead you to a new dialog box, where you can see everything in
that category. (But with a couple of obvious exceptions: If you click
Web, it will launch a Bing search; click Store, and it will launch the
Windows Store.) From there, you will very likely find what you’re
looking for.
5:04 PMHigh Tech House Calls, Expert Computer Consulting
Microsoft released Windows 10 four weeks ago today, and now the company is providing a fresh update on its upgrade figures. 14 million machines had been upgraded to Windows 10 within
24 hours of the operating system release last month, and that figure
has now risen to more than 75 million in just four weeks. Microsoft has
been rolling out Windows 10 in waves, as a free upgrade for Windows 8
and Windows 7 users. While it’s difficult to compare exact figures
between Windows 10 and Windows 8, Microsoft “sold” 40 million licenses of Windows 8 a month after its debut. It took Microsoft six months to get to 100 million licenses of Windows 8, and it’s clear the free aspect of Windows 10 is obviously driving higher adoption rates.
An encouraging start for Windows 10
Microsoft’s Windows marketing chief Yusuf Mehdi revealed the figure
today, alongside some more interesting statistics about Windows 10.
More than 90,000 unique PCs or tablet models have been upgraded to
Windows 10 in 192 countries. That’s nearly every country on the planet.
Xbox One owners have streamed nearly 122 years of gameplay to Windows 10
PCs. More importantly, Mehdi revealed that the Windows Store for
Windows 10 has seen six times more downloads per device than Windows 8.
That’s an encouraging start to Microsoft’s universal apps goal.
While Microsoft has been rolling out Windows 10 in waves, there are ways to avoid the wait. There’s even methods to clean install
Windows 10 if you want to remove the cruft of your previous version of
Windows and wipe out the upgrade. If you haven’t upgraded to Windows 10
yet, you can read our review here to get a closer look at Microsoft’s latest operating system.
3:18 PMHigh Tech House Calls, Expert Computer Consulting
It's about a month since Windows 10 launched and the early reviews
are mostly positive. On my site, Komando.com, I've had readers report
everything from smooth sailing to minor annoyances to serious problems
that made them go back to Windows 7 or 8.1. With major new software,
that's to be expected.
I've also been getting a flood of questions from Windows 10 users try
to get the hang of the new system, and from non-users trying to decide
if they should upgrade. You probably have similar questions, so I'm
going to answer some of the most pressing ones here.
1. Does Windows 10 really share my Wi-Fi automatically?
Windows 10 has a feature called Wi-Fi Sense that makes it easier for
friends and family to get on your encrypted Wi-Fi networks. They don't
have to type a password; Microsoft will log them in automatically.
There's a lot of confusion around this feature that makes it sound
scarier than it is. To start, it doesn't actually give anyone your Wi-Fi
password. Plus, you have a lot of control over how it works, and you
can even disable it completely.
For example, someone only gets logged in automatically if they're a
contact of yours in Outlook, Outlook.com/Hotmail, Skype or Facebook. If
you remove someone from your contacts, they can't connect.
You can also choose which of the above services to pull contacts
from. Simply go to Network & Internet>>Wi-Fi>>Manage
Wi-Fi Settings (only available on computers that support Wi-Fi). Uncheck
the services you don't want to allow under "For networks I select,
share them with my contacts."
You might have noticed it says "for networks I select." The first
time you connect to a Wi-Fi network, Microsoft will ask if you want to
share it. Simply say no and Wi-Fi Sense won't log anyone in to that
network. You can also disable these later in your network settings.
2. How can I tell if there are potential compatibility problems BEFORE I install Windows 10?
Some people are (correctly) worried about upgrading to Windows 10 and
then finding out that a critical program or piece of hardware doesn't
work. Fortunately, you can get the scoop on potential problems before
you hit the Upgrade button.
Find the Get Windows 10 app icon in the notification tray at the
bottom-right corner of your screen (it's the white Windows logo).
Right-click on it and select "Check your upgrade status."
Then in the screen that appears, click the icon with the three
horizontal lines in the upper-left corner. From the menu that drops
down, click "Check your PC."
The app will bring up an overall "yea" or "nay" on installing Windows
10, and then list some items on the computer that might not be fully
compatible. There might be things it misses, but it should give you a
general idea of whether or not an upgrade is going to be smooth for you.
3. Are there any critical features in older versions of Windows that Windows 10 doesn't have?
It depends on your definition of "critical," but yes, Windows 10 has
dropped some features that some people rely on. The one most people seem
to be upset about is Windows Media Center (don't confuse this with
Windows Media Player, which is still installed).
Media Center is a Windows program that lets you watch and record TV
using third-party TV tuner cards in your computer. It's also a nice way
to manage and interact with your videos, music and other media.
You can replace this with a free program like Kodi,
but test it out before you upgrade to make sure it does everything you
want. Some of my readers have tried it and say they prefer Media Center.
4. Is it true I can't refuse updates?
With Windows 10, Microsoft decided that all security and program updates
would install automatically the day they're released. This makes sense
for security, since millions of Windows users worldwide don't install
updates and leave their computers open to attack.
Unfortunately, it also means that you can't avoid problematic updates, as some Windows 10 users found out recently. Microsoft released a cumulative update that put some machines into an endless reboot,
and there was no way to tell Windows to ignore the update. Microsoft is
probably going to keep tweaking the system to minimize situations like
that in the future, but it's still a bit of control you no longer have.
5. If I upgrade and don't like Windows 10, can I undo it?
For 30 days after you upgrade, you can go back to the version of Windows you upgraded from.
Go to Start>>Settings and choose the Update & Security
icon. Then go to the Recovery section and under "Go back to Windows 8.1"
or "Go back to Windows 7," click "Get Started."
Windows will ask why you're going back, give you some warnings and
then do its thing. It's relatively simple, although the process will
take a while.
3:14 PMHigh Tech House Calls, Expert Computer Consulting
It’s easy to forget just how important surge protectors are.
It’s not just about adding more outlets to a room, it’s about protecting
your gear from power surges. As anyone who has fallen victim to a power
surge knows all too well, it can be very costly if your expensive TVs,
computers and other pricey gear is plugged in when a surge hits. Be
prepared and get yourself the best and most convenient surge protector
in the business with Belkin’s 12-Outlet model.
It sports a list price of $49.99 but on Amazon it’s 61% off at just
$19.50. A 4.5-star rating from more than 3,900 customer reviews can’t be
wrong.
3:08 PMHigh Tech House Calls, Expert Computer Consulting
Photos for OS X
is designed to appeal to a broad audience, with simple editing tools
that let anyone improve their photographs. But is that it? Even though
it’s a 1.0 product (replacing iPhoto and Aperture), a lot of editing
power is actually hidden beneath that user-friendly surface.
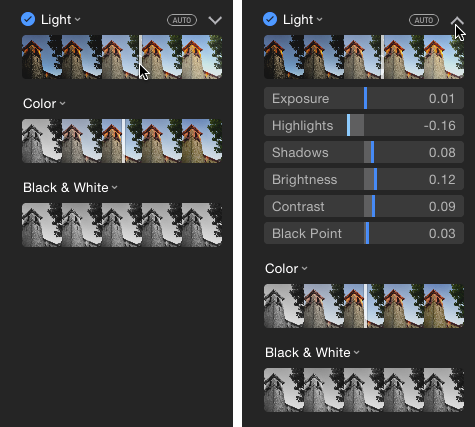
Click the arrow (left) to expose the Light controls (right).
For example, when you edit a photo and click the Adjust button, you’re
presented with sliders for improving light and color. Dragging a slider
makes the image brighter or darker (Light), or more or less saturated
(Color); you can also click the Auto button that appears when the mouse
pointer moves over the tool. Clicking the down-facing arrow icon,
however, exposes individual controls.
That’s just the beginning.
Jump into editing
To access the editing view, normally you click the Edit button when
viewing an image, but there’s a better way: simply press the Return key.
This shortcut also works in the Moments view when a photo is selected.
Shortcuts also go directly to specific tools, even if you’re not yet in
the editing view. Press C to open the Crop tool, F for filters, A for
the Adjust tool, R for the Retouch tool, and E for the Red-eye tool.
While you’re editing, press the arrow keys to switch to the previous or
next photo without leaving the editing view.
To compare your edits to the original version of the photo, press the M key for a quick before-and-after.
Choose which version to edit
If you shoot with your camera set to Raw+JPEG format (which records both
a raw image and a high-resolution JPEG version), Photos treats the two
separate images as one. However, the application defaults to editing the
JPEG instead of the richer raw version.
To switch, open the photo in the editing view and choose Image > Use RAW as Original. (The option is disabled unless you’re in the editing view.)
Add more adjustments
The Light, Color, and Black & White adjustments in the Adjust tool
are just the most common adjustments. Several more are available by
clicking the Add menu (see image below). I find having the Histogram
visible to be helpful, for example. If you use some controls regularly,
such as White Balance, choose Save As Default at the bottom of the Add
menu; those adjustments will appear every time you edit a photo.
Edit the photo using several adjustments that aren’t immediately visible.
Extend edit ranges
A funny thing happened one day when I accidentally pressed the Option
key while editing a photo: The tick marks on several of the adjustment
controls moved.
Many of the controls use a scale that ranges from –1.00 to +1.00, with
the image’s original value sitting in the middle at zero. The Exposure
control, for example, darkens the image significantly at –1.00, but
doesn’t turn it black. When you hold Option, that range changes to
between –2.00 and +2.00, letting you darken the photo even more (or go
the other direction and brighten a dark photo).
This feature is also useful when you’re looking for more pop or an
extreme treatment for a drab photo. In the images below, I’ve taken a
photo of dried leaves and pushed the contrast to its initial maximum
value of 1.00. With the Option key held, however, I can push that higher
and get a more dramatic effect.
Adjusting the Contrast control beyond the obvious range. Original (top),
contrast set to +1.00 (middle), contrast set to +1.70 (bottom).
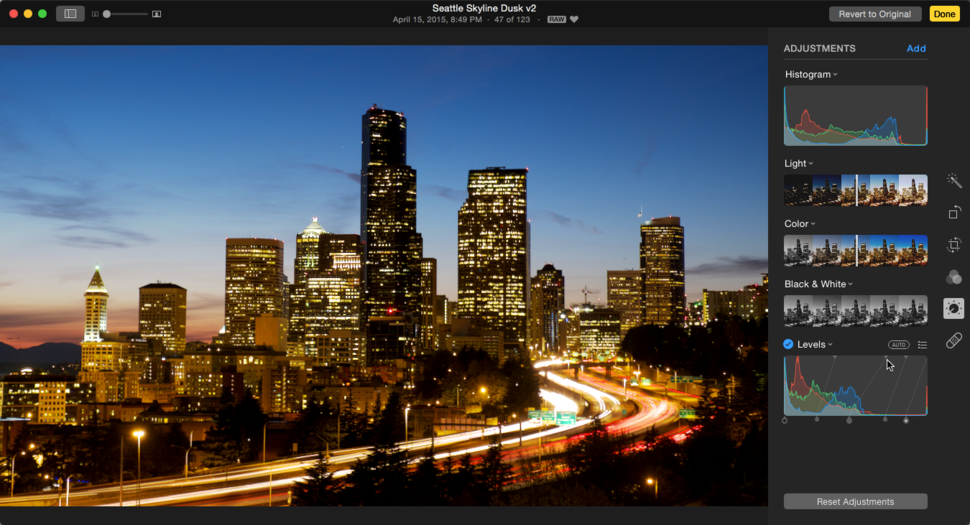
Multiple levels of Levels
The Histogram is good for identifying the color and tonal values in a
photo, but it’s there just for reference.
The Levels adjustment,
however, lets you manipulate those values in some sophisticated ways.
Choose Levels from the Add menu to view it.
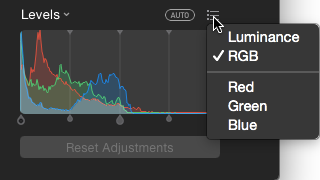
The histogram in the Levels adjustment shows RGB and Luminance values.
Looking at a histogram, the left side represents dark values (with black
at the far left) and the right side represents light values (with white
at the far right). The colored areas within indicate the distribution
of red, green, and blue (RGB) pixels within the scene. If you want to
isolate and edit any of those channels, click the options menu that
appears when you move your mouse cursor over the controls. You can also
choose Luminance to view only the brightness values.
The teardrop-shaped handles at the bottom of the Levels histogram
control (from left to right) the black point, midtones, and the white
point. To brighten an image, for example, drag the white point to the
left—the values to the right of the white point get pushed to their full
luminance, increasing the overall brightness of the photo (see below).
Drag the white point to make the photo brighter.
Similarly, dragging the black point makes the image darker, and dragging
the midtones lightens or darkens the values that fall between the light
and dark extremes; the smaller handles that flank the midtones control
affect shadows (left) and highlights (right). Sometimes, for instance,
it may be better to adjust the midtones to brighten an image to avoid clipping, which is when pixels are pushed all the way to pure white or black.
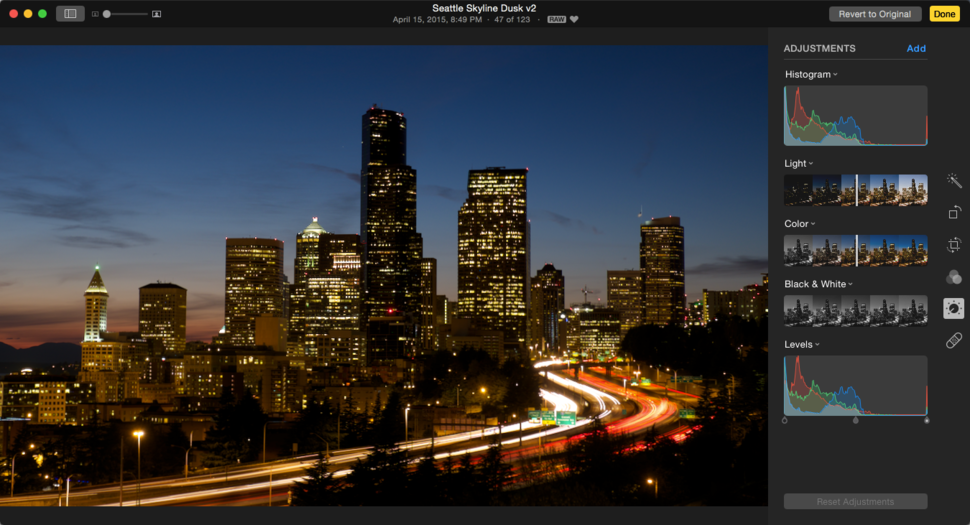
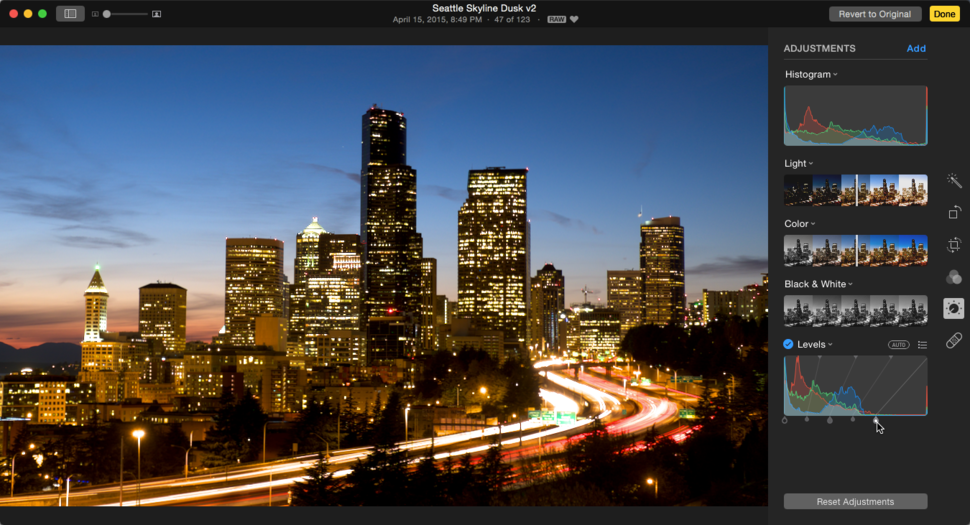
There’s more to the Levels adjustment, however. The handles at the top
of the Levels adjustment allow you to fine-tune the edits made with the
bottom handles. In the image below, I’ve reduced the white point setting
(by moving it to the right) so the lightest areas aren’t blown out, and
then also dragged the top-center control to brighten the midtones. The
result is a brighter, more saturated sky, but also detail in light areas
such as the pyramid-topped building in the center of the skyline. You
can also hold Option and drag a top handle to also move its connected
bottom handle in unison, maintaining the relationship between the two.
Use the top controls for fine-tuning.
Copy and paste adjustments
After you’ve edited a photo to your liking, you probably have similar
shots taken at the same time that would benefit from those adjustments.
Rather than try to replicate everything by hand, it’s much easier to
copy the work you did on the first one and paste it onto another.
While you’re still in the editing view, choose Image > Copy Adjustments (or press Command-Shift-C). Next, switch to the unedited photo and choose Image > Paste Adjustments (or press Command-Shift-V).
All the changes you made to the first apply to the second.
Looking ahead
These advanced or hidden editing features exist in the current 1.0.1
version of Photos for OS X, and there’s more to come. An update arriving
with the upcoming OS X El Capitan will support editing extensions:
third-party developers can create modules that will enable you to edit
your images within Photos for OS X using the developer’s tools. This
capability already exists on iOS—you can use the editing tools of
Pixelmator or Camera Plus, to name just two examples, without leaving
the Photos app on your iPhone or iPad.
For now, though, Photos for OS X turns out to be a much more capable
photo editor than it first appears, which is a good place to start
moving forward.
We also like to tell you about free stuff that tech companies are
giving away, especially when almost no one else knows about them. Today, we're talking about getting freebies from your cellphone
company.
When you think about how your cell provider locks you into two-year
contracts for a couple of hundred dollars a month, who doesn't want some
free stuff in return? If you look deep into the contract you signed, or
read your company's data plan offerings, you'll start finding free
stuff you might not be taking advantage of.
We're talking about good stuff, too, such as streaming NFL, Major
League Baseball and NBA games. There are perks like free international
calls and texting, plus free texting while you're on a plane.
A lot of cellphone companies offer free streaming TV and free storage
in the cloud. But only if you know where to look for it. We've done the
work for you, so keep reading to see the best freebies for each of the
major carriers!
1. AT&T
Every AT&T subscriber gets free stuff, but the juiciest freebies
come with its Mobile Share Value Plans. That's a pretty broad
mix-and-match plan starting around $40 a month for a bare bones 3GB deal
for one phone, up to $260 a month for a 10GB family package with four
smartphones.
If you're a Mobile Share customer, you get free stuff like a monthly
rollover deal where the data you don't use rolls over for one more
month. You also get free international texting.
But the biggest freebie, if having extra storage is something you find enticing, is 50GB of storage on AT&T's cloud. What that means is simple: You can securely save loads and loads of photos, videos, music and files online.
There's more. For all AT&T cellphone customers, there's an
especially cool feature if you find it annoying to ask your barista for
the coffee shop Wi-Fi password. At Starbucks and retailers like The Home
Depot, AT&T customers just walk in and are automatically connected
to their Wi-Fi. No password, no hassle.
Sprint offers freebies to subscribers of its All-In package, which is
a standard deal. Starting at about $80 a month for each smartphone,
like Apple's iPhone 6 (16GB), All-In customers get sports packages and
free streaming TV.
All Sprint data customers get free Sprint TV. Using the app, you can
stream TV networks like Fox News and TV shows such as "American Dad" and
"Access Hollywood."
NASCAR Mobile is also free with any Sprint data plan, which gives you
up-close NASCAR action. So up close, in fact, that you'll hear live
radio coverage of races, and you'll hear and see drivers inside their
cars during races.
For sports fans, Sprint's unlimited data plans like All-In offer more
free stuff. Namely, NBA Game Time packages that give you free radio
coverage of every NBA game. It shows you stats from the game and you can
watch highlights from the games while the players are still on the
court.
If you do any traveling to Canada or Mexico, or if you have friends
or family in the U.S., Canada or Mexico, T-Mobile has an enticing offer:
Free calls, texts and data throughout North America. Plus, your data
plan follows you into those countries, so you can use it just like
you're home.
Continent-wide plans are rare, so this freebie starting with T-Mobile's $50 a month 1GB plan is intriguing. But it's not T-Mobile's only free stuff.
Other freebies include free in-flight texting on Gogo-enabled phones,
and a few non-Gogo phones. That way you can keep tabs on what's going
on at home 35,000 feet below.
T-Mobile's Data Stash deal includes free data rollover for one month
out. This freebie has a small catch, which is that it's free for 4G LTE
customers, which adds $10 a month to your bill.
Also with 4G LTE, however, you get an MLB At Bat subscription is free. That includes watching MLB.TV's game of the day and highlights from other games.
Still, free music may be T-Mobile's most enticing perk.
Without eating any of your data plan, T-Mobile lets you stream free
music from Apple Music, iHeartRadio, Rhapsody and other music services.
Plus, if you have T-Mobile's Unlimited LTE Plan, which starts at $80 a
month for the first phone, T-Mobile throws in a great freebie:
Rhapsody's commercial-free online radio app UnRadio.
4. Verizon
Verizon offers more free stuff than NFL football games. But if you're
an NFL fan, with the season just about to get underway, Verizon's free
stuff starts and ends with the NFL.
It includes live highlights from NFL games on Thursday nights,
Saturday nights and Sunday nights. Plus, it includes 24/7 access to
watch NFL Network shows and games.
Verizon's free stuff also includes the IndyCar app, which airs live
radio broadcasts of IndyCar races. Plus, you can hear and see what's
going on in the car, and you can listen to the pit crews.
2:59 PMHigh Tech House Calls, Expert Computer Consulting
Limited data plans suck, but getting
dinged because you went over your cap sucks even more. Here's how to
keep tabs on your data plan so you can avoid getting penalized.
If you, like many of us, have a limited cellular data plan,
monitoring your data usage is essential. Between iOS’s built-in tools
and apps from carriers, though, you have several options for monitoring
your data usage.
Check through your carrier
Checking your data usage through your carrier is perhaps the
easiest and most precise way to go. The four major U.S. carriers each
offer an iOS app for their subscribers, and each of those apps lets you
see your data usage for your current pay period. You can find apps for AT&T, Verizon, Sprint, and T-Mobile in the App Store.
The built-in way
If you’d rather not download and install another app, you
can use some built-in tools to track your usage. Open the Settings app,
then tap Cellular; here you’ll be able to view how much data
you’ve used in the current period, how much data each app has used, and
how much talk time you’ve used.
You’ll need to reset your usage statistics regularly. If not, well, this happens.
But there is one catch: You’ll need to manually reset the
stats each month to get a more accurate picture of your data use.
Otherwise, your iPhone will keep track of your data usage from the point
you first activated it. To reset the stats, scroll to the bottom of the
Cellular settings screen, then tap Reset Statistics. Confirm that you want to reset the stats, and iOS will zero out your stats.
You’ll want to reset this screen once per month, to
correspond to your cell plan billing cycle. To remind yourself, you’ll
want to add a recurring event to your calendar.
Open the Calendar app, then tap the “+” button. Go ahead and
give the calendar entry a title—something like “Reset data usage stats”
works—and set the event to repeat each month on the first day of your
billing cycle. You’ll want to set an alarm, too, so you get a
notification when it’s time to reset your usage stats. Once you’re set,
tap Add. Now you’ll be all set to keep on track and avoid going over your data cap.
2:55 PMHigh Tech House Calls, Expert Computer Consulting
You may have recently heard conflicting reports about ID fraud, and
whether you should be concerned about it or not. You should. The threat
of cyberattacks and ID theft is very real. Keep these two thoughts in
mind: the White House and 12.7 million.
That's quite serious, and we know you know it. At Komando.com, we get
questions from you every day about keeping yourself safe online,
understandably.
So, we thought it was time to boil down some of the best advice you
can follow to stay safe. Do these five steps and you'll greatly improve
your chances of not becoming the next victim of ID theft or cybercrime.
1. Password manager
If there were only one way for you to protect yourself from
cybercrimes and ID theft, we'd tell you, "Change your passwords. Often."
That's something almost every cybersecurity expert agrees on.
Many cybercrimes affect people with easy-to-remember passwords. We've
told you before that a lot of people use similar passwords, like
"password" or "123456." Cybercriminals won't even break a sweat trying
to figure those out.
What you need is an incredibly long and complex password, say 10 to
20 characters long. It's best to use a complicated mixture of numbers,
symbols, uppercase letters and lowercase letters. Plus, be sure to have a
different password for all your programs.
Whew! Too much? OK, breathe easy.
There's an easy way to create and store complicated passwords. They're called password managers, like KeePass or Dashlane.
These are often free, or low-cost, tools that securely save all your
passwords, and help you create new ones. All you have to do is remember
one really strong master password. Use a lot of letters, numbers and
symbols for that master password.
2. Software updates
You know those little boxes that pop up on your computer screen
saying something like, "An update is ready to install?" Don't think of
them as being annoying.
It's really important that you update your software programs. A lot
of times, those pop-up boxes are for fixes to serious security
vulnerabilities.
Every major computer company, like Microsoft and Adobe, regularly issues software updates and patches. Some updates are automatic, like on Microsoft's new Windows 10 operating system. But many updates and patches need your OK before they're installed.
If you're worried that you've missed important software updates, and
who hasn't, don't worry. There are apps to check for software that needs
to be updated.
For example, download the free SUMo app. It'll show you when software updates are available, and it'll let you know which updates you still need to install.
3. Two-step verification
Protecting yourself online starts with your password, of course. But
even super-complex passwords like the ones described above aren't
foolproof.
To get closer to foolproof, you'll want to make it tougher for
crybercriminals to steal your ID. One great way to do that is with a
two-step verification. You've probably come across these before,
although you may not realize what they're called.
When you're banking online, have you ever gotten a message from the
bank saying, essentially, that your password isn't enough to get in? It
prompts you for another code that you get as a text message or phone
call. Once you type in that additional code, it'll let you in.
That's a two-step verification, or two-step authentication, and all
the major companies use it for online transactions, or even social media
sites like Facebook. At worst, it's a minor inconvenience.
At best, it's keeping the hackers away. Even if they have your password, it's highly unlikely they'll also have your phone.
Setting up two-step verification on sites like Facebook and Google is
pretty easy. On Facebook, for instance, click the little upside down
triangle to the right of Find Friends. Choose Settings, then click on
the Security badge on the left. Click on Login Approvals, then put a
check in the box that says, Require a security code. Click Get Started
and follow the simple instructions.
Want to be secure on the Internet? Don't want the government invading your privacy, or hackers stealing your ID?
Of course, you don't. There's an easy way to block much of that from
happening, and it involves adding the letter "S" to the letters "HTTP."
You sometimes see those before "www" on websites; even if you don't,
they're there.
HTTPS means that your connection to that site is encrypted so no one
can see what you're sending or receiving. Many sites now use HTTPS by
default, but not every site does. You can force them to with the browser
plug-in HTTPS Everywhere.
5. Security software
These days, hackers are loading every device you've got with malware and viruses. It doesn't matter if you have a PC or a Mac, an iPhone or an Android phone.
You've either been hacked, or will be. Hackers will try to install
malicious software onto your device, to get access to your ID, your
personal conversations and even the webcam on your computer.
But there's good news. Despite what seems like never-ending threats,
there are powerful security programs to protect yourself. You can find
ones that are free and ones that are paid. The main difference is the
paid ones have more features, although nearly all of them are going to
offer good basic protection.
2:50 PMHigh Tech House Calls, Expert Computer Consulting
More than two weeks after the worldwide launch of Windows 10, Microsoft
is keeping quiet about how many upgrades it's delivered. But third-party
data suggests that the upgrade pace isn't slowing. The next major
milestone? 100 million installs.
The day after Microsoft launched Windows 10 worldwide, the company
announced that the new OS was running on more than 14 million machines.
Since then, executives in the Windows division have been quiet about
disclosing follow-up numbers for Windows installations.
But a check of third-party data sources suggests that the upgrade pace is not slowing down.
StatCounter,
for example, reported that worldwide web traffic from devices running
Windows 10 was roughly 0.3 percent of the total in the week leading up
to the July 29 launch.
Two weeks after the launch, for the week
ending August 16, the share of traffic from Windows 10 devices had
soared to nearly 20 times that level, or 5.4 percent. Data from StatCounterIt's
no coincidence that other Windows versions were down an identical
amount, with the share of traffic from Windows 7 machines dropping 1.4
percent and the Windows 8.1 share declining even more precipitously. If
the StatCounter numbers are even close to reflecting real-world usage,
then roughly one out of every six Windows 8.1 machines has already
upgraded to Windows 10.
Internal traffic numbers at ZDNet suggest even more dramatic momentum
for Windows 10 among our audience, which is more technically
sophisticated than the general population.
In the full week that
ended a few days before the worldwide launch, about 1.8 percent of
unique visitors to ZDNet were running Windows 10. Two weeks after the
launch, 12.6 percent of all unique visitors to this site (roughly one
out of every eight, including mobile devices) were using Windows 10.
ZDNet unique visitors (internal data)[Note:
The ZDNet traffic numbers include both PCs and mobile devices, unlike
StatCounter's figures, which are for desktop operating systems only.]
ZDNet
readers are apparently more eager than the general populace to trade in
their old Windows for the new one. Visits from devices running Windows 7
dropped sharply, but the exodus from Windows 8.1 was even more
profound.
At Neowin, the usually reliable Brad Sams reported this morning
that the total number of Windows 10 installations is over 53 million,
according to anonymous Microsoft sources. And that pace will probably
continue for a while. I'm still hearing from Windows 7 users who
reserved their copy of Windows 10 but haven't yet received the upgrade
notice, which suggests Microsoft is still throttling the upgrade
servers.
For those who are scratching their heads trying to do the
math, keep in mind that the initial 14 million figure included 2-3
million machines upgraded to the final build by Windows Insiders between
July 15 and July 29. In addition, Microsoft trickled the initial
Windows 10 download packages out over the course of several days before
the July 29 launch.
Microsoft's reticence to disclose installation
totals beyond those initial figures might be strategic, with the goal
of saving the next announcement for a very big number, like 100 million
installations. At the current pace, that magic number could well be
reached before the end of this calendar quarter on September 30.
It's not a billion yet, but it's a pretty good start.
For your convenience Venmo and Zelle are also accepted for payment.
Fed up with Windows based computers?
Think an Apple Computer might be what the doctor ordered?
We can help you with that decision for free! Give us a call so we can discuss your computing needs!
Gift Certificates
What will you use your certificate for?
Making the move to an Apple laptop? My business has been running on an Apple laptop for 6 years.
You bought an iPhone. Now what? We have been working on iPhone problems since they came out and we can help.
Summer will be here before you know it. You want to surf on the internet on your wireless network from your pool. We are wireless network experts in both design and deployment.
Or you can use this gift card for any help needed (including training) for the computers in your home or small business.
The perfect present for any occasion:
Available in one hour increments.
No expiration date.
Can be used for service calls or training.
Giving a technology gift that requires setup or training? Why not add a gift certificate?