Dan Moren and Lex Friedman
http://www.macworld.com/article/2027220/33-expert-tips-and-tricks-for-ios-6.html?page=0
Perhaps you are already an iOS
master. Or maybe you consider yourself more of a novice. Either way, we feel
confident that at least some of the tips and tricks for iOS 6 that we present
below will be new to you. What’s more, we hope you love them—and benefit from
them—as much as we do.
Spread
the word
Once
you've enabled Speak Selection, you can get your iOS device to read any
selectable text aloud.
Your iPhone or iPad can read to you. Enabling the Speak option makes it possible for your iOS
device to read aloud any selectable text. Launch the Settings app, tap on General,
and then choose Accessibility. Scroll down to Speak Selection, and tap
to turn it on.
Now, go into any app where you can
highlight text. Your options include Mail, Safari, Notes, and many others.
Select some text, and you’ll see a new option appear in the contextual menu
(you may have to tap the right arrow to view more options). Tap the Speak
command, and your iOS device will start reading the text aloud.
The
Emoji keyboard lets you insert all kinds of fun images wherever you can type.
And your iOS device can speak the names of those symbols, too.
Enable the Emoji keyboard. Perhaps you’ve seen these iconographic symbols in emails,
iMessages, and tweets, and wondered how the heck people managed to type them.
Maybe you’ve mistakenly assumed that you need to purchase a third-party app to
gain access to those special symbols.
You don't: Apple treats those
symbols, called Emoji, as an international keyboard. Launch Settings,
and tap General, International, Keyboards. Then tap Add New Keyboard
and find Emoji. Now open an app where you can type some text.
Next to the spacebar, you’ll see a
little globe icon. Tap it to switch between your regular keyboard and the Emoji
one, which contains many tabs full of different characters. Tap on those
characters to insert them wherever you’d like. (If you have many international
keyboards, tap and hold the globe to bring up a menu of all your options.)
Spoken Emoji. For real fun, type in a bunch of Emoji symbols, select them
all, and then tap the Speak button. You’ll hear the often-entertaining names of
each symbol read in sequence.
A
series of Siri tips
Use the “in transit” cue. Ask Siri to help you find an address with a couple extra
words at the end, as in: “give me directions to San Francisco International
Airport via transit.” iOS will open up the Maps app and display the routing
pane, which lets you choose which third-party app you’d like to supply your
directions.
Attentive readers will know that
Google Maps is included among these routing apps, which means that you can actually
use this trick to get directions via Google Maps using Siri.
When
your Siri-capable iOS device is paired via Bluetooth, tap that blue button to
choose which microphone Siri should use.
Siri audio output. If your car has a built-in speakerphone, or if you have a
Bluetooth accessory that has a microphone and speakers, you can choose which
one Siri listens to for commands. When you click and hold the iPhone’s Home
button, you’ll see a speaker icon to the right of the main Siri button. Tap it,
and you’ll get a menu of all the various sound inputs your iPhone can use;
select the one you want, and Siri will listen using that microphone and, if
possible, give its feedback via those speakers.
Siri
can help you find unusual actor pairings.
Your own private IMDb. You probably already know that you can use Siri to get
information about what’s playing at movie theaters near you. But Siri’s also in
expert in pretty much every motion picture ever made. That means you can ask
questions about your favorite films, but you can also make Siri do more of the
legwork for you when, say, you’re curious about which films specific actors
have appeared in together. You might ask, “What movies star both Susan Sarandon
and Tim Curry?” And Siri will, in turn, reply with both The Rocky Horror
Picture Show and Rugrats In Paris.
Get movie reviews. Not sure if a given movie is worth your time? Just ask
Siri: “Is Rugrats In Paris any good?” Siri replies with a review from
Rotten Tomatoes.
Editing Siri. Sometimes Siri doesn’t understand you quite right. Maybe
you told it to call your friend “Aaron” and it thought you said “Erin.”
Fortunately, you can fix Siri’s mistake; after Siri reports that she doesn’t
know what you’re talking about, scroll up and find the speech bubble where Siri
records what it thinks you said. Then tap that bubble, and you’ll find that you
can now edit what Siri heard and resubmit your request.
If you don’t want to bother typing
out a long correction, you can also use iOS’s built-in dictation feature to
enter your corrected text. Just tap the microphone in the keyboard and speak
your text aloud. We’ll give you time to make your own Inception joke
about using Siri to fix Siri.
Siri can help you post to your
favorite social network. If you
use Facebook and/or Twitter, Siri offers a bunch of helpful options. You can
say “Post to Facebook I love reading Lex and Dan’s stuff at Macworld.com,” or
“Write on my Wall I love Siri,” or even, “Post I’m an over-sharer to Facebook.”
With Twitter, you can say “Tweet I’m eating breakfast” or “Post I’m still
eating breakfast to Twitter,” along with other, similar variations.
Fun
with Settings
Control
which apps can access what data in the Privacy settings.
Privacy. You don’t necessarily want your personal data accessible to
every app that asks, and iOS is here to give you the kind of fine-grained
control that you crave. Under the Privacy section of Settings you can not only
adjust which apps have access to your location, but also prevent them from
accessing your contacts, calendars, reminders, photos, and Bluetooth sharing.
Plus, if you use Twitter or Facebook, you can decide which of your apps can log
in with your credentials. Just tap the appropriate section for any of these and
slide the switch for the selected app to Off.
Restrictions. Go to General and then to Restrictions.
You’ll be prompted to enter a passcode. You can then select which features you
would like to lock down on your iOS device. If you’re planning to hand the
iPhone off to Junior, and Junior has a habit of unintentionally deleting your
apps, you can specifically disable that capability from the Restrictions
screen. You can also prevent access to the iTunes Store, the iBookstore,
Safari, Camera, FaceTime, and more.
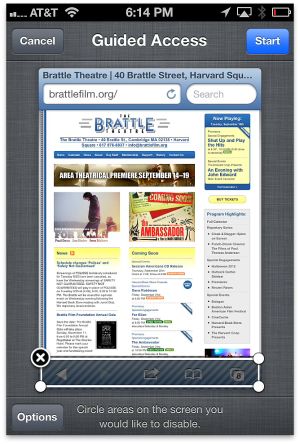
Guided
Access lets you block out parts of apps' interfaces.
Guided Access. While we’re talking about limiting what your iOS device can
do, now’s a good time to mention Guided Access, which you turn on under General
> Accessibility. Once you’ve enabled the feature, go into any other app and
triple-click the Home button. That enters Guided Access.
Now, if you want, you can black out
certain regions of the current app’s interface. Say, for example, that the game
your kid will play has an omnipresent Settings button. You can trace a circle
around that button, and that section of the app will ignore any taps. The other
key feature of Guided Access is that it disables the Home button, so your kid
won’t accidentally quit the app prematurely. To exit an app in Guided Access
mode, you triple-click the Home button again, and provide your passcode.
One added benefit of Guided Access
is that it can serve as a better Do Not Disturb,
since it silences banner notifications and alert sounds while enabled.
You
can use these settings to limit how much advertisers can track your iOS habits.
Limit advertiser tracking. If you’re going to restrict your children’s access, you
might as well restrict what marketers can do too, right? Under General, tap on About,
and then tap on Advertising way down at the bottom. On the screen that
appears, you’ll find two options. The first one, Limit Ad Tracking, provides an
indicator to Internet advertisers that you don’t want them to track which ads
you’ve viewed and engaged with, so they can show you ads that they think may be
better suited to you.
The second option on this screen is
a button to reset your advertising identifier—a new creation of Apple’s in iOS
6; it’s meant to be an anonymized tracker that advertisers can use to recognize
your interest when showing their ads in apps. Apple doesn’t yet require that
in-app ads use the identifier, but says that one day it will. If you start
seeing in-app ads that seem to know you too well, you can reset your
advertising identifier here to start from scratch.
Manage storage on your device. Maybe your iPhone won’t let you snap another photo. Perhaps
your iPad refuses to let you download one more app. Because iOS storage space
isn’t expandable, it’s important to monitor what’s gobbling up the available
gigabytes on your device. Here’s how. Go to General > Usage in
Settings, and wait for a moment or three as iOS calculates which apps are using
the most space.
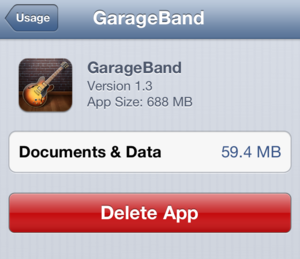
If
you never use large apps, delete them from the Usage area of Settings.
Often, Music and Photos & Camera
are the two biggest offenders. If you use a service like iTunes Match, you can
safely delete the Music cache on your device to free up space. If you sync your
device with your Mac to back up photos and videos, you can delete those photos
and videos, too.
Elsewhere on the list, you’ll spot
the apps you use, sorted with the most storage-intensive ones at the top. If
you see apps that you rarely use but that take up a ton of space, tap on them
in the list, and then tap Delete App to remove them in an instant.
Manually manage iCloud backup space. While we’re saving space, don’t forget that you can control
what iCloud stores for you in your online backup—especially if you’re just
using the free 5GB allotment that Apple offers. Find instructions here.
Picture
perfect
Snap photos while shooting videos. You’re using your iPhone 5 to film a magical moment, and
you wish you could snap a photo at the same time. Don’t stop recording! Just
tap the camera button, which appears on-screen in addition to the shutter
button as you film. You aren’t using the iPhone’s true photo sensor; you’re
getting the slightly less impressive video sensors instead, but the photos
should still turn out pretty nicely. Note that this tip doesn’t work on older
iPhones.
Free
yourself from the confines of left-to-right-only panoramas.
Reverse panorama. While we’re sharing tips that work only with certain
iPhones, here’s one that matters just to folks with the iPhone 4S or newer—that
is, iPhones that support taking panoramic photos. Normally, the Camera app prompts
you to take those photos from left to right. To reverse that, tap once on the
panorama guide to flip it to the opposite side of your screen.
In
the Mail
Quickly add photos and videos to
messages. Suppose you snapped the perfect
panorama and want to email it to your friend. You needn’t start from the Camera
or Photos app. Instead, head over to the Mail app and start composing your new
message. Tap once in a blank section of the message to bring up the contextual
menu, and then tap on Insert Photo or Video. You’ll get the familiar
photo selecting screen.
Get back to drafts in a snap. Maybe you abandoned that message before you tapped to send
it. You needn’t navigate deep into the Mail app’s mailbox hierarchy to find
your Drafts folder. Rather, you can tap and hold on the New Message button to
bring up a menu listing all your saved drafts.
Archiving messages. You probably already know that you can archive messages
from your Gmail account on iOS. But you can also add an archive option for
messages to your iCloud email address. To do so, navigate to Settings >
Mail, Contacts, Calendar and tap on your iCloud account. Tap on the Account
entry at the top, scroll down to the Advanced section, and tap on your
email address; swipe down until you find the Archive Messages switch. Slide it
to On, and then make sure to tap the Done button in the upper right
corner twice to save the change.
Now, all instances of the Delete
command in Mail will be replaced by an Archive button.
Tap
and hold on the Archive button to expose a Delete Message option.
Deleting messages. If you do enable archiving as an option for your messages,
that doesn’t mean you’re no longer able to delete messages outright from your
iPhone or iPad. Just tap and hold on the Archive button, and you’ll get
a second option: Delete Message.
Surf’s
our turf
Quickly access your recent browsing
history. In Mobile Safari, tap and hold on
the Back button to see a list of your recently visited pages. On the
iPad, tap and hold on the browser’s New Tab Plus (+) button to get a
list of recently closed tabs.
When
you enable Safari's option to open links in the background, you'll get a new
button when you tap and hold on links in the browser.
Open webpages in the background. Safari on the Mac makes it easy to open linked webpages in
a new tab, so that you needn’t interrupt what you’re reading just because you
also want to check out a few linked items. You get that same perk on iOS—though
you need to enable it first. Visit Settings > Safari > Open Links
and choose the In Background option. Now, tap and hold on links in
Safari to choose to open them in the background instead.
Full screen mode. New in iOS 6 is an option to browse the Web in full-screen
mode—at least when you’re using your iPhone in landscape orientation. This
frees up the pixels otherwise occupied by Safari’s location bar and tab bar.
Rotate your phone to landscape mode, and then press the full-screen
double-arrows at the bottom right corner.
Stream
of photo consciousness
You
can share your Photo Streams with the Web at large, if you're so inclined.
Shared Photo Streams. You probably already know about your own Photo Stream,
which shares devices between your iOS devices and Macs. But if you want to
share photos with your friends, family, or colleagues you can also create
Shared Photo Streams.
To create such a stream, open Photos
and tap on the Photo Stream button in the toolbar. In the upper left
corner is a Plus (+) button; tap that and enter a name for your shared stream
along with a list of people you’d like to invite. Photos can be added from your
existing photo albums or Camera Roll by tapping on the Share button and
selecting Photo Stream or by tapping Edit while viewing your shared stream and
tapping the Add button that appears at the bottom. While the people you’ve
shared the photo stream with can write comments on or “like” your photos, they
cannot add their own photos to the stream.
Public websites for Shared Photo
Streams. One downside to Shared Photo
Streams is that they're really accessible only to users on iOS devices running
iOS 6 or later or on Macs running Mountain Lion. So if you want to share those
photos with Mom, who’s using an original iPad, or Dad, who’s still using his PC
laptop, you’ll want, instead, to make your stream available via a public
website.
You can do this when you create a
Shared Photo Stream by tapping the Public Website slider; after you’ve made a
stream, you can find that same option by tapping the blue arrow next to the
Shared Photo Stream in the Photos app. An icloud.com link to the stream will be
generated; be aware that it is public, so anyone who has the URL can access it,
though it’s not something that people are likely to stumble across. You can tap
the Share Link button to send the link via email, an iMessage, or a Twitter or
Facebook post, or just copy it to the clipboard.
Phones,
texts, and such
Customize
up to three automatic messages with which to reply to incoming phone calls.
Customize iMessage auto-replies for
rejected calls. Sometimes it’s not the right time
for a phone call; while you could just let calls you don’t want to take go to
voicemail, sometimes you want to explain why you’re not picking up. iOS 6 lets
you quickly respond to a call with a text message. Just swipe upward on the
phone icon that appears next to the unlock slider and choose Reply with
Message.
By default, you’ll get three
pre-canned options, along with a button that lets you enter a custom text.
However, you can also customize those pre-canned messages under Settings
> Phone > Reply with Message.
Create custom ringtones and alert
tones in GarageBand. It’s true, you can create custom
ringtones for your iPhone—on your iPhone. Here’s how.
With
a custom pattern, you can achieve some pretty good vibrations.
Custom vibrations for text and
ringtones. Want to know who’s calling you
without ever taking your phone out of your pocket? Not only can you assign a
custom ringtone or text tone to a contact, you can even give them a custom
vibration pattern.
Open Phone or Contacts;
select a contact, then tap the Edit button in the top right corner.
Scroll down to find the ringtone field; below it is a vibration field. Tap
that, and you’ll see an assortment of built-in vibration patterns you can
choose from. Further down, though, is the ability to add a custom pattern: Tap Create
New Vibration, and you can just tap on the screen to create your own
rhythm. When you’re satisfied (tap the Play button to see what it will
feel like), tap Save to set the pattern.
If that’s not enough, go back to the
contact record and also assign a custom vibration pattern for text messages.
But
wait, there's more
Swipeable Map directions. We’ve all run into problems with iOS 6 Maps taking us
places that we weren’t sure we wanted to go to. But if you simply get
directions for a route by tapping the Quick Route button in Maps, you can’t
always tell what route Maps has in mind.
If you’d like to get a preview of
your route, tap your destination on the map and choose Directions to Here.
Then, instead of using the Current Location option for your starting point,
enter your address manually and tap Route. Once you’ve chosen your route
and tapped Start, you’ll be able to swipe through the instructions at the top
and see exactly which turns Maps wants you to take. (It’s the same way you got
directions back in iOS 5.)
Location-based reminders for
specific locations. If you want to be reminded to do
something when you leave your home, work, current location, or any address in
your address book, that’s pretty easy to get with iOS’s Reminders app. But what
if you want to remember to buy something when you’re at the grocery store or
pharmacy? You probably don’t want to add their locations in your address book
just to get that feature.
Fortunately, you don’t have to. When
you create a reminder, tap on it and turn on Remind Me At a Location. By
default, Reminders will populate your current address—tap that and you’ll get a
host of options, including, at the bottom, a text box to enter a custom
address.
We welcome the return of individual
download buttons for iTunes Match tracks stored in iCloud.
Download a single track from iTunes
Match. As of iOS 6.1, Apple has once again
restored the ability for iTunes Match users to download any individual track
from the cloud onto your iOS device—just tap the cloud download icon next to
the entry. In addition, if you decide you want to free up space on your device,
you can delete a downloaded track by swiping your finger across it and tapping Delete.
Easier music controls over USB. Perhaps you’ve abandoned the notion of hooking your iPhone
up in your car over USB, because you’re so sick of the Accessory Connected
screen that dominates the Music app in that setup. Good news! iOS 6.1 improved
matters, and—finally—the Music app now remains accessible even when you’ve
plugged your iPhone into a USB playthrough device that lacks the Made for
iPhone distinction. It’s a delight.
Carl Thorne
Expert Computer Consulting